UIMA project logo
Getting Started: Working With PEARs
Apache UIMA

Search the site

 Getting Started: Working With PEARs

The "Getting Started: Working With PEARs" guide should help you to understand what a PEAR package is, how to generate them and how to use them within UIMA applications.

What are UIMA™ PEAR files

A PEAR (Processing Engine ARchive) file is the UIMA standard packaging format for UIMA components like analysis engines (annotators) or CAS consumers. The PEAR package can be used to distribute and reuse components within UIMA applications. The UIMA framework also provides APIs and methods to automatically deploy, verify and run PEAR packages. When having a valid packaged PEAR, the application doesn't need any additional information or any manually deployed settings like classpath settings to run the packaged component.

To guarantee these characteristics, each PEAR package has the same internal structure as shown in the picture below.

PEAR file structure
  • metadata - The metadata folder contains the PEAR package installation descriptor (install.xml) that hosts all the necessary information about the PEAR package.

  • desc - The desc folder contains the component descriptor files e.g. analysis engine descriptor files or aggregate analysis engine descriptor files.

  • src - The src folder contains the component source (if it is packaged).

  • bin - The bin folder contains the compiled classes and script files.

  • lib - The lib folder contains dependent jar files and libraries.

  • doc - The doc folder contains the component documentation materials.

  • data - The data folder contains some test or example data files.

  • conf - The conf folder contains some component configuration files.

  • resources - The resources folder contains the component resources and dependencies.

The most important file in a PEAR package is the installation descriptor (metadata/install.xml) that contains all the necessary information about the PEAR package. It it used to install and run the PEAR package and defines all dependencies and settings. These are for example the ID/name of the PEAR package, Java classpath settings, UIMA datapath settings or the descriptor file that should be used to run the PEAR package component. For more details about the installation descriptor, please refer to the UIMA documentation at Documented template for the installation descriptor.

Generating PEAR files

In this section we will discuss how to generate a PEAR package. The UIMA framework distribution provides different possibilities to create PEAR packages which are discussed below.

Independent of how PEAR packages are generated, PEAR macros or PEAR variables should be recognized and used. The PEAR architecture defines various macros, but the most important one is the $main_root macro. When using this macro in the installation descriptor or within a UIMA descriptor, it will be substituted with the real PEAR package installation path to the main component root directory after the PEAR package is installed on the target system. For example, this macro can be used to specify the classpath settings for a PEAR component as shown in some of the examples below. This guarantees that in each scenario the classpath settings are interpreted correctly since an absolute path to the jar file is used. For more details about PEAR macros, please refer to the UIMA documentation at Documented template for the installation descriptor.

  • PearPackaging Eclipse plugin

    The PearPackaging Eclipse plugin is automatically installed in your Eclipse environment if you have installed the UIMA Eclipse plugins. The PearPackaging plugin allows you to package a PEAR based on the content of an eclipse project that has the UIMA nature. This plugin can for example be used in an analysis engine development environment. I will not give more details here since this is already explained in the Getting Started: Writing My First UIMA Annotator guide.

  • PearPackaging Ant task

    The PEAR packaging Ant task can be used in an Ant build environment to create PEAR packages for UIMA components. The PEAR package content as well as the PEAR package settings can be specified within the build. An example how this can look like is shown below:

    <!-- PEAR packaging Ant task -->
    <packagePear
       componentID="SampleAnnotator"
       mainComponentDesc="desc/mainComponentDesc.xml"
       classpath="$main_root/pearClasspahtEntry;$main_root/anotherPearClasspahtEntry"
       datapath="$main_root/resources"
       mainComponentDir="/home/user/workspace/SampeAnntotator"
       targetDir="/home/user/pearArchive">
    
       <envVar name="ENV_VAR_NO1" value="value1"/>
       <envVar name="ENV_VAR_NO2" value="value2"/>
    
    </packagePear>

    For additional information on how to integrate the PEAR packaging Ant task, please refer to the PEAR packaging Ant task documentation.

  • PearPackaging Maven plugin

    The PEAR packaging Maven plugin can be used in a Maven build environment to create PEAR packages for UIMA components. The PEAR package content as well as the PEAR package settings can be specified in the POM (Project Object Model). An example how this can look like is shown below:

    <!-- PEAR packaging Maven plugin -->
    <build>
     <plugins>
      ...
      <plugin>
        <groupId>org.apache.uima</groupId>
        <artifactId>PearPackagingMavenPlugin</artifactId>
        <extensions>true</extensions>
        <executions>
          <execution>
            <phase>package</phase>
            <configuration>
               <classpath>$main_root/lib/sample.jar</classpath>
               <mainComponentDesc>desc/${project.artifactId}.xml</mainComponentDesc>
               <componentId>${project.artifactId}</componentId>
               <datapath>$main_root/resources</datapath>
            </configuration>
            <goals>
              <goal>package</goal>
            </goals>
          </execution>
        </executions>
      </plugin>
      ...
     </plugins>
    </build>

    For additional information how to integrate the PEAR packaging Maven plugin, please refer to the PEAR packaging Maven plugin documentation.

  • PearPackaging command line

    The PearPackaging command line can be used if scripting should be used to create PEAR packages. Details about how to use the PearPackaging command line is available in the UIMA documentation at Using the PEAR command line packager.

  • PEAR packaging API

    If there is a need to create PEAR packages out of Java source code, the PEAR packaging API can be used. With that API it is either possible to create complete PEAR packages or to create the PEAR packages step by step - first create the installation descriptor and later package the PEAR. Detailed information about the PEAR packaging API is available in the UIMA documentation at Packaging the PEAR structure into one file and in the PEAR packaging API JavaDocs.

Installing PEAR files

Before a component that is packaged as PEAR can be used in a UIMA application, the PEAR package must be installed on the target system. During the installation, the package content is extracted and the internal PEAR settings (PEAR macros) are updated with the actual install information. This also means that an installed PEAR package cannot be moved to another directory without internal changes. By default the PEAR packages are not installed directly to the specified installation directory. For each PEAR a subdirectory with the name of the PEAR's ID is created where the PEAR package is installed. If the PEAR installation directory already exists, the old content is automatically deleted before the new content is installed.

During installation, a setenv.txt file containing the PEAR settings is generated in the metadata subdirectory of the install directory. Go there too check the most important PEAR settings (classpath, datapath, ...), or to read in the settings programmatically.

After the PEAR file is installed, the installed package is automatically verified using a separate verification step. The verification checks if the installed PEAR package is runnable inside UIMA.

Another imported point during the PEAR installation is the generation of the PEAR package descriptor. The PEAR package descriptor is a special UIMA descriptor that can be used to run installed PEAR packages in every UIMA application out of the box. For details about the PEAR descriptor, please refer to the UIMA documentation at PEAR package descriptor.

To install a PEAR package you have two options:

  • PEAR Installer UI

    The PEAR Installer UI is a standalone Swing application to install PEAR packages. After the PEAR package and the install directory is selected, the installation is performed and the installation and verification results are displayed. Out of the tool it is directly possible to test the installed PEAR package using the Cas Visual Debugger (CVD). For more details about the PEAR Installer, please refer to the UIMA documentation at PEAR Installer User's Guide.
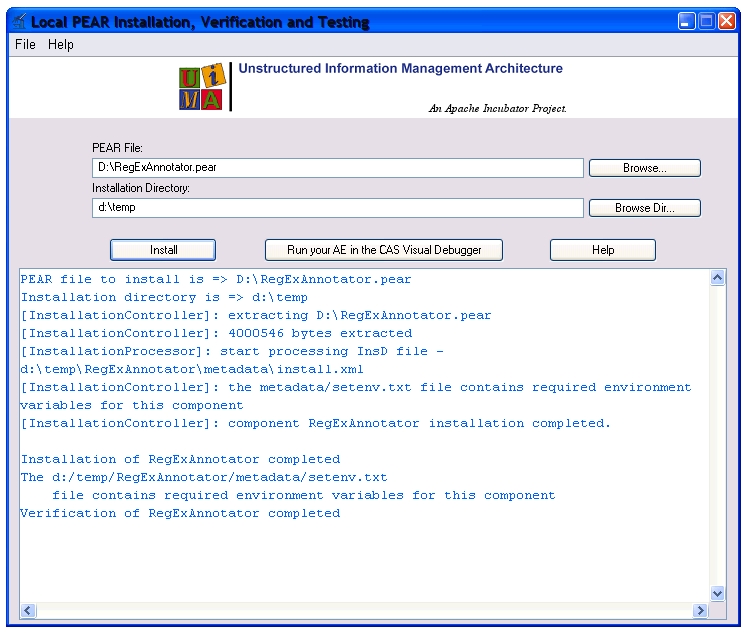
    PEAR installer

  • PEAR API

    The PEAR API should be used if you want to integrate the PEAR installation with a custom application. With the PEAR API it is possible to install PEAR packages to a given installation directory and to optionally verify the installed packages. Details about the PEAR API are available in the UIMA documentation at Installing a PEAR file using the PEAR APIs.

Running installed PEAR files

The UIMA framework has an integrated PEAR runtime to run installed PEAR packages out of the box. For this, the PEAR runtime makes use of the PEAR's installation descriptor settings. To use the PEAR runtime, the generated PEAR package descriptor must be used to integrate or run PEAR components. The PEAR package descriptor is generated in the main component root directory of the installed PEAR package during the PEAR installation. As PEAR package descriptor name of <componentID>_pear.xml is used.

The PEAR package descriptor can be used like an analysis engine descriptor. It can be added at any place where an analysis engine descriptor or cas consumer descriptor can be used. So for example to run an installed PEAR package in the CAS Visual Debugger or in the Document Analyzer just use the PEAR package descriptor as analysis engine - you don't have to take care about classpath and datapath settings.

CVD load PEAR

The PEAR package descriptor can also be added to an aggregate analysis engine descriptor as one of the delegates. Therefore, a PEAR can easily be integrated into an analysis chain. But note, the integrated PEAR is treated as a black box and the aggregate analysis engine cannot override any PEAR specific parameters or settings since the PEAR is executed in its own environment with a separate classloader. This also means that resources cannot be shared easily between PEARs. An advantage of this concept is that for example the PEAR specific JCAS classes do not affect the application in case of minor feature differences.

<analysisEngineDescription xmlns="https://uima.apache.org/resourceSpecifier">
    <frameworkImplementation>org.apache.uima.java</frameworkImplementation>
    <primitive>false</primitive>
    <delegateAnalysisEngineSpecifiers>
      <delegateAnalysisEngine key="AE">
          <import location="./AnalysisEngine/AnalysisEngine1.xml"/>
      </delegateAnalysisEngine>
      <delegateAnalysisEngine key="PEAR">
            <import location="./RegExAnnotator/RegExAnnotator_pear.xml"/>
        </delegateAnalysisEngine>
    </delegateAnalysisEngineSpecifiers>
    <analysisEngineMetaData>
        <name>PEAR aggregate</name>
        <description>combines tow PEARs</description>
        <version>1.0</version>
        <configurationParameters/>
        <configurationParameterSettings/>
        <flowConstraints>
            <fixedFlow>
              <node>AE</node>
              <node>PEAR</node>
            </fixedFlow>
        </flowConstraints>
...

There's a complete example of how to install a PEAR package and how to run it using the UIMA framework API in the UIMA documentation .