Version 2.1
Copyright © 2006, 2007 The Apache Software Foundation
Copyright © 2004, 2006 International Business Machines Corporation
Incubation Notice and Disclaimer. Apache UIMA is an effort undergoing incubation at the Apache Software Foundation (ASF). Incubation is required of all newly accepted projects until a further review indicates that the infrastructure, communications, and decision making process have stabilized in a manner consistent with other successful ASF projects. While incubation status is not necessarily a reflection of the completeness or stability of the code, it does indicate that the project has yet to be fully endorsed by the ASF.
License and Disclaimer. The ASF licenses this documentation to you under the Apache License, Version 2.0 (the "License"); you may not use this documentation except in compliance with the License. You may obtain a copy of the License at
Unless required by applicable law or agreed to in writing, this documentation and its contents are distributed under the License on an "AS IS" BASIS, WITHOUT WARRANTIES OR CONDITIONS OF ANY KIND, either express or implied. See the License for the specific language governing permissions and limitations under the License.
Trademarks. All terms mentioned in the text that are known to be trademarks or service marks have been appropriately capitalized. Use of such terms in this book should not be regarded as affecting the validity of the the trademark or service mark.
February, 2007
Table of Contents
- 1. Annotator & AE Developer's Guide
- 2. CPE Developer's Guide
- 3. Application Developer's Guide
- 4. Flow Controller Developer's Guide
- 5. Annotations, Artifacts & Sofas
- 6. Multiple CAS Views
- 7. CAS Multiplier
- 8. XMI & EMF
This chapter describes how to develop UIMA type systems, Annotators and Analysis Engines using the UIMA SDK. It is helpful to read the UIMA Conceptual Overview chapter for a review on these concepts.
An Analysis Engine (AE) is a program that analyzes artifacts (e.g. documents) and infers information from them.
Analysis Engines are constructed from building blocks called Annotators. An annotator is a component that contains analysis logic. Annotators analyze an artifact (for example, a text document) and create additional data (metadata) about that artifact. It is a goal of UIMA that annotators need not be concerned with anything other than their analysis logic – for example the details of their deployment or their interaction with other annotators.
An Analysis Engine (AE) may contain a single annotator (this is referred to as a Primitive AE), or it may be a composition of others and therefore contain multiple annotators (this is referred to as an Aggregate AE). Primitive and aggregate AEs implement the same interface and can be used interchangeably by applications.
Annotators produce their analysis results in the form of typed Feature Structures, which are simply data structures that have a type and a set of (attribute, value) pairs. An annotation is a particular type of Feature Structure that is attached to a region of the artifact being analyzed (a span of text in a document, for example).
For example, an annotator may produce an Annotation over the span of text
President Bush, where the type of the Annotation is
Person and the attribute fullName has the
value George W. Bush, and its position in the artifact is character
position 12 through character position 26.
It is also possible for annotators to record information associated with the entire document rather than a particular span (these are considered Feature Structures but not Annotations).
All feature structures, including annotations, are represented in the UIMA Common Analysis Structure(CAS). The CAS is the central data structure through which all UIMA components communicate. Included with the UIMA SDK is an easy-to-use, native Java interface to the CAS called the JCas. The JCas represents each feature structure as a Java object; the example feature structure from the previous paragraph would be an instance of a Java class Person with getFullName() and setFullName() methods. Though the examples in this guide all use the JCas, it is also possible to directly access the underlying CAS system; for more information see Chapter 4, CAS Reference in UIMA References .
The remainder of this chapter will refer to the analysis of text documents and the creation of annotations that are attached to spans of text in those documents. Keep in mind that the CAS can represent arbitrary types of feature structures, and feature structures can refer to other feature structures. For example, you can use the CAS to represent a parse tree for a document. Also, the artifact that you are analyzing need not be a text document.
This guide is organized as follows:
Section 1.1, “Getting Started” is a tutorial with step-by-step instructions for how to develop and test a simple UIMA annotator.
Section 1.2, “Configuration and Logging” discusses how to make your UIMA annotator configurable, and how it can write messages to the UIMA log file.
Section 1.3, “Building Aggregate Analysis Engines” describes how annotators can be combined into aggregate analysis engines. It also describes how one annotator can make use of the analysis results produced by an annotator that has run previously.
Section 1.4, “Other examples” describes several other examples you may find interesting, including
SimpleTokenAndSentenceAnnotator – a simple tokenizer and sentence annotator.
PersonTitleDBWriterCasConsumer – a sample CAS Consumer which populates a relational database with some annotations. It uses JDBC and in this example, hooks up with the Open Source Apache Derby database.
Section 1.5, “Additional Topics” describes additional features of the UIMA SDK that may help you in building your own annotators and analysis engines.
Section 1.6, “Common Pitfalls” contains some useful guidelines to help you ensure that your annotators will work correctly in any UIMA application.
This guide does not discuss how to build UIMA Applications, which are programs that use Analysis Engines, along with other components, e.g. a search engine, document store, and user interface, to deliver a complete package of functionality to an end-user. For information on application development, see Chapter 3: “Application Developer's Guide” .
This section is a step-by-step tutorial that will get you started developing UIMA
annotators. All of the files referred to by the examples in this chapter are in the
examples directory of the UIMA SDK. This directory is designed to
be imported into your Eclipse workspace; see Section 3.2, “Setting up Eclipse to view Example Code” in Overview & Setup for instructions on how to do
this. Also you may wish to refer to the UIMA SDK JavaDocs located in the docs/api directory.
Note
In Eclipse 3.1, if you highlight a UIMA class or method defined in the UIMA SDK JavaDocs, you can conveniently have Eclipse open the corresponding JavaDoc for that class or method in a browser, by pressing Shift + F2.
The example annotator that we are going to walk through will detect room numbers for rooms where the room numbering scheme follows some simple conventions. In our example, there are two kinds of patterns we want to find; here are some examples, together with their corresponding regular expression patterns:
- Yorktown patterns:
20-001, 31-206, 04-123(Regular Expression Pattern: ##-[0-2]##)
- Hawthorne patterns:
GN-K35, 1S-L07, 4N-B21 (Regular Expression Pattern: [G1-4][NS]-[A-Z]##)
There are several steps to develop and test a simple UIMA annotator.
Define the CAS types that the annotator will use.
Generate the Java classes for these types.
Write the actual annotator Java code.
Create the Analysis Engine descriptor.
Test the annotator.
These steps are discussed in the next sections.
The first step in developing an annotator is to define the CAS Feature Structure
types that it creates. This is done in an XML file called a Type System
Descriptor. UIMA defines basic primitive types such as
Boolean, Byte, Short, Integer, Long, Float, and Double, as well as Arrays of these primitive
types. UIMA also defines the built-in types TOP, which is the root
of the type system, analogous to Object in Java; FSArray, which is
an array of Feature Structures (i.e. an array of instances of TOP); and
Annotation, which we will discuss in more detail in this section.
UIMA includes an Eclipse plug-in that will help you edit Type System Descriptors, so if you are using Eclipse you will not need to worry about the details of the XML syntax. See Chapter 3, Setting up the Eclipse IDE to work with UIMA in Overview & Setup for instructions on setting up Eclipse and installing the plugin.
The Type System Descriptor for our annotator is located in the file
descriptors/tutorial/ex1/TutorialTypeSystem.xml. (This
and all other examples are located in the examples directory of
the installation of the UIMA SDK, which can be imported into an Eclipse project for
your convenience, as described in Section 3.2, “Setting up Eclipse to view Example Code” in Overview & Setup.)
In Eclipse, expand the uimaj-examples project in the
Package Explorer view, and browse to the file
descriptors/tutorial/ex1/TutorialTypeSystem.xml.
Right-click on the file in the navigator and select Open With → Component
Descriptor Editor. Once the editor opens, click on the “Type System”
tab at the bottom of the editor window. You should see a view such as the
following:
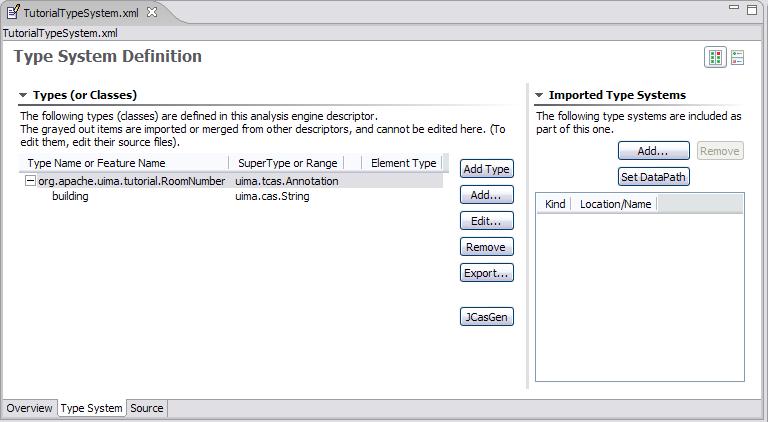 |
Our annotator will need only one type –
org.apache.uima.tutorial.RoomNumber. (We use the same
namespace conventions as are used for Java classes.) Just as in Java, types have
supertypes. The supertype is listed in the second column of the left table. In this
case our RoomNumber annotation extends from the built-in type
uima.tcas.Annotation.
Descriptions can be included with types and features. In this example, there is a
description associated with the building feature. To see it,
hover the mouse over the feature.
The bottom tab labeled “Source” will show you the XML source file associated with this descriptor.
The built-in Annotation type declares three fields (called
Features in CAS terminology). The features begin
and end store the character offsets of the span of text to which the
annotation refers. The feature sofa (Subject of Analysis) indicates
which document the begin and end offsets point into. The sofa feature
can be ignored for now since we assume in this tutorial that the CAS contains only one
subject of analysis (document).
Our RoomNumber type will inherit these three features from
uima.tcas.Annotation, its supertype; they are not visible in
this view because inherited features are not shown. One additional feature,
building, is declared. It takes a String as its value. Instead
of String, we could have declared the range-type of our feature to be any other CAS type
(defined or built-in).
If you are not using Eclipse, if you need to edit the type system, do so using any XML or text editor, directly. The following is the actual XML representation of the Type System displayed above in the editor:
<?xml version="1.0" encoding="UTF-8" ?>
  <typeSystemDescription xmlns="http://uima.apache.org/resourceSpecifier">
    <name>TutorialTypeSystem</name>
    <description>Type System Definition for the tutorial examples -
        as of Exercise 1</description>
    <vendor>Apache Software Foundation</vendor>
    <version>1.0</version>
    <types>
      <typeDescription>
        <name>org.apache.uima.tutorial.RoomNumber</name>
        <description></description>
        <supertypeName>uima.tcas.Annotation</supertypeName>
        <features>
          <featureDescription>
            <name>building</name>
            <description>Building containing this room</description>
            <rangeTypeName>uima.cas.String</rangeTypeName>
          </featureDescription>
        </features>
      </typeDescription>
    </types>
</typeSystemDescription>When you save a descriptor that you have modified, the Component Descriptor Editor will automatically generate Java classes corresponding to the types that are defined in that descriptor (unless this has been disabled), using a utility called JCasGen. These Java classes will have the same name (including package) as the CAS types, and will have get and set methods for each of the features that you have defined.
This feature is enabled/disabled using the UIMA menu pulldown (or the Eclipse Preferences → UIMA). If automatic running of JCasGen is not happening, please make sure the option is checked:
 |
The Java class for the example org.apache.uima.tutorial.RoomNumber type can
be found in src/org/apache/uima/tutorial/RoomNumber.java
. You will see how to use these generated classes in the next section.
If you are not using the Component Descriptor Editor, you will need to generate
these Java classes by using the JCasGen tool. JCasGen reads a
Type System Descriptor XML file and generates the corresponding Java classes that
you can then use in your annotator code. To launch JCasGen, run the jcasgen shell
script located in the /bin directory of the UIMA SDK
installation. This should launch a GUI that looks something like this:
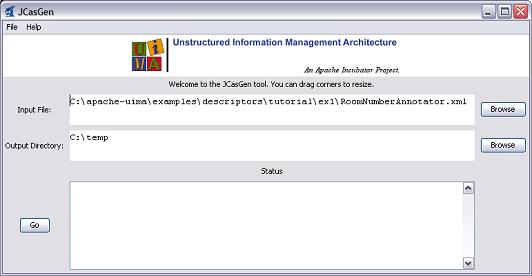 |
Use the “Browse” buttons to select your input file (TutorialTypeSystem.xml) and output directory (the root of the source tree into which you want the generated files placed). Then click the “Go” button. If the Type System Descriptor has no errors, new Java source files will be generated under the specified output directory.
There are some additional options to choose from when running JCasGen; please refer to the Chapter 6, JCasGen User's Guide in UIMA Tools Guide and Reference for details.
Annotator implementations all implement a standard interface (AnalysisComponent), having several methods, the most important of which are:
initialize,process, anddestroy.
initialize is called by the framework once when it first creates an instance of the
annotator class. process is called once per item being processed.
destroy may be called by the application when it is done using your annotator. There is a
default implementation of this interface for annotators using the JCas, called JCasAnnotator_ImplBase, which
has implementations of all required methods except for the process method.
Our annotator class extends the JCasAnnotator_ImplBase; most annotators that use the JCas will extend from this class, so they only have to implement the process method. This class is not restricted to handling just text; see Chapter 5, Annotations, Artifacts, and Sofas .
Annotators are not required to extend from the JCasAnnotator_ImplBase class; they may instead directly implement the AnalysisComponent interface, and provide all method implementations themselves. [1] This allows you to have your annotator inherit from some other superclass if necessary. If you would like to do this, see the JavaDocs for JCasAnnotator for descriptions of the methods you must implement.
Annotator classes need to be public, cannot be declared abstract, and must have public, 0-argument constructors, so that they can be instantiated by the framework. [2] .
The class definition for our RoomNumberAnnotator implements the process method, and is shown here. You
can find the source for this in the
uimaj-examples/src/org/apache/uima/tutorial/ex1/RoomNumberAnnotator.java .
Note
In Eclipse, in the “Package Explorer” view, this will appear by default in the project
uimaj-examples, in the folder src, in the package
org.apache.uima.tutorial.ex1.
In Eclipse, open the RoomNumberAnnotator.java in the uimaj-examples project, under the src directory.
package org.apache.uima.tutorial.ex1;

import java.util.regex.Matcher;
import java.util.regex.Pattern;

import org.apache.uima.analysis_component.JCasAnnotator_ImplBase;
import org.apache.uima.jcas.JCas;
import org.apache.uima.tutorial.RoomNumber;

/**
 * Example annotator that detects room numbers using
 * Java 1.4 regular expressions.
 */
public class RoomNumberAnnotator extends JCasAnnotator_ImplBase {
  private Pattern mYorktownPattern =
        Pattern.compile("\\b[0-4]\\d-[0-2]\\d\\d\\b");

  private Pattern mHawthornePattern =
        Pattern.compile("\\b[G1-4][NS]-[A-Z]\\d\\d\\b");

  public void process(JCas aJCas) {
    // Discussed Later
  }
}
The two Java class fields, mYorktownPattern and mHawthornePattern, hold regular expressions that will be used in the process method. Note that these two fields are part of the Java implementation of the annotator code, and not a part of the CAS type system. We are using the regular expression facility that is built into Java 1.4. It is not critical that you know the details of how this works, but if you are curious the details can be found in the Java API docs for the java.util.regex package.
The only method that we are required to implement is process. This method is typically
called once for each document that is being analyzed. This method takes one argument, which is a JCas instance;
this holds the document to be analyzed and all of the analysis results. [3]
public void process(JCas aJCas) {
  // get document text
  String docText = aJCas.getDocumentText();
  // search for Yorktown room numbers
  Matcher matcher = mYorktownPattern.matcher(docText);
  int pos = 0;
  while (matcher.find(pos)) {
    // found one - create annotation
    RoomNumber annotation = new RoomNumber(aJCas);
    annotation.setBegin(matcher.start());
    annotation.setEnd(matcher.end());
    annotation.setBuilding("Yorktown");
    annotation.addToIndexes();
    pos = matcher.end();
  }
  // search for Hawthorne room numbers
  matcher = mHawthornePattern.matcher(docText);
  pos = 0;
  while (matcher.find(pos)) {
    // found one - create annotation
    RoomNumber annotation = new RoomNumber(aJCas);
    annotation.setBegin(matcher.start());
    annotation.setEnd(matcher.end());
    annotation.setBuilding("Hawthorne");
    annotation.addToIndexes();
    pos = matcher.end();
  }
}
The Matcher class is part of the java.util.regex package and is used to find the room numbers in the document text. When we find one, recording the annotation is as simple as creating a new Java object and calling some set methods:
RoomNumber annotation = new RoomNumber(aJCas);
annotation.setBegin(matcher.start());
annotation.setEnd(matcher.end());
annotation.setBuilding("Yorktown");
The RoomNumber class was generated from the type system description by the
Component Descriptor Editor or the JCasGen tool, as discussed in the previous section.
Finally, we call annotation.addToIndexes() to add the new annotation to the
indexes maintained in the CAS. By default, the CAS implementation used for analysis of text documents keeps
an index of all annotations in their order from beginning to end of the document. Subsequent annotators or
applications use the indexes to iterate over the annotations.
Note
If you don't add the instance to the indexes, it cannot be retrieved by down-stream annotators, using the indexes.
Note
You can also call addToIndexes() on Feature Structures that are not subtypes of
uima.tcas.Annotation, but these will not be sorted in any particular way. If you want
to specify a sort order, you can define your own custom indexes in the CAS: see Chapter 4, CAS Reference
in UIMA References and Section 2.4.1.7, “Index Definition” in UIMA References for details.
We're almost ready to test the RoomNumberAnnotator. There is just one more step remaining.
The UIMA architecture requires that descriptive information about an annotator be represented in an XML file and provided along with the annotator class file(s) to the UIMA framework at run time. This XML file is called an Analysis Engine Descriptor. The descriptor includes:
Name, description, version, and vendor
The annotator's inputs and outputs, defined in terms of the types in a Type System Descriptor
Declaration of the configuration parameters that the annotator accepts
The Component Descriptor Editor plugin, which we previously used to edit the Type System descriptor, can also be used to edit Analysis Engine Descriptors.
A descriptor for our RoomNumberAnnotator is provided with the UIMA
distribution under the name
descriptors/tutorial/ex1/RoomNumberAnnotator.xml. To
edit it in Eclipse, right-click on that file in the navigator and select Open With
→ Component Descriptor Editor.
Tip
In Eclipse, you can double click on the tab at the top of the Component Descriptor Editor's window identifying the currently selected editor, and the window will “Maximize”. Double click it again to restore the original size.
If you are not using Eclipse, you will need to edit Analysis Engine descriptors manually. See Section 1.8, “Analysis Engine XML Descriptor” for an introduction to the Analysis Engine descriptor XML syntax. The remainder of this section assumes you are using the Component Descriptor Editor plug-in to edit the Analysis Engine descriptor.
The Component Descriptor Editor consists of several tabbed pages; we will only need to use a few of them here. For more information on using this editor, see Chapter 1, Component Descriptor Editor User's Guide in UIMA Tools Guide and Reference.
The initial page of the Component Descriptor Editor is the Overview page, which appears as follows:
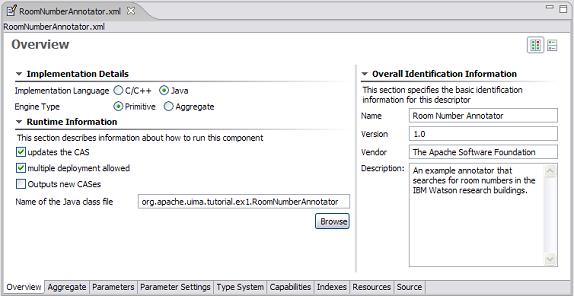 |
This presents an overview of the RoomNumberAnnotator Analysis Engine (AE). The left side of the page shows that this descriptor is for a Primitive AE (meaning it consists of a single annotator), and that the annotator code is developed in Java. Also, it specifies the Java class that implements our logic (the code which was discussed in the previous section). Finally, on the right side of the page are listed some descriptive attributes of our annotator.
The other two pages that need to be filled out are the Type System page and the Capabilities page. You can switch to these pages using the tabs at the bottom of the Component Descriptor Editor. In the tutorial, these are already filled out for you.
The RoomNumberAnnotator will be using the TutorialTypeSystem we looked at in Section Section 1.1.1, “Defining Types”. To specify this, we add this type system to the Analysis Engine's list of Imported Type Systems, using the Type System page's right side panel, as shown here:
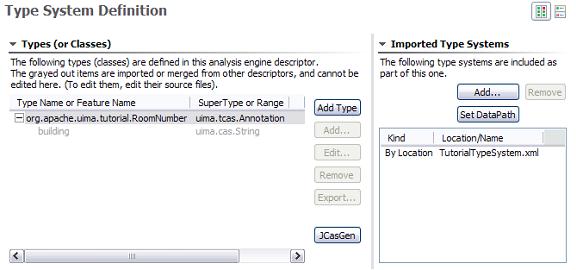 |
On the Capabilities page, we define our annotator's inputs and outputs, in terms of the types in the type system. The Capabilities page is shown below:
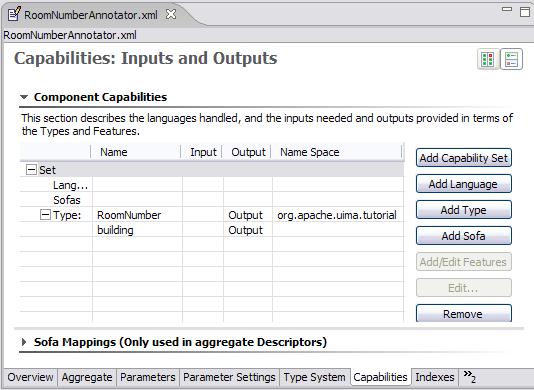 |
Although capabilities come in sets, having multiple sets is deprecated; here
we're just using one set. The RoomNumberAnnotator is very simple. It requires
no input types, as it operates directly on the document text -- which is supplied as a
part of the CAS initialization (and which is always assumed to be present). It
produces only one output type (RoomNumber), and it sets the value of the
building feature on that type. This is all represented on the
Capabilities page.
The Capabilities page has two other parts for specifying languages and Sofas. The languages section allows you to specify which languages your Analysis Engine supports. The RoomNumberAnnotator happens to be language-independent, so we can leave this blank. The Sofas section allows you to specify the names of additional subjects of analysis. This capability and the Sofa Mappings at the bottom are advanced topics, described in Chapter 5, Annotations, Artifacts, and Sofas .
This is all of the information we need to provide for a simple annotator. If you want to peek at the XML that this tool saves you from having to write, click on the “Source” tab at the bottom to view the generated XML.
Having developed an annotator, we need a way to try it out on some example
documents. The UIMA SDK includes a tool called the Document Analyzer that will allow
us to do this. To run the Document Analyzer, execute the documentAnalyzer shell
script that is in the bin directory of your UIMA SDK
installation, or, if you are using the example Eclipse project, execute the
“UIMA Document Analyzer” run configuration supplied with that
project. (To do this, click on the menu bar Run → Run ... → and under Java
Applications in the left box, click on UIMA Document Analyzer.)
You should see a screen that looks like this:
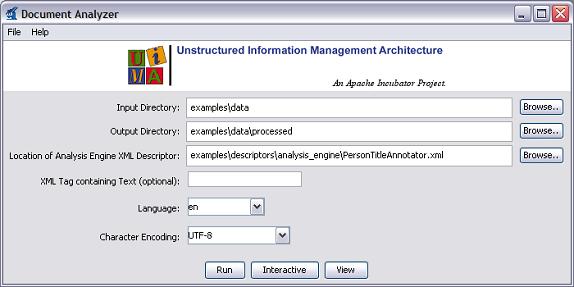 |
There are six options on this screen:
Directory containing documents to analyze
Directory where analysis results will be written
The XML descriptor for the Analysis Engine (AE) you want to run
(Optional) an XML tag, within the input documents, that contains the text to be analyzed. For example, the value TEXT would cause the AE to only analyze the portion of the document enclosed within <TEXT>...</TEXT> tags.
Language of the document
Character encoding
Use the Browse button next to the third item to set the “Location of AE XML
Descriptor” field to the descriptor we've just been discussing
—
<where-you-installed-uima-e.g.UIMA_HOME>
          /examples/descriptors/tutorial/ex1/RoomNumberAnnotator.xml
. Set the other fields to the values shown in the screen shot above (which should be the
default values if this is the first time you've run the Document Analyzer). Then
click the “Run” button to start processing.
When processing completes, an “Analysis Results” window should appear.
 |
Make sure “Java Viewer” is selected as the Results Display Format, and double-click on the document UIMASummerSchool2003.txt to view the annotations that were discovered. The view should look something like this:
 |
You can click the mouse on one of the highlighted annotations to see a list of all its features in the frame on the right.
Note
The legend will only show those types which have at least one instance in the CAS, and are declared as outputs in the capabilities section of the descriptor (see Section 1.1.4, “Creating the XML Descriptor”.
You can use the DocumentAnalyzer to test any UIMA annotator — just make sure that the annotator's classes are in the class path.
The example RoomNumberAnnotator from the previous section used hardcoded regular expressions and location names, which is obviously not very flexible. For example, you might want to have the patterns of room numbers be supplied by a configuration parameter, rather than having to redo the annotator's Java code to add additional patterns. Rather than add a new hardcoded regular expression for a new pattern, a better solution is to use configuration parameters.
UIMA allows annotators to declare configuration parameters in their descriptors. The descriptor also specifies default values for the parameters, though these can be overridden at runtime.
The example descriptor
descriptors/tutorial/ex2/RoomNumberAnnotator.xml is
the same as the descriptor from the previous section except that information has
been filled in for the Parameters and Parameter Settings pages of the Component
Descriptor Editor.
First, in Eclipse, open example two's RoomNumberAnnotator in the Component Descriptor Editor, and then go to the Parameters page (click on the parameters tab at the bottom of the window), which is shown below:
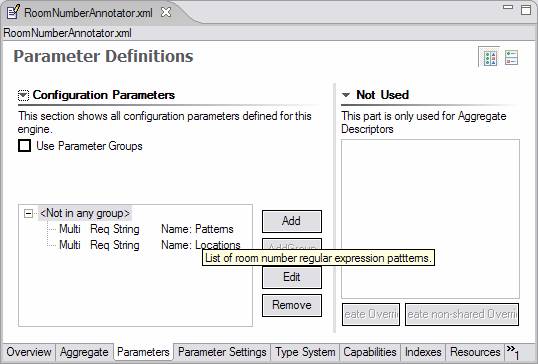 |
Two parameters – Patterns and Locations -- have been declared. In this screen shot, the mouse (not shown) is hovering over Patterns to show its description in the small popup window. Every parameter has the following information associated with it:
name – the name by which the annotator code refers to the parameter
description – a natural language description of the intent of the parameter
type – the data type of the parameter's value – must be one of String, Integer, Float, or Boolean.
multiValued – true if the parameter can take multiple-values (an array), false if the parameter takes only a single value. Shown above as
Multi.mandatory – true if a value must be provided for the parameter. Shown above as
Req(for required).
Both of our parameters are mandatory and accept an array of Strings as their value.
Next, default values are assigned to the parameters on the Parameter Settings page:
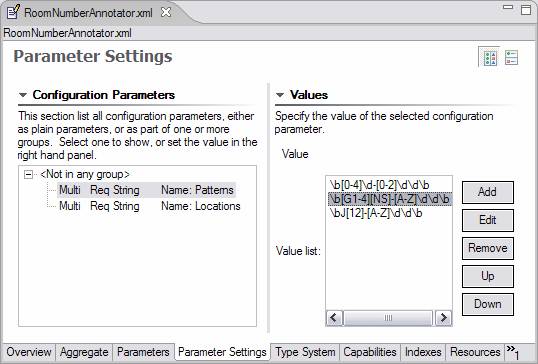 |
Here the “Patterns” parameter is selected, and the right pane
shows the list of values for this parameter, in this case the regular expressions
that match particular room numbering conventions. Notice the third pattern is
new, for matching the style of room numbers in the third building, which has room
numbers such as J2-A11.
The class
org.apache.uima.tutorial.ex2.RoomNumberAnnotator has
overridden the initialize method. The initialize method is called by the UIMA
framework when the annotator is instantiated, so it is a good place to read
configuration parameter values. The default initialize method does nothing with
configuration parameters, so you have to override it. To see the code in Eclipse,
switch to the src folder, and open
org.apache.uima.tutorial.ex2. Here is the method
body:
/**
* @see AnalysisComponent#initialize(UimaContext)
*/
public void initialize(UimaContext aContext)
        throws ResourceInitializationException {
  super.initialize(aContext);

  // Get config. parameter values
  String[] patternStrings =
        (String[]) aContext.getConfigParameterValue("Patterns");
  mLocations =
        (String[]) aContext.getConfigParameterValue("Locations");

  // compile regular expressions
  mPatterns = new Pattern[patternStrings.length];
  for (int i = 0; i < patternStrings.length; i++) {
    mPatterns[i] = Pattern.compile(patternStrings[i]);
  }
}
Configuration parameter values are accessed through the UimaContext. As you will see in subsequent sections of this chapter, the UimaContext is the annotator's access point for all of the facilities provided by the UIMA framework – for example logging and external resource access.
The UimaContext's getConfigParameterValue
method takes the name of the parameter as an argument; this must match one of the
parameters declared in the descriptor. The return value of this method is a Java
Object, whose type corresponds to the declared type of the parameter. It is up to the
annotator to cast it to the appropriate type, String[] in this case.
If there is a problem retrieving the parameter values, the framework throws an exception. Generally annotators don't handle these, and just let them propagate up.
To see the configuration parameters working, run the Document Analyzer
application and select the descriptor
examples/descriptors/tutorial/ex2/RoomNumberAnnotator.xml
. In the example document WatsonConferenceRooms.txt, you
should see some examples of Hawthorne II room numbers that would not have been
detected by the ex1 version of RoomNumberAnnotator.
If you take a look at the JavaDocs (located in the docs/api directory) for
org.apache.uima.analysis_component.AnaysisComponent
(which our annotator implements indirectly through JCasAnnotator_ImplBase),
you will see that there is a reconfigure() method, which is called by the containing
application through the UIMA framework, if the configuration parameter values
are changed.
The AnalysisComponent_ImplBase class provides a default implementation that just calls the annotator's destroy method followed by its initialize method. This works fine for our annotator. The only situation in which you might want to override the default reconfigure() is if your annotator has very expensive initialization logic, and you don't want to reinitialize everything if just one configuration parameter has changed. In that case, you can provide a more intelligent implementation of reconfigure() for your annotator.
For annotators with many sets of configuration parameters, UIMA supports organizing them into groups. It is possible to define a parameter with the same name in multiple groups; one common use for this is for annotators that can process documents in several languages and which want to have different parameter settings for the different languages.
The syntax for defining parameter groups in your descriptor is fairly
straightforward – see Chapter 2, Component Descriptor Reference
in UIMA References for details. Values of
parameters defined within groups are accessed through the two-argument version
of UimaContext.getConfigParameterValue, which takes
both the group name and the parameter name as its arguments.
The UIMA SDK provides a logging facility, which is very similar to the java.util.logging.Logger class that was introduced in Java 1.4.
In the Java architecture, each logger instance is associated with a name. By convention, this name is often the fully qualified class name of the component issuing the logging call. The name can be referenced in a configuration file when specifying which kinds of log messages to actually log, and where they should go.
The UIMA framework supports this convention using the
UimaContext object. If you access a logger instance using
getContext().getLogger() within an Annotator, the logger
name will be the fully qualified name of the Annotator implementation class.
Here is an example from the process method of
org.apache.uima.tutorial.ex2.RoomNumberAnnotator:
getContext().getLogger().log(Level.FINEST,"Found: " + annotation);
The first argument to the log method is the level of the log output. Here, a value of FINEST indicates that this is a highly-detailed tracing message. While useful for debugging, it is likely that real applications will not output log messages at this level, in order to improve their performance. Other defined levels, from lowest to highest importance, are FINER, FINE, CONFIG, INFO, WARNING, and SEVERE.
If no logging configuration file is provided (see next section), the Java Virtual Machine defaults would be used, which typically set the level to INFO and higher messages, and direct output to the console.
If you specify the standard UIMA SDK Logger.properties,
the output will be directed to a file named uima.log, in the current working directory
(often the “project” directory when running from Eclipse, for
instance).
Note
When using Eclipse, the uima.log file, if written into the Eclipse workspace in the project uimaj-examples, for example, may not appear in the Eclipse package explorer view until you right-click the uimaj-examples project with the mouse, and select “Refresh”. This operation refreshes the Eclipse display to conform to what may have changed on the file system. Also, you can set the Eclipse preferences for the workspace to automatically refresh (Window → Preferences → General → Workspace, then click the “refresh automatically” checkbox.
The standard UIMA logger uses the underlying Java 1.4 logging mechanism. You
can use the APIs that come with that to configure the logging. In addition, the
standard Java 1.4 logging initialization mechanisms will look for a Java System
Property named java.util.logging.config.file and if
found, will use the value of this property as the name of a standard
“properties” file, for setting the logging level. Please refer to
the Java 1.4. documentation for more information on the format and use of this
file.
Two sample logging specification property files can be found in the UIMA_HOME
directory where the UIMA SDK is installed:
config/Logger.properties, and
config/FileConsoleLogger.properties. These specify the same
logging, except the first logs just to a file, while the second logs both to a file and
to the console. You can edit these files, or create additional ones, as described
below, to change the logging behavior.
When running your own Java application, you can specify the location of the
logging configuration file on your Java command line by setting the Java system
property java.util.logging.config.fileto be the logging
configuration filename. This file specification can be either absolute or
relative to the working directory. For example:
java "-Djava.util.logging.config.file=C:/Program Files/apache-uima/config/Logger.properties"
Note
In a shell script, you can use environment variables such as UIMA_HOME if convenient.
If you are using Eclipse to launch your application, you can set this property
in the VM arguments section of the Arguments tab of the run configuration screen. If
you've set an environment variable UIMA_HOME, you could for example, use the
string:
"-Djava.util.logging.config.file=${env_var:UIMA_HOME}/config/Logger.properties".
Within the logging control file, the default global logging level specifies
which kinds of events are logged across all loggers. For any given facility this
global level can be overridden by a facility specific level. Multiple handlers are
supported. This allows messages to be directed to a log file, as well as to a
“console”. Note that the ConsoleHandler also has a separate level
setting to limit messages printed to the console. For example: .level=
INFO
The properties file can change where the log is written, as well.
Facility specific properties allow different logging for each class, as
well. For example, to set the com.xyz.foo logger to only log SEVERE messages:
com.xyz.foo.level = SEVERE
If you have a sample annotator in the package
org.apache.uima.SampleAnnotator you can set the log level
by specifying: org.apache.uima.SampleAnnotator.level =
ALL
There are other logging controls; for a full discussion, please read the
contents of the Logger.properties file and the Java
specification for logging in Java 1.4.
The logging output is formatted by handlers specified in the properties file for configuring logging, described above. The default formatter that comes with the UIMA SDK formats logging output as follows:
Timestamp - threadID: sourceInfo: Message level:
          message
Here's an example:
7/12/04 2:15:35 PM - 10:
          org.apache.uima.util.TestClass.main(62): INFO: You are not logged
          in!
These levels are defined by the Java logging framework, which was incorporated into Java as of the 1.4 release level. The levels are defined in the JavaDocs for java.util.logging.Level, and include both logging and tracing levels:
OFF is a special level that can be used to turn off logging.
ALL indicates that all messages should be logged.
CONFIG is a message level for configuration messages. These would typically occur once (during configuration) in methods like
initialize().INFO is a message level for informational messages, for example, connected to server IP: 192.168.120.12
WARNING is a message level indicating a potential problem.
SEVERE is a message level indicating a serious failure.
Tracing levels, typically used for debugging:
FINE is a message level providing tracing information, typically at a collection level (messages occurring once per collection).
FINER indicates a fairly detailed tracing message, typically at a document level (once per document).
FINEST indicates a highly detailed tracing message.
An application using UIMA may want to log its messages using the same logging framework. This can be done by getting a reference to the UIMA logger, as follows:
Logger logger = UIMAFramework.getLogger(TestClass.class);
The optional class argument allows filtering by class (if the log handler supports this). If not specified, the name of the returned logger instance is “org.apache.uima”.
The UIMA SDK makes it very easy to combine any sequence of Analysis Engines to form an Aggregate Analysis Engine. This is done through an XML descriptor; no Java code is required!
If you go to the examples/descriptors/tutorial/ex3
folder (in Eclipse, it's in your uimaj-examples project, under the
descriptors/tutorial/ex3 folder), you will find a
descriptor for a TutorialDateTime annotator. This annotator detects dates and
times (and also sentences and words). To see what this annotator can do, try it out
using the Document Analyzer. If you are curious as to how this annotator works, the
source code is included, but it is not necessary to understand the code at this
time.
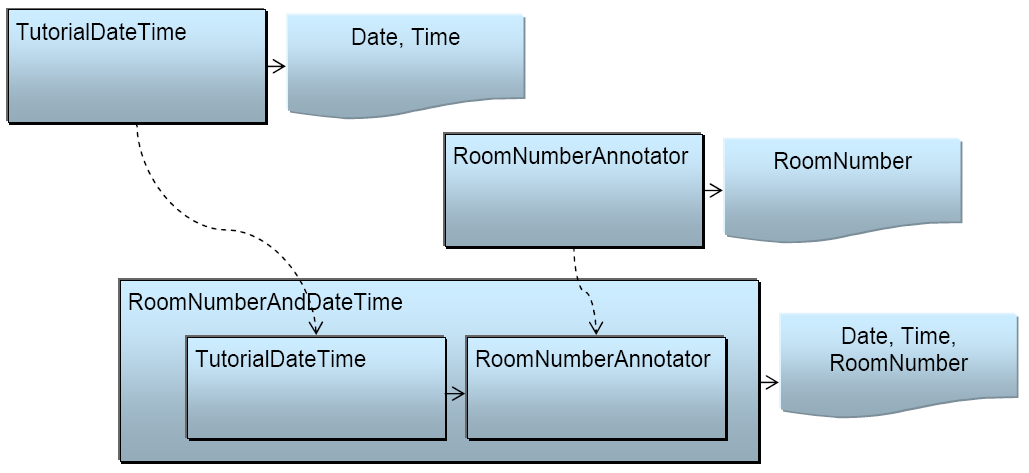
We are going to combine the TutorialDateTime annotator with the RoomNumberAnnotator to create an aggregate Analysis Engine. This is illustrated in the following figure:
The descriptor that does this is named
RoomNumberAndDateTime.xml, which you can open in the
Component Descriptor Editor plug-in. This is in the uimaj-examples project in the
folder descriptors/tutorial/ex3.
The “Aggregate” page of the Component Descriptor Editor is used to define which components make up the aggregate. A screen shot is shown below. (If you are not using Eclipse, see Section 1.8, “Analysis Engine XML Descriptor” for the actual XML syntax for Aggregate Analysis Engine Descriptors.)
 |
On the left side of the screen is the list of component engines that make up the aggregate – in this case, the TutorialDateTime annotator and the RoomNumberAnnotator. To add a component, you can click the “Add” button and browse to its descriptor. You can also click the “Find AE” button and search for an Analysis Engine in your Eclipse workspace.
Note
The “AddRemote” button is used for adding components which run remotely (for example, on another machine using a remote networking connection). This capability is described in section Section 3.6.3, “Calling a UIMA Service”,
The order of the components in the left pane does not imply an order of
execution. The order of execution, or “flow” is determined in the
“Component Engine Flow” section on the right. UIMA supports
different types of algorithms (including user-definable) for determining the
flow. Here we pick the simplest: FixedFlow. We have chosen to
have the RoomNumberAnnotator execute first, although in this case it
doesn't really matter, since the RoomNumber and DateTime annotators do not
have any dependencies on one another.
If you look at the “Type System” page of the Component Descriptor Editor, you will see that it displays the type system but is not editable. The Type System of an Aggregate Analysis Engine is automatically computed by merging the Type Systems of all of its components.
Warning
If the components have different definitions for the same type name, The Component Descriptor Editor will show a warning. It is possible to continue past this warning, in which case your aggregate's type system will have the correct “merged” type definition that contains all of the features defined on that type by all of your components. However, it is not recommended to use this feature in conjunction with JCAS, since the JCAS Java Class definitions cannot be so easily merged. See Section 5.5, “Merging Types” in UIMA References for more information.
The Capabilities page is where you explicitly declare the aggregate Analysis Engine's inputs and outputs. Sofas and Languages are described later.
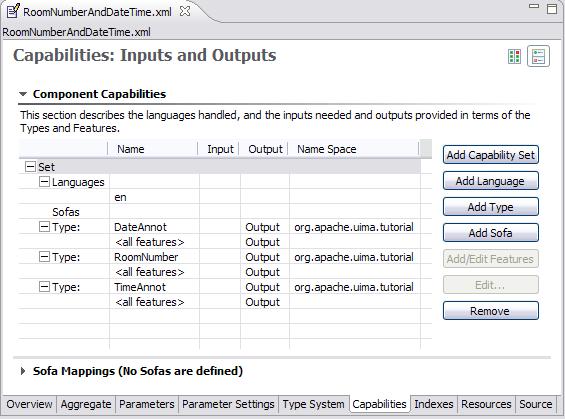 |
Note that it is not automatically assumed that all outputs of each component Analysis Engine (AE) are passed through as outputs of the aggregate AE. In this case, for example, we have decided to suppress the Word and Sentence annotations that are produced by the TutorialDateTime annotator.
You can run this AE using the Document Analyzer in the same way that you run any
other AE. Just select the examples/descriptors/tutorial/ex3/
RoomNumberAndDateTime.xml descriptor and click the Run button. You
should see that RoomNumbers, Dates, and Times are all shown but that Words and
Sentences are not:
 |
In addition to aggregating Analysis Engines, Aggregates can also contain CAS
Consumers (see Chapter 2, Collection Processing Engine Developer's Guide
, or even a mixture of these components with regular
Analysis Engines. The UIMA Examples has an example of an Aggregate which contains
both an analysis engine and a CAS consumer, in
examples/descriptors/MixedAggregate.xml.
So far, we have been looking at annotators that look directly at the document text. However, annotators can also use the results of other annotators. One useful thing we can do at this point is look for the co-occurrence of a Date, a RoomNumber, and two Times – and annotate that as a Meeting.
The CAS maintains indexes of annotations, and from an index you can obtain an iterator that allows you to step through all annotations of a particular type. Here's some example code that would iterate over all of the TimeAnnot annotations in the JCas:
FSIndex timeIndex = aJCas.getAnnotationIndex(TimeAnnot.type);
Iterator timeIter = timeIndex.iterator();
while (timeIter.hasNext()) {
  TimeAnnot time = (TimeAnnot)timeIter.next();

  //do something
}
Note
You can also use the method
JCAS.getJFSIndexRepository().getAllIndexedFS(YourClass.type), which returns an iterator
over all instances of YourClass in no particular order. This can be useful for types
that are not subtypes of the built-in Annotation type and which therefore have no default sort order.
Also, if you've defined your own custom index as described in Section 2.4.1.7, “Index Definition” in UIMA References, you can get an iterator over that
specific index by calling aJCas.getJFSIndexRepository().getIndex(label).
The getIndex(...) method has also a 2 argument form; the second argument,
if used, specialized the index to subtype of the type the index was declared to index. For instance,
if you defined an index called "allEvents" over the type Event, and wanted
to get an index over just a particular subtype of event, say, TimeEvent,
you can ask for that index using
aJCas.getJFSIndexRepository().getIndex("allEvents", TimeEvent.type).
Now that we've explained the basics, let's take a look at the process method for
org.apache.uima.tutorial.ex4.MeetingAnnotator. Since we're looking for a
combination of a RoomNumber, a Date, and two Times, there are four nested iterators. (There's surely a
better algorithm for doing this, but to keep things simple we're just going to look at every combination
of the four items.)
For each combination of the four annotations, we compute the span of text that includes all of them, and then we check to see if that span is smaller than a “window” size, a configuration parameter. There are also some checks to make sure that we don't annotate the same span of text multiple times. If all the checks pass, we create a Meeting annotation over the whole span. There's really nothing to it!
The XML descriptor, located in
examples/descriptors/tutorial/ex4/MeetingAnnotator.xml , is also very
straightforward. An important difference from previous descriptors is that this is the first annotator
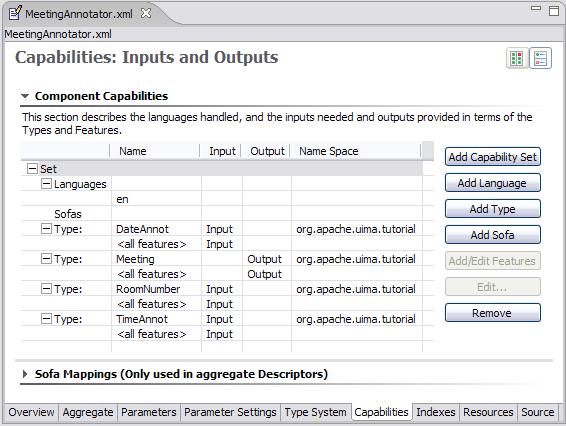
we've discussed that has input requirements. This can be seen on the “Capabilities”
page of the Component Descriptor Editor:
 |
If we were to run the MeetingAnnotator on its own, it wouldn't detect anything because it
wouldn't have any input annotations to work with. The required input annotations can be produced by the
RoomNumber and DateTime annotators. So, we create an aggregate Analysis Engine containing these two
annotators, followed by the Meeting annotator. This aggregate is illustrated in Figure 1.2, “An Aggregate Analysis Engine where an internal component uses output from previous
engines”. The descriptor for this is in
examples/descriptors/tutorial/ex4/MeetingDetectorAE.xml . Give it a try in the
Document Analyzer.
 |
Figure 1.2. An Aggregate Analysis Engine where an internal component uses output from previous engines
The UIMA SDK include several other examples you may find interesting, including
SimpleTokenAndSentenceAnnotator – a simple tokenizer and sentence annotator.
XmlDetagger – A multi-sofa annotator that does XML detagging. Multiple Sofas (Subjects of Analysis) are described in a later – see Chapter 6, Multiple CAS Views of an Artifact . Reads XML data from the input Sofa (named "xmlDocument"); this data can be stored in the CAS as a string or array, or it can be a URI to a remote file. The XML is parsed using the JVM's default parser, and the plain-text content is written to a new sofa called "plainTextDocument".
PersonTitleDBWriterCasConsumer – a sample CAS Consumer which populates a relational database with some annotations. It uses JDBC and in this example, hooks up with the Open Source Apache Derby database.
The UIMA framework ensures that an Annotator instance is called by only one thread at a time. An instance never has to worry about running some method on one thread, and then asynchronously being called using another thread. This approach simplifies the design of annotators – they do not have to be designed to support multi-threading. When multiple threading is wanted, for performance, multiple instances of the Annotator are created, each one running on just one thread.
The following table defines the methods called by the framework, when they are called, and the requirements annotator implementations must follow.
| Method | When Called by Framework | Requirements |
|---|---|---|
| initialize | Typically only called once, when instance is created. Can be called
again if application does a reinitialize call and the default behavior
isn't overridden (the default behavior for reinitialize is to call
destroy followed by
initialize | Normally does one-time initialization, including reading of configuration parameters. If the application changes the parameters, it can call initialize to have the annotator re-do its initialization. |
| typeSystemInit | Called before process whenever the type system
in the CAS being passed in differs from what was previously passed in a
process call (and called for the first CAS passed in,
too). The Type System being passed to an annotator only changes in the case of
remote annotators that are active as servers, receiving possibly
different type systems to operate on. | Typically, users of JCas do not implement any method for this. An annotator can use this call to read the CAS type system and setup any instance variables that make accessing the types and features convenient. |
| process | Called once for each CAS. Called by the application if not using Collection Processing Manager (CPM); the application calls the process method on the analysis engine, which is then delegated by the framework to all the annotators in the engine. For Collection Processing application, the CPM calls the process method. If the application creates and manages your own Collection Processing Engine via API calls (see JavaDocs), the application calls this on the Collection Processing Engine, and it is delegated by the framework to the components. | Process the CAS, adding and/or modifying elements in it |
| destroy | This method can be called by applications, and is also called by the Collection Processing Manager framework when the collection processing completes. If called by an application on the Engine object, it is propagated to all contained annotators. | An annotator should release all resources, close files, close database connections, etc., and return to a state where another initialize call could be received to restart. Typically, after a destroy call, no further calls will be made to an annotator instance. |
| reconfigure | This method is never called by the framework, unless an application calls it on the Engine object – in which case it the framework propagates it to all annotators contained in the Engine. Its purpose is to signal that the configuration parameters have changed. | A default implementation of this calls destroy, followed by initialize. This is the only case where initialize would be called more than once. Users should implement whatever logic is needed to return the annotator to an initialized state, including re-reading the configuration parameter data. |
There are two broad classes of errors that can occur: recoverable and unrecoverable. Because Annotators are often expected to process very large numbers of artifacts (for example, text documents), they should be written to recover where possible.
For example, if an upstream annotator created some input for an annotator which is invalid, the annotator may want to log this event, ignore the bad input and continue. It may include a notification of this event in the CAS, for further downstream annotators to consider. Or, it may throw an exception (see next section) – but in this case, it cannot do any further processing on that document.
Note
The choice of what to do can be made configurable, using the configuration parameters.
Let's say an invalid regular expression was passed as a parameter to the RoomNumberAnnotator. Because this is an error related to the overall configuration, and not something we could expect to ignore, we should throw an appropriate exception, and most Java programmers would expect to do so like this:
throw new ResourceInitializationException(
    "The regular expression " + x + " is not valid.");
UIMA, however, does not do it this way. All UIMA exceptions are
internationalized, meaning that they support translation
into other languages. This is accomplished by eliminating hardcoded message
strings and instead using external message digests. Message digests are files
containing (key, value) pairs. The key is used in the Java code instead of the actual
message string. This allows the message string to be easily translated later by
modifying the message digest file, not the Java code. Also, message strings in the
digest can contain parameters that are filled in when the exception is thrown. The
format of the message digest file is described in the JavaDocs for the Java class
java.util.PropertyResourceBundle and in the load method of
java.util.Properties.
The first thing an annotator developer must choose is what Exception class to use. There are three to choose from:
ResourceConfigurationException should be thrown from the annotator's initialize() method if invalid configuration parameter values have been specified.
ResourceInitializationException should be thrown from the annotator's initialize() method if initialization fails for some other reason.
AnalysisEngineProcessException should be thrown from the annotator's process() method if the processing of a particular document fails for any reason.
Generally you will not need to define your own custom exception classes, but if you do they must extend one of these three classes, which are the only types of Exceptions that the annotator interface permits annotators to throw.
All of the UIMA Exception classes share common constructor varieties. There are four possible arguments:
The name of the message digest to use (optional – if not specified the default UIMA message digest is used).
The key string used to select the message in the message digest.
An object array containing the parameters to include in the message. Messages can have substitutable parts. When the message is given, the string representation of the objects passed are substituted into the message. The object array is often created using the syntax new Object[]{x, y}.
Another exception which is the “cause” of the exception you are throwing. This feature is commonly used when you catch another exception and rethrow it. (optional)
If you look at source file (folder: src in Eclipse)
org.apache.uima.tutorial.ex5.RoomNumberAnnotator, you
will see the following code:
try {
  mPatterns[i] = Pattern.compile(patternStrings[i]);
}
catch (PatternSyntaxException e) {
  throw new ResourceInitializationException(
     MESSAGE_DIGEST, "regex_syntax_error",
     new Object[]{patternStrings[i]}, e);
}
where the MESSAGE_DIGEST constant has the value
"org.apache.uima.tutorial.ex5.RoomNumberAnnotator_Messages".
Message digests are specified using a dotted name, just like Java classes. This
file, with the .properties extension, must be present in the class path. In Eclipse,
you find this file under the src folder, in the package
org.apache.uima.tutorial.ex5, with the name
RoomNumberAnnotator_Messages.properties. Outside of Eclipse, you can find this
in the uimaj-examples.jar with the name
org/apache/uima/tutorial/ex5/RoomNumberAnnotator_Messages.properties.
If you look in this file you will see the line:
regex_syntax_error = {0} is not a valid regular expression.which is the error message for the example exception we showed above. The placeholder {0} will be filled by the toString() value of the argument passed to the exception constructor – in this case, the regular expression pattern that didn't compile. If there were additional arguments, their locations in the message would be indicated as {1}, {2}, and so on.
If a message digest is not specified in the call to the exception constructor, the
default is UIMAException.STANDARD_MESSAGE_CATALOG (whose
value is “org.apache.uima.UIMAException_Messages
” in the current release but may change). This message digest is located in the
uima-core.jar file at
org/apache/uima/UIMAException_messages.properties
– you can take a look to see if any of these exception messages are useful to
use.
To try out the regex_syntax_error exception, just use the Document Analyzer to
run
examples/descriptors/tutorial/ex5/RoomNumberAnnotator.xml
, which happens to have an invalid regular expression in its configuration parameter
settings.
To summarize, here are the steps to take if you want to define your own exception message:
Create a file with the .properties extension, where you declare message keys and their associated messages, using the same syntax as shown above for the regex_syntax_error exception. The properties file syntax is more completely described in the JavaDocs for the load method of the java.util.Properties class.
Put your properties file somewhere in your class path (it can be in your annotator's .jar file).
Define a String constant (called MESSAGE_DIGEST for example) in your annotator
code whose value is the dotted name of this properties file. For example, if your
properties file is inside your jar file at the location
org/myorg/myannotator/Messages.properties, then this
String constant should have the value
org.myorg.myannotator.Messages. Do not include the
.properties extension. In Java Internationalization terminology, this is called
the Resource Bundle name. For more information see the JavaDocs for the
PropertyResourceBundle class.
In your annotator code, throw an exception like this:
throw new ResourceConfigurationException(
    MESSAGE_DIGEST, "your_message_name",
    new Object[]{param1,param2,...});
You may also wish to look at the JavaDocs for the UIMAException class.
For more information on Java's internationalization features, see the Java Internationalization Guide.
Sometimes you may want an annotator to read from an external file – for example, a long list of keys and values that you are going to build into a HashMap. You could, of course, just introduce a configuration parameter that holds the absolute path to this resource file, and build the HashMap in your annotator's initialize method. However, this is not the best solution for three reasons:
Including an absolute path in your descriptor makes your annotator difficult for others to use. Each user will need to edit this descriptor and set the absolute path to a value appropriate for his or her installation.
You cannot share the HashMap between multiple annotators. Also, in some deployment scenarios there may be more than one instance of your annotator, and you would like to have the option for them to use the same HashMap instance.
Your annotator would become dependent on a particular data representation – the word list would have to come from a file on the local disk and it would have to be in a particular format. It would be better if this were decoupled.
A better way to access external resources is through the ResourceManager component. In this section we are going to show an example of how to use the Resource Manager.
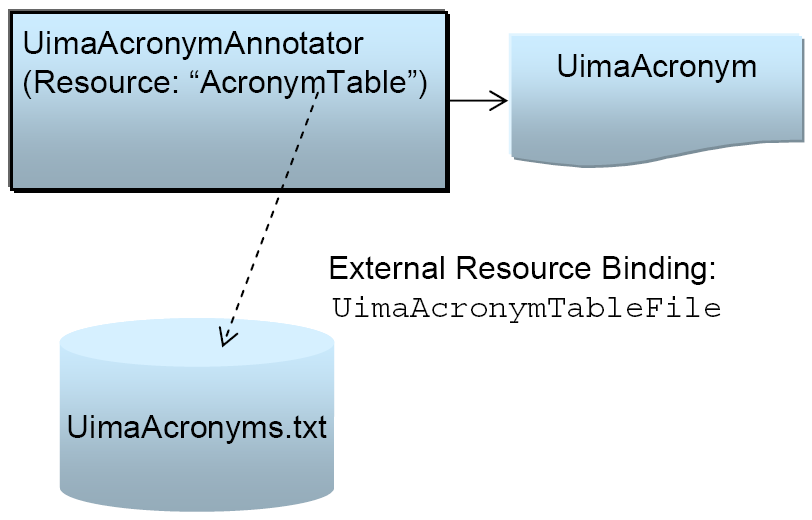
This example annotator will annotate UIMA acronyms (e.g. UIMA, AE, CAS, JCas) and store the acronym's expanded form as a feature of the annotation. The acronyms and their expanded forms are stored in an external file.
First, look at the
examples/descriptors/tutorial/ex6/UimaAcronymAnnotator.xml
descriptor.
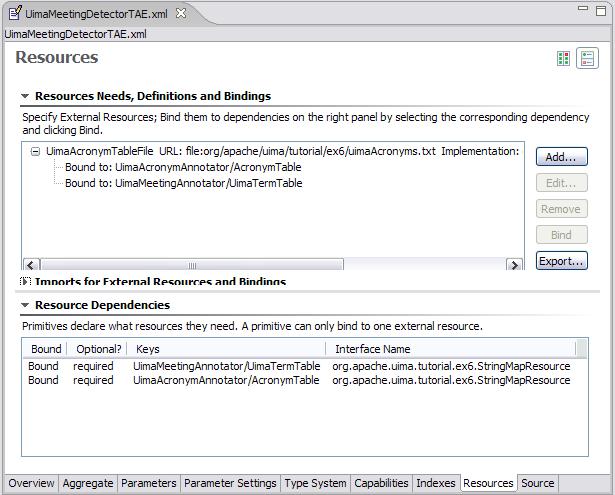
 |
The values of the rows in the two tables are longer than can be easily shown. You can click the small button at the top right to shift the layout from two side-by-side tables, to a vertically stacked layout. You can also click the small twisty on the “Imports for External Resources and Bindings” to collapse this section, because it's not used here. Then the same screen will appear like this:
 |
The top window has a scroll bar allowing you to see the rest of the line.
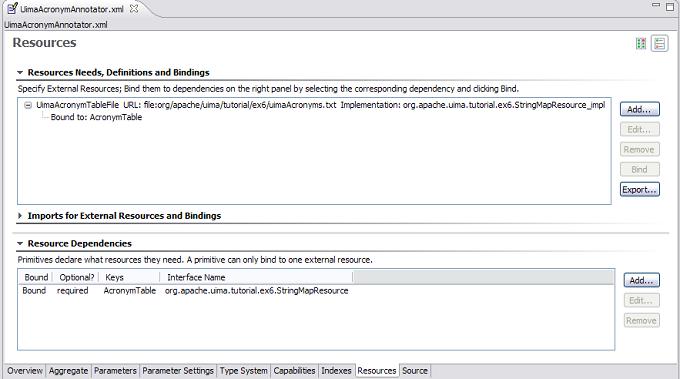
The bottom window is where an annotator declares an external resource dependency. The XML for this is as follows:
<externalResourceDependency>
  <key>AcronymTable</key>
  <description>Table of acronyms and their expanded forms.</description>
  <interfaceName>org.apache.uima.tutorial.ex6.StringMapResource</interfaceName>
</externalResourceDependency>
The <key> value (AcronymTable) is the name by which the annotator
identifies this resource. The key must be unique for all resources that this
annotator accesses, but the same key could be used by different annotators to mean
different things. The interface name
(org.apache.uima.tutorial.ex6.StringMapResource) is
the Java interface through which the annotator accesses the data. Specifying an
interface name is optional. If you do not specify an interface name, annotators
will get direct access to the data file.
If you look at the
org.apache.uima.tutorial.ex6.UimaAcronymAnnotator
source, you will see that the annotator accesses this resource from the
UimaContext by calling:
StringMapResource mMap =
  (StringMapResource)getContext().getResourceObject("AcronymTable");
The object returned from the getResourceObject method
will implement the interface declared in the
<interfaceName> section of the descriptor,
StringMapResource in this case. The annotator code does not
need to know the location of the data nor the Java class that is being used to read the
data and implement the StringMapResource
interface.
Note that if we did not specify a Java interface in our descriptor, our annotator could directly access the resource data as follows:
InputStream stream = getContext().getResourceAsStream("AcronymTable");If necessary, the annotator could also determine the location of the resource file, by calling:
URI uri = getContext().getResourceURI("AcronymTable");These last two options are only available in the case where the descriptor does not declare a Java interface.
Note
The methods for getting access to resources include getResourceURL. That
method returns a URL, which may contain spaces encoded as %20. url.getPath() would
return the path without decoding these %20 into spaces. getResourceURI
on the other hand, returns a URI, and the uri.getPath() does
do the conversion of %20 into spaces. See also getResourceFilePath,
which does a getResourceURI followed by uri.getPath().
Refer back to the top window in the Resources page of the Component Descriptor Editor. This is where we specify the location of the resource data, and the Java class used to read the data. For the example, this corresponds to the following section of the descriptor:
<resourceManagerConfiguration>
  <externalResources>
    <externalResource>
      <name>UimaAcronymTableFile</name>
      <description>
         A table containing UIMA acronyms and their expanded forms.
      </description>
      <fileResourceSpecifier>
        <fileUrl>file:org/apache/uima/tutorial/ex6/uimaAcronyms.txt
        </fileUrl>
      </fileResourceSpecifier>
      <implementationName>
         org.apache.uima.tutorial.ex6.StringMapResource_impl
      </implementationName>
    </externalResource>
  </externalResources>

  <externalResourceBindings>
    <externalResourceBinding>
      <key>AcronymTable</key>
      <resourceName>UimaAcronymTableFile</resourceName>
    </externalResourceBinding>
  </externalResourceBindings>
</resourceManagerConfiguration>
The first section of this XML declares an externalResource, the
UimaAcronymTableFile. With this, the fileUrl element
specifies the path to the data file. This can be an absolute URL (e.g. one that starts
with file:/ or file:///, or file://my.host.org/), but that is not recommended
because it makes installation of your component more difficult, as noted earlier.
Better is a relative URL, which will be looked up within the classpath (and/or
datapath), as used in this example. In this case, the file
org/apache/uima/tutorial/ex6/uimaAcronyms.txt is
located in uimaj-examples.jar, which is in the classpath.
If you look in this file you will see the definitions of several UIMA
acronyms.
The second section of the XML declares an externalResourceBinding, which
connects the key AcronymTable, declared in the
annotator's external resource dependency, to the actual resource name
UimaAcronymTableFile. This is rather trivial in this case;
for more on bindings see the example
UimaMeetingDetectorAE.xml below. There is no global
repository for external resources; it is up to the user to define each resource
needed by a particular set of annotators.
In the Component Descriptor Editor, bindings are indicated below the
external resource. To create a new binding, you select an external resource (which
must have previously been defined), and an external resource dependency, and then
click the Bind button, which only enables if you have
selected two things to bind together.
When the Analysis Engine is initialized, it creates a single instance of
StringMapResource_impl and loads it with the contents of
the data file. The UimaAcronymAnnotator then accesses the data through the
StringMapResource interface. This single instance could
be shared among multiple annotators, as will be explained later.
Note that all resource implementation classes (e.g. StringMapResource_impl in the provided example) must be declared public must not be declared abstract, and must have public, 0-argument constructors, so that they can be instantiated by the framework. (Although Java classes in which you do not define any constructor will, by default, have a 0-argument constructor that doesn't do anything, a class in which you have defined at least one constructor does not get a default 0-argument constructor.)
This annotator is illustrated in Figure 1.3, “External Resource Binding”. To see it in action, just run it using the Document Analyzer. When it finishes, open up the UIMA_Seminars document in the processed results window, (double-click it), and then left-click on one of the highlighted terms, to see the expandedForm feature's value.
By designing our annotator in this way, we have gained some flexibility. We can freely replace the StringMapResource_impl class with any other implementation that implements the simple StringMapResource interface. (For example, for very large resources we might not be able to have the entire map in memory.) We have also made our external resource dependencies explicit in the descriptor, which will help others to deploy our annotator.
Another advantage of the Resource Manager is that it allows our data to be shared between annotators. To demonstrate this we have developed another annotator that will use the same acronym table. The UimaMeetingAnnotator will iterate over Meeting annotations discovered by the Meeting Detector we previously developed and attempt to determine whether the topic of the meeting is related to UIMA. It will do this by looking for occurrences of UIMA acronyms in close proximity to the meeting annotation. We could implement this by using the UimaAcronymAnnotator, of course, but for the sake of this example we will have the UimaMeetingAnnotator access the acronym map directly.
The Java code for the UimaMeetingAnnotator in example 6 creates a new type, UimaMeeting, if it finds a meeting within 50 characters of the UIMA acronym.
We combine three analysis engines, the UimaAcronymAnnotator to annotate UIMA acronyms, the MeetingDectector from example 4 to find meetings and finally the UimaMeetingAnnotator to annotate just meetings about UIMA. Together these are assembled to form the new aggregate analysis engine, UimaMeetingDectector. This aggregate and the sharing of a common resource are illustrated in Figure 1.4, “Component engines of an aggregate share a common resource”.
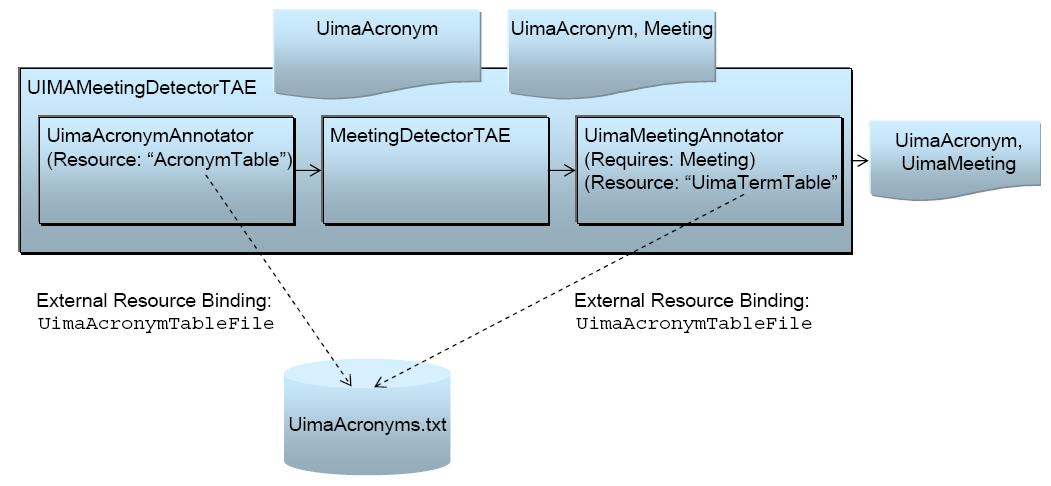
The important thing to notice is in the
UimaMeetingDetectorAE.xml aggregate descriptor. It
includes both the UimaMeetingAnnotator and the UimaAcronymAnnotator, and
contains a single declaration of the UimaAcronymTableFile resource. (The actual
example has the order of the first two annotators reversed versus the above
picture, which is OK since they do not depend on one another).
It also binds the resources as follows:
 |
<externalResourceBindings>
  <externalResourceBinding>
    <key>UimaAcronymAnnotator/AcronymTable</key>
    <resourceName>UimaAcronymTableFile</resourceName>
  </externalResourceBinding>

  <externalResourceBinding>
    <key>UimaMeetingAnnotator/UimaTermTable</key>
    <resourceName>UimaAcronymTableFile</resourceName>
  </externalResourceBinding>
</externalResourceBindings>
This binds the resource dependencies of both the UimaAcronymAnnotator (which uses the name AcronymTable) and UimaMeetingAnnotator (which uses UimaTermTable) to the single declared resource named UimaAcronymFile. Therefore they will share the same instance. Resource bindings in the aggregate descriptor override any resource declarations in individual annotator descriptors.
If we wanted to have the annotators use different acronym tables, we could easily do that. We would simply have to change the resourceName elements in the bindings so that they referred to two different resources. The Resource Manager gives us the flexibility to make this decision at deployment time, without changing any Java code.
The Result Specification is passed to the annotator instance by calling its
setResultSpecificaiton method. When called, the default implementation saves the
result specification in an instance variable of the Annotator instance, which can be
accessed by the annotator using the protected
getResultSpecification() method.
A Result Specification is a list of output types and / or type:feature names, which are expected to be output from (produced by) the annotator. Annotators may use this to optimize their operations, when possible, for those cases where only particular outputs are wanted. The interface to the Result Specification object (see the JavaDocs) allows querying both types and particular features of types.
Sometimes you can specify the Result Specification; othertimes, you cannot (for instance, inside a Collection Processing Engine, you cannot). When you cannot specify it, or choose not to specify it (for example, using the form of the process(...) call on an Analysis Engine that doesn't include the Result Specification), a “Default” Result Specification is used.
The default Result Specification is taken from the Engine's output Capability Specification. Remember that a Capability Specification has both inputs and outputs, can specify types and / or features, and there can be more than one Capability Set. If there is more than one set, the logical union of these sets is used. The default Result Specification is exactly what's included in the output Capability Specification.
If you are not using a Collection Processing Engine, you can specify a Result
Specification for your AnalysisEngine(s) by calling the
AnalysisEngine.setResultSpecification(ResultSpecification)
method.
It is also possible to pass a Result Specification on each call to
AnalysisEngine.process(CAS, ResultSpecification). However,
this is not recommended if your Result Specification will stay constant across
multiple calls to
process. In that case it will be more efficient to call
AnalysisEngine.setResultSpecification(ResultSpecification)
only when the Result Specification changes.
For primitive Analysis Engines, whatever Result Specification you pass in is
passed along to the annotator's
setResultSpecification(ResultSpecification) method. For
aggregate Analysis Engines, see below.
For aggregate engines, the Result Specification passed to the
AnalysisEngine.setResultSpecification(ResultSpecification)
method is intended to specify the set of output types/features that the aggregate
should produce. This is not necessarily equivalent to the set of output
types/features that each annotator should produce. For example, an annotator may
need to produce an intermediate type that is then consumed by a downstream annotator,
even though that intermediate type is not part of the Result Specification.
To handle this situation, when
AnalysisEngine.setResultSpecification(ResultSpecification)
is called on an aggregate, the framework computes the union of the passed Result
Specification with the set of
all input types and features of
all component AnalysisEngines within that aggregate. This forms the
complete set of types and features that any component of the aggregate might need to
produce. This derived Result Specification is then passed to the
AnalysisEngine.setResultSpecification(ResultSpecification)
of each component AnalysisEngine. In the case of nested aggregates, this procedure
is applied recursively.
JCas provides Java classes that correspond to each CAS type in an application. These classes are generated by the JCasGen utility (which can be automatically invoked from the Component Descriptor Editor).
The Java source classes generated by the JCasGen utility are typically compiled and packaged into a JAR file. This JAR file must be present in the classpath of the UIMA application.
For more details on issues around setting up this class path, including deployment issues where class loaders are being used to isolate multiple UIMA applications inside a single running Java Virtual Machine, please see Section 5.6.6, “Class Loaders in UIMA” in UIMA References .
The SDK includes a /bin subdirectory containing shell
scripts, for Windows (.bat files) and Unix (.sh files). Many of these scripts invoke
sample Java programs which require a class path; they call a common shell script,
setUimaClassPath to set up the UIMA required files and
directories on the class path.
If you need to include files on the class path, the scripts will add anything you
specify in the environment variable UIMA_CLASSPATH to the classpath. So, for
example, if you are running the document analyzer, and wanted it to find a Java class
file named (on Windows) c:\a\b\c\myProject\myJarFile.jar, you could first issue a
set command to set the UIMA_CLASSPATH to this file, followed by
the documentAnalyzer script:
set UIMA_CLASSPATH=c:\a\b\c\myProject\myJarFile.jar
documentAnalyzer
Other environment variables are used by the shell scripts, as follows:
Table 1.1. Environment variables used by the shell scripts
| Environment Variable | Description |
|---|---|
| UIMA_HOME | Path where the UIMA SDK was installed. Set automatically if installing via the InstallShield installer. |
| JAVA_HOME | (Optional) Path to a Java Runtime Environment. If not set, the Java JRE that is shipped with the UIMA SDK (InstallShield versions) is used. |
| UIMA_CLASSPATH | (Optional) if specified, a path specification to use as the default ClassPath. |
| UIMA_DATAPATH | (Optional) if specified, a path specification to use as the default DataPath (see Section 2.2, “Imports” in UIMA References) |
| VNS_HOST | (Optional) if specified, the network IP name of the host running the Vinci Name Server (VNS) (see Section 3.6.5, “The Vinci Naming Services (VNS)”) |
| VNS_PORT | (Optional) if specified, the network IP port number of the Vinci Name Server (VNS) (see Section 3.6.5, “The Vinci Naming Services (VNS)”) |
| ECLIPSE_HOME | (Optional) Needs to be set to the root of your Eclipse installation when using shell scripts that invoke Eclipse (e.g. jcasgen_merge) |
Here are some things to avoid doing in your annotator code:
Retaining references to JCas objects between calls to process()
The JCas will be cleared between calls to your annotator's process() method. All of the analysis results related to the previous document will be deleted to make way for analysis of a new document. Therefore, you should never save a reference to a JCas Feature Structure object (i.e. an instance of a class created using JCasGen) and attempt to reuse it in a future invocation of the process() method. If you do so, the results will be undefined.
Careless use of static data
Always keep in mind that an application that uses your annotator may create multiple instances of your annotator class. A multithreaded application may attempt to use two instances of your annotator to process two different documents simultaneously. This will generally not cause any problems as long as your annotator instances do not share static data.
In general, you should not use static variables other than static final constants of primitive data types (String, int, float, etc). Other types of static variables may allow one annotator instance to set a value that affects another annotator instance, which can lead to unexpected effects. Also, static references to classes that aren't thread-safe are likely to cause errors in multithreaded applications.
Eclipse (as of version 3.1 or later) has a new feature for viewing Java Logical Structures. When enabled, it will permit you to see a view of UIMA objects (such as feature structure instances, CAS or JCas instances, etc.) which displays the logical subparts. For example, here is a view of a feature structure for the RoomNumber annotation, from the tutorial example 1:
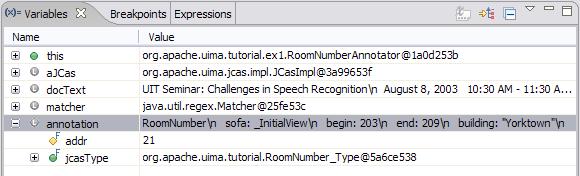 |
The “annotation” object in Java shows as a 2 element object, not very convenient for seeing the features or the part of the input that is being annotatoed. But if you turn on the Java Logical Structure mode by pushing this button:
 |
the features of the FeatureStructure instance will be shown:
 |
This section is an introduction to the syntax used for Analysis Engine Descriptors. Most users do not need to understand these details; they can use the Component Descriptor Editor Eclipse plugin to edit Analysis Engine Descriptors rather than editing the XML directly.
This section walks through the actual XML descriptor for the RoomNumberAnnotator example introduced in section Section 1.1, “Getting Started”. The discussion is divided into several logical sections of the descriptor.
The full specification for Analysis Engine Descriptors is defined in Chapter 2, Component Descriptor Reference in UIMA References .
<?xml version="1.0" encoding="UTF-8" ?>
<!--  Descriptor for the example RoomNumberAnnotator. -->
<analysisEngineDescription xmlns="http://uima.apache.org/resourceSpecifier">
  <frameworkImplementation>org.apache.uima.java</frameworkImplementation>
  <primitive>true</primitive>
  <annotatorImplementationName>
    org.apache.uima.tutorial.ex1.RoomNumberAnnotator
  </annotatorImplementationName>
The document begins with a standard XML header and a comment. The root element of
the document is named <analysisEngineDescription>,
and must specify the XML namespace
http://uima.apache.org/resourceSpecifier.
The first subelement,
<frameworkImplementation>, must contain the value
org.apache.uima.java. The second subelement,
<primitive>, contains the Boolean value true,
indicating that this XML document describes a Primitive
Analysis Engine. A Primitive Analysis Engine is comprised of a single annotator. It
is also possible to construct XML descriptors for non-primitive or
Aggregate Analysis Engines; this is covered later.
The next element,
<annotatorImplementationName>, contains the
fully-qualified class name of our annotator class. This is how the UIMA framework
determines which annotator class to instantiate.
<analysisEngineMetaData>
  <name>Room Number Annotator</name>
  <description>An example annotator that searches for room numbers in
     the IBM Watson research buildings.</description>
  <version>1.0</version>
  <vendor>The Apache Software Foundation</vendor></para>
Here are shown four simple metadata fields – name, description, version, and vendor. Providing values for these fields is optional, but recommended.
<typeSystemDescription>
  <imports>
    <import location="TutorialTypeSystem.xml"/>
  </imports>
</typeSystemDescription>
This section of the XML descriptor defines which types the annotator works with. The recommended way to do this is to import the type system definition from a separate file, as shown here. The location specified here should be a relative path, and it will be resolved relative to the location of the aggregate descriptor. It is also possible to define types directly in the Analysis Engine descriptor, but these types will not be easily shareable by others.
<capabilities>
  <capability>
    <inputs />
    <outputs>
      <type>org.apache.uima.tutorial.RoomNumber</type>
      <feature>org.apache.uima.tutorial.RoomNumber:building</feature>
    </outputs>
  </capability>
</capabilities>
The last section of the descriptor describes the Capabilities of the annotator – the Types/Features it consumes (input) and the Types/Features that it produces (output). These must be the names of types and features that exist in the ANALYSIS ENGINE descriptor's type system definition.
Our annotator outputs only one Type, RoomNumber and one feature, RoomNumber:building. The fully-qualified names (including namespace) are needed.
The building feature is listed separately here, but clearly specifying every feature for a complex type would be cumbersome. Therefore, a shortcut syntax exists. The <outputs> section above could be replaced with the equivalent section:
<outputs>
  <type allAnnotatorFeatures ="true">
     org.apache.uima.tutorial.RoomNumber
  </type>
</outputs><configurationParameters>
<configurationParameter>
<name>Patterns</name>
<description>List of room number regular expression patterns.
</description>
<type>String</type>
<multiValued>true</multiValued>
<mandatory>true</mandatory>
</configurationParameter>
<configurationParameter>
<name>Locations</name>
<description>List of locations corresponding to the room number
expressions specified by the Patterns parameter.
</description>
<type>String</type>
<multiValued>true</multiValued>
<mandatory>true</mandatory>
</configurationParameter>
</configurationParameters>The <configurationParameters> element
contains the definitions of the configuration parameters that our annotator
accepts. We have declared two parameters. For each configuration parameter, the
following are specified:
name – the name that the annotator code uses to refer to the parameter
description – a natural language description of the intent of the parameter
type – the data type of the parameter's value – must be one of String, Integer, Float, or Boolean.
multiValued – true if the parameter can take multiple-values (an array), false if the parameter takes only a single value.
mandatory – true if a value must be provided for the parameter
Both of our parameters are mandatory and accept an array of Strings as their value.
<configurationParameterSettings>
  <nameValuePair>
    <name>Patterns</name>
    <value>
      <array>
        <string>b[0-4]d-[0-2]ddb</string>
        <string>b[G1-4][NS]-[A-Z]ddb</string>
        <string>bJ[12]-[A-Z]ddb</string>
      </array>
    </value>
  </nameValuePair>
  <nameValuePair>
    <name>Locations</name>
    <value>
      <array>
        <string>Watson - Yorktown</string>
        <string>Watson - Hawthorne I</string>
        <string>Watson - Hawthorne II</string>
      </array>
    </value>
  </nameValuePair>
</configurationParameterSettings><?xml version="1.0" encoding="UTF-8" ?>
<analysisEngineDescription xmlns="http://uima.apache.org/resourceSpecifier">
<frameworkImplementation>org.apache.uima.java</frameworkImplementation>
<primitive>false</primitive>
<delegateAnalysisEngineSpecifiers>
<delegateAnalysisEngine key="RoomNumber">
<import location="../ex2/RoomNumberAnnotator.xml"/>
</delegateAnalysisEngine>
<delegateAnalysisEngine key="DateTime">
<import location="TutorialDateTime.xml" />
</delegateAnalysisEngine>
</delegateAnalysisEngineSpecifiers>The first difference between this descriptor and an individual
annotator's descriptor is that the
<primitive> element contains the value
false. This indicates that this Analysis Engine (AE) is an
aggregate AE rather than a primitive AE.
Then, instead of a single annotator class name, we have a list of
delegateAnalysisEngineSpecifiers. Each specifies one of
the components that constitute our Aggregate . We refer to each component by the
relative path from this XML descriptor to the component AE's XML
descriptor.
This list of component AEs does not imply an ordering of them in the execution pipeline. Ordering is done by another section of the descriptor:
<analysisEngineMetaData>
  <name>Aggregate AE - Room Number and DateTime Annotators</name>
  <description>Detects Room Numbers, Dates, and Times</description>
  <flowConstraints>
    <fixedFlow>
      <node>RoomNumber</node>
      <node>DateTime</node>
    </fixedFlow>
  </flowConstraints>
Here, a fixedFlow is adequate, and we specify the exact ordering in which the AEs will be executed. In this case, it doesn't really matter, since the RoomNumber and DateTime annotators do not have any dependencies on one another.
Finally, the descriptor has a capabilities section, which has exactly the same syntax as a primitive AE's capabilities section:
<capabilities>
  <capability>
    <inputs />
    <outputs>
      <type allAnnotatorFeatures="true">
        org.apache.uima.tutorial.RoomNumber
      </type>
      <type allAnnotatorFeatures="true">
        org.apache.uima.tutorial.DateAnnot
      </type>
      <type allAnnotatorFeatures="true">
        org.apache.uima.tutorial.TimeAnnot
      </type>
    </outputs>
    <languagesSupported>
      <language>en</language>
    </languagesSupported>
  </capability>
</capabilities>
[1] Note that AnalysisComponent is not specific to JCAS. There is a method getRequiredCasInterface()
which the user would have to implement to return JCas.class. Then in the
process(AbstractCas cas) method, they would need to typecast
cas to type JCas.
[2] Although Java classes in which you do not define any constructor will, by default, have a 0-argument constructor that doesn't do anything, a class in which you have defined at least one constructor does not get a default 0-argument constructor.
[3] Version 1 of UIMA specified an additional parameter, the ResultSpecification. This provides a specification of which types and features are desired to be computed and "output" from this annotator. Its use is optional; many annotators ignore it.
This parameter has been replaced by specific set/getResultSpecification() methods, which allow the annotator to receive a signal (a method call) when the result specification changes.
The UIMA Analysis Engine interface provides support for developing and integrating algorithms that analyze unstructured data. Analysis Engines are designed to operate on a per-document basis. Their interface handles one CAS at a time. UIMA provides additional support for applying analysis engines to collections of unstructured data with its Collection Processing Architecture. The Collection Processing Architecture defines additional components for reading raw data formats from data collections, preparing the data for processing by Analysis Engines, executing the analysis, extracting analysis results, and deploying the overall flow in a variety of local and distributed configurations.
The functionality defined in the Collection Processing Architecture is implemented by a Collection Processing Engine (CPE). A CPE includes an Analysis Engine and adds a Collection Reader, a CAS Initializer (deprecated as of version 2), and CAS Consumers. The part of the UIMA Framework that supports the execution of CPEs is called the Collection Processing Manager, or CPM.
A Collection Reader provides the interface to the raw input data and knows how to iterate over the data collection. Collection Readers are discussed in Section 2.4.1, “Developing Collection Readers”. The CAS Initializer [4] prepares an individual data item for analysis and loads it into the CAS. CAS Initializers are discussed in Section 2.4.2, “Developing CAS Initializers” A CAS Consumer extracts analysis results from the CAS and may also perform collection level processing, or analysis over a collection of CASes. CAS Consumers are discussed in Section 2.4.3, “Developing CAS Consumers”.
Analysis Engines and CAS Consumers are both instances of CAS Processors. A Collection Processing Engine (CPE) may contain multiple CAS Processors. An Analysis Engine contained in a CPE may itself be a Primitive or an Aggregate (composed of other Analysis Engines). Aggregates may contain Cas Consumers. While Collection Readers and CAS Initializers always run in the same JVM as the CPM, a CAS Processor may be deployed in a variety of local and distributed modes, providing a number of options for scalability and robustness. The different deployment options are covered in detail in Section 2.5, “Deploying a CPE”.
Each of the components in a CPE has an interface specified by the UIMA Collection Processing Architecture and is described by a declarative XML descriptor file. Similarly, the CPE itself has a well defined component interface and is described by a declarative XML descriptor file.
A user creates a CPE by assembling the components mentioned above. The UIMA SDK provides a graphical tool, called the CPE Configurator, for assisting in the assembly of CPEs. Use of this tool is summarized in Section 2.2.1, “Using the CPE Configurator”, and more details can be found in Chapter 2, Collection Processing Engine Configurator User's Guide in UIMA Tools Guide and Reference. Alternatively, a CPE can be assembled by writing an XML CPE descriptor. Details on the CPE descriptor, including its syntax and content, can be found in the Chapter 3, Collection Processing Engine Descriptor Reference in UIMA References. The individual components have associated XML descriptors, each of which can be created and / or edited using the Component Description Editor in UIMA Tools Guide and Reference.
A CPE is executed by a UIMA infrastructure component called the Collection Processing Manager (CPM). The CPM provides a number of services and deployment options that cover instantiation and execution of CPEs, error recovery, and local and distributed deployment of the CPE components.
Figure 2.1, “CPE Components” illustrates the data flow that occurs between the different types of components that make up a CPE.
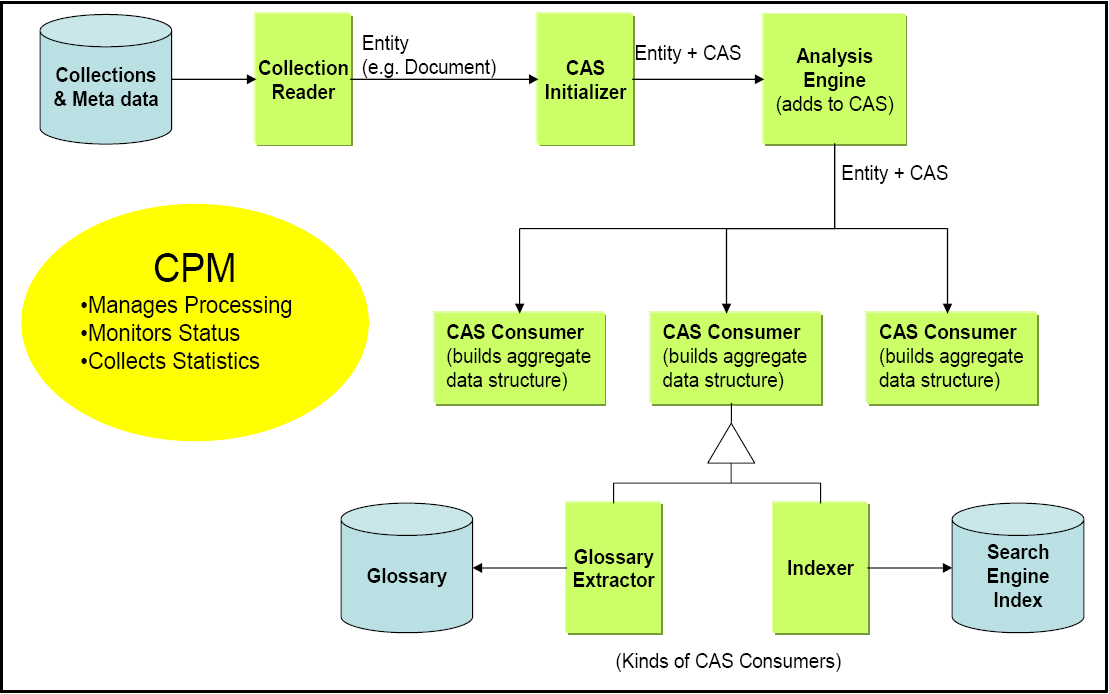
The components of a CPE are:
Collection Reader – interfaces to a collection of data items (e.g., documents) to be analyzed. Collection Readers return CASes that contain the documents to analyze, possibly along with additional metadata.
Analysis Engine – takes a CAS, analyzes its contents, and produces an enriched CAS. Analysis Engines can be recursively composed of other Analysis Engines (called an Aggregate Analysis Engine). Aggregates may also contain CAS Consumers.
CAS Consumer – consume the enriched CAS that was produced by the sequence of Analysis Engines before it, and produce an application-specific data structure, such as a search engine index or database.
A fourth type of component, the CAS Initializer, may be used by a Collection Reader to populate a CAS from a document. However, as of UIMA version 2 CAS Initializers are now deprecated in favor of a more general mechsanism, multiple Subjects of Analysis.
The Collection Processing Manager orchestrates the data flow within a CPE, monitors status, optionally manages the life-cycle of internal components and collects statistics.
CASes are not saved in a persistent way by the framework. If you want to save CASes, then you have to save each CAS as it comes through (for example) using a CAS Consumer you write to do this, in whatever format you like. The UIMA SDK supplies an example CAS Consumer to save CASes to XML files, either in the standard XMI format or in an older format called XCAS. It also supplies an example CAS Consumer to extract information from CASes and store the results into a relational Database, using Java's JDBC APIs.
A CPE can be assembled by writing an XML CPE descriptor. Details on the CPE descriptor, including its syntax and content, can be found in Chapter 3, Collection Processing Engine Descriptor Reference in UIMA References. Rather than edit raw XML, you may develop a CPE Descriptor using the CPE Configurator tool. The CPE Configurator tool is described briefly in this section, and in more detail in Chapter 2, Collection Processing Engine Configurator User's Guide in UIMA Tools Guide and Reference.
The CPE Configurator tool can be run from Eclipse (see Section 2.2.2, “Running the CPE Configurator from Eclipse”, or using
the cpeGui shell script (cpeGui.bat on
Windows, cpeGui.sh on Unix), which is located in the
bin directory of the UIMA SDK installation. Executing this
batch file will display the window shown here:
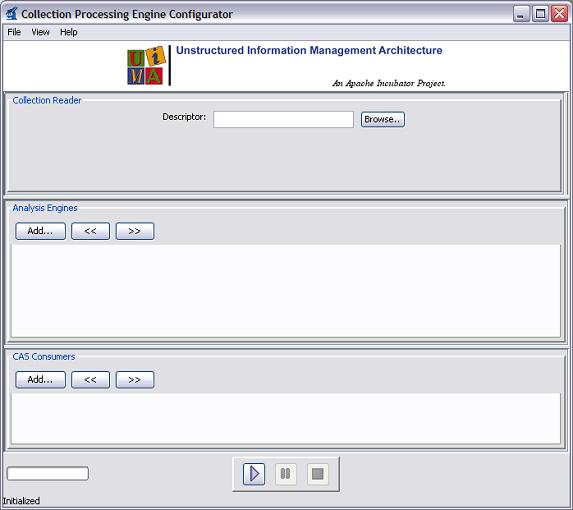 |
The window is divided into three sections, one each for the Collection Reader, Analysis Engines, and CAS Consumers.[5] In each section, you select the component(s) you want to include in the CPE by browsing to their XML descriptors. The configuration parameters present in the XML descriptors will then be displayed in the GUI; these can be modified to override the values present in the descriptor. For example, the screen shot below shows the CPE Configurator after the following components have been chosen:
Collection Reader:
   %UIMA_HOME%/examples/descriptors/collection_reader/
          FileSystemCollectionReader.xml

Analysis Engine:
   %UIMA_HOME%/examples/descriptors/analysis_engine/
          NamesAndPersonTitles_TAE.xml

CAS Consumer:
    %UIMA_HOME%/examples/descriptors/cas_consumer/
XmiWriterCasConsumer.xml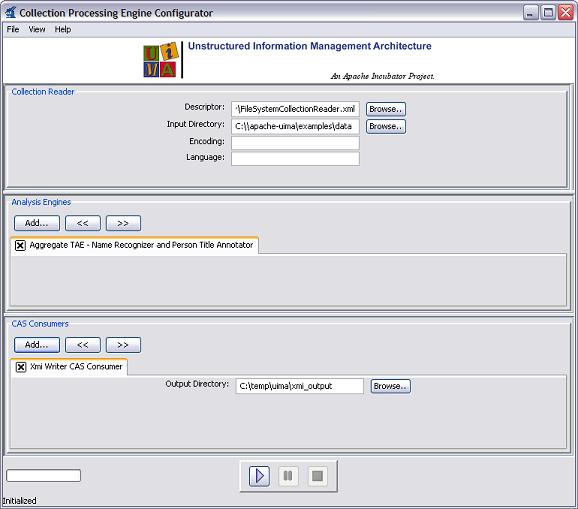 |
For the File System Collection Reader, ensure that the Input Directory is set to
%UIMA_HOME%\examples\data[6]. The other parameters may be left blank. For the External CAS Writer CAS
Consumer, ensure that the Output Directory is set to
%UIMA_HOME%\examples\data\processed.
After selecting each of the components and providing configuration settings, click the play (forward arrow) button at the bottom of the screen to begin processing. A progress bar should be displayed in the lower left corner. (Note that the progress bar will not begin to move until all components have completed their initialization, which may take several seconds.) Once processing has begun, the pause and stop buttons become enabled.
If an error occurs, you will be informed by an error dialog. If processing completes successfully, you will be presented with a performance report.
Using the File menu, you can select Save CPE Descriptor to
create an .xml descriptor file that defines the CPE you have constructed. Later, you
can use Open CPE Descriptor to restore the CPE Configurator to
the saved state. Also, CPE descriptors can be used to run a CPE from a Java program
– see section Section 2.3, “Running a CPE from Your Own Java Application”. CPE Descriptors
allow specifying operational parameters, such as error handling options, that are
not currently available for configuration through the CPE Configurator. For more
information on manually creating a CPE Descriptor, see the Chapter 3, Collection Processing Engine Descriptor Reference
in UIMA References.
The CPE configured above runs a simple name and title annotator on the sample data
provided with the UIMA SDK and stores the results using the XMI Writer CAS Consumer. To
view the results, start the External CAS Annotation Viewer by running the
annotationViewer batch file
(annotationViewer.bat on Windows,
annotationViewer.sh on Unix), which is located in the
bin directory of the UIMA SDK installation. Executing this
batch file will display the window shown here:
 |
Ensure that the Input Directory is the same as the Output Directory specified for
the XMI Writer CAS Consumer in the CPE configured above (e.g.,
%UIMA_HOME%\examples\data\processed) and that the TAE
Descriptor File is set to the Analysis Engine used in the CPE configured above (e.g.,
examples\descriptors\analysis_engine\NamesAndPersonTitles_TAE.xml
).
Click the View button to display the Analyzed Documents window:
 |
Double click on any document in the list to view the analyzed document. Double clicking the first document, IBM_LifeSciences.txt, will bring up the following window:
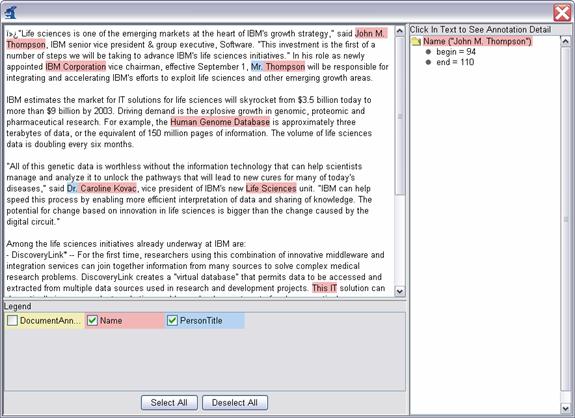 |
This window shows the analysis results for the document. Clicking on any highlighted annotation causes the details for that annotation to be displayed in the right-hand pane. Here the annotation spanning “John M. Thompson” has been clicked.
Congratulations! You have successfully configured a CPE, saved its descriptor, run the CPE, and viewed the analysis results.
If you have followed the instructions in Chapter 3, Setting up the Eclipse IDE to work with UIMA
in Overview & Setup and imported the example Eclipse
project, then you should already have a Run configuration for the CPE Configurator
tool (called UIMA CPE GUI) configured to run in the example
project. Simply run that configuration to start the CPE Configurator.
If you haven't followed the Eclipse setup instructions and wish to run the CPE Configurator tool from Eclipse, you will need to do the following. As installed, this Eclipse launch configuration is associated with the “uimaj-examples” project. If you've not already done so, you may wish to import that project into your Eclipse workspace. It's located in %UIMA_HOME%/docs/examples. Doing this will supply the Eclipse launcher with all the class files it needs to run the CPE configurator. If you don't do this, please manually add the JAR files for UIMA to the launch configuration.
Also, you need to add any projects or JAR files for any UIMA components you will be running to the launch class path.
Note
A simpler alternative may be to change the CPE launch configuration to be based on your project. If you do that, it will pick up all the files in your project's class path, which you should set up to include all the UIMA framework files. An easy way to do this is to specify in your project's properties' build-path that the uimaj-examples project is on the build path, because the uimaj-examples project is set up to include all the UIMA framework classes in its classpath already.
Next, in the Eclipse menu select Run →
Run..., which brings up the Run configuration screen.
In the Main tab, set the main class to
org.apache.uima.tools.cpm.CpmFrame
In the arguments tab, add the following to the VM arguments:
-Xms128M -Xmx256M
-Duima.home="C:\Program Files\Apache\uima"
(or wherever you installed the UIMA SDK)
Click the Run button to launch the CPE Configurator, and use it as previously described in this section.
The simplest way to run a CPE from a Java application is to first create a CPE descriptor as described in the previous section. Then the CPE can be instantiated and run using the following code:
      //parse CPE descriptor in file specified on command line
CpeDescription cpeDesc = UIMAFramework.getXMLParser().
        parseCpeDescription(new XMLInputSource(args[0]));

      //instantiate CPE
mCPE = UIMAFramework.produceCollectionProcessingEngine(cpeDesc);

      //Create and register a Status Callback Listener
mCPE.addStatusCallbackListener(new StatusCallbackListenerImpl());

      //Start Processing
mCPE.process();
This will start the CPE running in a separate thread.
Note
The process() method for a CPE can only be called once. If you
need to call it again, you have to instantiate a new CPE, and call that new CPE's process
method.
Updates of the CPM's progress, including any errors that occur, are sent to
the callback handler that is registered by the call to
addStatusCallbackListener, above. The callback handler is a
class that implements the CPM's
StatusCallbackListener interface. It responds to events by
printing messages to the console. The source code is fairly straightforward and is
not included in this chapter – see the
org.apache.uima.examples.cpe.SimpleRunCPE.java in the
%UIMA_HOME%\examples\src directory for the complete
code.
If you need more control over the information in the CPE descriptor, you can
manually configure it via its API. See the JavaDocs for package
org.apache.uima.collection for more details.
This section is an introduction to the process of developing Collection Readers,
CAS Initializers, and CAS Consumers. The code snippets refer to the classes that can be
found in %UIMA_HOME%\examples\src example project.
In the following sections, classes you write to represent components need to be public and have public, 0-argument constructors, so that they can be instantiated by the framework. (Although Java classes in which you do not define any constructor will, by default, have a 0-argument constructor that doesn't do anything, a class in which you have defined at least one constructor does not get a default 0-argument constructor.)
A Collection Reader is responsible for obtaining documents from the collection and returning each document as a CAS. Like all UIMA components, a Collection Reader consists of two parts — the code and an XML descriptor.
A simple example of a Collection Reader is the “File System Collection
Reader,” which simply reads documents from files in a specified directory.
The Java code is in the class
org.apache.uima.examples.cpe.FileSystemCollectionReader
and the XML descriptor is
%UIMA_HOME%/examples/src/main/descriptors/collection_reader/
          FileSystemCollectionReader.xml
.
The Java class for a Collection Reader must implement the
org.apache.uima.collection.CollectionReader
interface. You may build your Collection Reader from scratch and implement this
interface, or you may extend the convenience base class
org.apache.uima.collection.CollectionReader_ImplBase
.
The convenience base class provides default implementations for many of the
methods defined in the CollectionReader interface, and
provides abstract definitions for those methods that you are required to
implement in your new Collection Reader. Note that if you extend this base class,
you do not need to declare that your new Collection Reader implements the
CollectionReader interface.
Tip
Eclipse
tip – if you are using Eclipse, you can quickly create the boiler plate code and
stubs for all of the required methods by clicking File
→ New → Class to bring up the “New Java Class”
dialogue, specifying
org.apache.uima.collection.CollectionReader_ImplBase
as the Superclass, and checking “Inherited abstract methods” in the
section “Which method stubs would you like to create?”, as in the
screenshot below:
 |
For the rest of this section we will assume that your new Collection Reader
extends the CollectionReader_ImplBase class, and we will
show examples from the
org.apache.uima.examples.cpe.FileSystemCollectionReader
. If you must inherit from a different superclass, you must ensure that your
Collection Reader implements the CollectionReader
interface – see the JavaDocs for CollectionReader
for more details.
The following abstract methods must be implemented:
The initialize() method is called by the framework
when the Collection Reader is first created.
CollectionReader_ImplBase actually provides a default
implementation of this method (i.e., it is not abstract), so you are not strictly
required to implement this method. However, a typical Collection Reader will
implement this method to obtain parameter values and perform various
initialization steps.
In this method, the Collection Reader class can access the values of its configuration parameters and perform other initialization logic. The example File System Collection Reader reads its configuration parameters and then builds a list of files in the specified input directory, as follows:
public void initialize() throws ResourceInitializationException {
  File directory = new File(
            (String)getConfigParameterValue(PARAM_INPUTDIR));
  mEncoding = (String)getConfigParameterValue(PARAM_ENCODING);
  mDocumentTextXmlTagName = (String)getConfigParameterValue(PARAM_XMLTAG);
  mLanguage = (String)getConfigParameterValue(PARAM_LANGUAGE);
  mCurrentIndex = 0;

  //get list of files (not subdirectories) in the specified directory
  mFiles = new ArrayList();
  File[] files = directory.listFiles();
  for (int i = 0; i < files.length; i++) {
    if (!files[i].isDirectory()) {
      mFiles.add(files[i]);
    }
  }
}
Note
This is the zero-argument version of the initialize method. There is
also a method on the Collection Reader interface called
initialize(ResourceSpecifier, Map) but it is not
recommended that you override this method in your code. That method performs
internal initialization steps and then calls the zero-argument
initialize().
The hasNext() method returns whether or not there are
any documents remaining to be read from the collection. The File System
Collection Reader's hasNext() method is very
simple. It just checks if there are any more files left to be read:
public boolean hasNext() {
  return mCurrentIndex < mFiles.size();
}
The getNext() method reads the next document from the
collection and populates a CAS. In the simple case, this amounts to reading the
file and calling the CAS's setDocumentText method.
The example File System Collection Reader is slightly more complex. It first
checks for a CAS Initializer. If the CPE includes a CAS Initializer, the CAS
Initializer is used to read the document, and
initialize() the CAS. If the CPE does not include a CAS
Initializer, the File System Collection Reader reads the document and sets the
document text in the CAS.
The File System Collection Reader also stores additional metadata about
the document in the CAS. In particular, it sets the document's language in
the special built-in feature structure
uima.tcas.DocumentAnnotation (see Section 4.3, “Built-in CAS Types” in UIMA References for details about this
built-in type) and creates an instance of
org.apache.uima.examples.SourceDocumentInformation
, which stores information about the document's source location. This
information may be useful to downstream components such as CAS Consumers. Note
that the type system descriptor for this type can be found in
org.apache.uima.examples.SourceDocumentInformation.xml
, which is located in the examples/src directory.
The getNext() method for the File System Collection Reader looks like this:
  public void getNext(CAS aCAS) throws IOException, CollectionException {
    JCas jcas;
    try {
      jcas = aCAS.getJCas();
    } catch (CASException e) {
      throw new CollectionException(e);
    }

    // open input stream to file
    File file = (File) mFiles.get(mCurrentIndex++);
    BufferedInputStream fis =
            new BufferedInputStream(new FileInputStream(file));
    try {
      byte[] contents = new byte[(int) file.length()];
      fis.read(contents);
      String text;
      if (mEncoding != null) {
        text = new String(contents, mEncoding);
      } else {
        text = new String(contents);
      }
      // put document in CAS
      jcas.setDocumentText(text);
    } finally {
      if (fis != null)
        fis.close();
    }

    // set language if it was explicitly specified
    //as a configuration parameter
    if (mLanguage != null) {
      ((DocumentAnnotation) jcas.getDocumentAnnotationFs()).
            setLanguage(mLanguage);
    }

    // Also store location of source document in CAS.
    // This information is critical if CAS Consumers will
    // need to know where the original document contents
    // are located.
    // For example, the Semantic Search CAS Indexer
    // writes this information into the search index that
    // it creates, which allows applications that use the
    // search index to locate the documents that satisfy
    //their semantic queries.
    SourceDocumentInformation srcDocInfo =
            new SourceDocumentInformation(jcas);
    srcDocInfo.setUri(
            file.getAbsoluteFile().toURL().toString());
    srcDocInfo.setOffsetInSource(0);
    srcDocInfo.setDocumentSize((int) file.length());
    srcDocInfo.setLastSegment(
            mCurrentIndex == mFiles.size());
    srcDocInfo.addToIndexes();
  }
The Collection Reader can create additional annotations in the CAS at this point, in the same way that annotators create annotations.
The Collection Reader is responsible for returning progress information;
that is, how much of the collection has been read thus far and how much remains to be
read. The framework defines progress very generally; the Collection Reader
simply returns an array of Progress objects, where each
object contains three fields — the amount already completed, the total
amount (if known), and a unit (e.g. entities (documents), bytes, or files). The
method returns an array so that the Collection Reader can report progress in
multiple different units, if that information is available. The File System
Collection Reader's getProgress() method looks
like this:
public Progress[] getProgress() {
  return new Progress[]{
     new ProgressImpl(mCurrentIndex,mFiles.size(),Progress.ENTITIES)};
}
In this particular example, the total number of files in the collection is
known, but the total size of the collection is not known. As such, a
ProgressImpl object for
Progress.ENTITIES is returned, but a
ProgressImpl object for
Progress.BYTES is not.
The close method is called when the Collection Reader is no longer needed. The Collection Reader should then release any resources it may be holding. The FileSystemCollectionReader does not hold resources and so has an empty implementation of this method:
public void close() throws IOException { }The following methods may be implemented:
If you are only setting the document text in the CAS, or if you are using the JCas (recommended, as in the current example, you do not have to implement this method. If you are directly using the CAS API, this method is used in the same way as it is used for an annotator – see Section 1.5.1, “Annotator Methods” for more information.
Collection readers do not have to be thread safe; they are run with a single thread per instance, and only one instance per instance of the Collection Processing Manager (CPM) is made.
You can use the Component Description Editor to create and / or edit the File System Collection Reader's descriptor. Here is its descriptor (abbreviated somewhat), which is very similar to an Analysis Engine descriptor:
<collectionReaderDescription
          xmlns="http://uima.apache.org/resourceSpecifier">
  <frameworkImplementation>org.apache.uima.java</frameworkImplementation>
  <implementationName>
    org.apache.uima.examples.cpe.FileSystemCollectionReader
  </implementationName>
  <processingResourceMetaData>
    <name>File System Collection Reader</name>
    <description>Reads files from the filesystem.</description>
    <version>1.0</version>
    <vendor>The Apache Software Foundation</vendor>
    <configurationParameters>
      <configurationParameter>
        <name>InputDirectory</name>
        <description>Directory containing input files</description>
        <type>String</type>
        <multiValued>false</multiValued>
        <mandatory>true</mandatory>
      </configurationParameter>
      <configurationParameter>
        <name>Encoding</name>
        <description>Character encoding for the documents.</description>
        <type>String</type>
        <multiValued>false</multiValued>
        <mandatory>false</mandatory>
      </configurationParameter>
      <configurationParameter>
        <name>Language</name>
        <description>ISO language code for the documents</description>
        <type>String</type>
        <multiValued>false</multiValued>
        <mandatory>false</mandatory>
      </configurationParameter>
    </configurationParameters>
    <configurationParameterSettings>
      <nameValuePair>
        <name>InputDirectory</name>
        <value>
          <string>C:/Program Files/apache/uima/examples/data</string>
        </value>
      </nameValuePair>
    </configurationParameterSettings>

    <!-- Type System of CASes returned by this Collection Reader -->

    <typeSystemDescription>
      <imports>
        <import name="org.apache.uima.examples.SourceDocumentInformation"/>
      </imports>
    </typeSystemDescription>

    <capabilities>
      <capability>
        <inputs/>
        <outputs>
          <type allAnnotatorFeatures="true">
            org.apache.uima.examples.SourceDocumentInformation
          </type>
        </outputs>
      </capability>
    </capabilities>
    <operationalProperties>
      <modifiesCas>true</modifiesCas>
      <multipleDeploymentAllowed>false</multipleDeploymentAllowed>
      <outputsNewCASes>true</outputsNewCASes>
    </operationalProperties>
  </processingResourceMetaData>
</collectionReaderDescription>Note
CAS Initializers are now deprecated (as of version 2.1). For complex initialization, please use instead the capabilities of creating additional Subjects of Analysis (see Chapter 6, Multiple CAS Views of an Artifact ).
In UIMA 1.x, the CAS Initializer component was intended to be used as a plug-in to the Collection Reader for when the task of populating the CAS from a raw document is complex and might be reusable with other data collections.
A CAS Initializer Java class must implement the interface
org.apache.uima.collection.CasInitializer, and will also
generally extend from the convenience base class
org.apache.uima.collection.CasInitializer_ImplBase. A
CAS Initializer also must have an XML descriptor, which has the exact same form as a
Collection Reader Descriptor except that the outer tag is
<casInitializerDescription>.
CAS Initializers have optional initialize(),
reconfigure(), and typeSystemInit()
methods, which perform the same functions as they do for Collection Readers. The only
required method for a CAS Initializer is initializeCas(Object,
CAS). This method takes the raw document (for example, an
InputStream object from which the document can be read) and a
CAS, and populates the CAS from the document.
Note
In version 2, there is no difference in capability
between CAS Consumers and ordinary Analysis Engines, except for the default setting of
the XML parameters for multipleDeploymentAllowed and
modifiesCas. We recommend for future work that users implement
and use Analysis Engine components instead of CAS Consumers.
The rest of this section is written using the version 1 style of CAS Consumer;
the methods described are also available for Analysis Engines. Note that the
CAS Consumer processCAS method is equivalent to the Analysis Engine
process method.
A CAS Consumer receives each CAS after it has been analyzed by the Analysis Engine. CAS Consumers typically do not update the CAS; they typically extract data from the CAS and persist selected information to aggregate data structures such as search engine indexes or databases.
A CAS Consumer Java class must implement the interface
org.apache.uima.collection.CasConsumer, and will also
generally extend from the convenience base class
org.apache.uima.collection.CasConsumer_ImplBase. A CAS
Consumer also must have an XML descriptor, which has the exact same form as a
Collection Reader Descriptor except that the outer tag is
<casConsumerDescription>.
CAS Consumers have optional initialize(),
reconfigure(), and typeSystemInit()
methods, which perform the same functions as they do for Collection Readers and CAS
Initializers. The only required method for a CAS Consumer is
processCas(CAS), which is where the CAS Consumer does the bulk
of its work (i.e., consume the CAS).
The CasConsumer interface (as well as the version 2
Analysis Engine interfac) additionally defines batch
and collection level processing methods. The CAS Consumer or Analysis Engine
can implement the
batchProcessComplete() method to perform processing that
should occur at the end of each batch of CASes. Similarly, the CAS Consumer
or Analysis Engine can
implement the collectionProcessComplete() method to
perform any collection level processing at the end of the collection.
A very simple example of a CAS Consumer, which writes an XML representation of the
CAS to a file, is the XMI Writer CAS Consumer. The Java code is in the class
org.apache.uima.examples.cpe.XmiWriterCasConsumer and
the descriptor is in
%UIMA_HOME%/examples/descriptors/cas_consumer/XmiWriterCasConsumer.xml
.
When extending the convenience class
org.apache.uima.collection.CasConsumer_ImplBase, the
following abstract methods must be implemented:
The initialize() method is called by the framework
when the CAS Consumer is first created.
CasConsumer_ImplBase actually provides a default
implementation of this method (i.e., it is not abstract), so you are not strictly
required to implement this method. However, a typical CAS Consumer will
implement this method to obtain parameter values and perform various
initialization steps.
In this method, the CAS Consumer can access the values of its configuration parameters and perform other initialization logic. The example XMI Writer CAS Consumer reads its configuration parameters and sets up the output directory:
public void initialize() throws ResourceInitializationException {
  mDocNum = 0;
  mOutputDir = new File((String) getConfigParameterValue(PARAM_OUTPUTDIR));
  if (!mOutputDir.exists()) {
    mOutputDir.mkdirs();
  }
}The processCas() method is where the CAS Consumer
does most of its work. In our example, the XMI Writer CAS Consumer obtains an
iterator over the document metadata in the CAS (in the
SourceDocumentInformation feature structure, which is created by the File
System Collection Reader) and extracts the URI for the current document. From
this the output filename is constructed in the output directory and a subroutine
(writeXmi) is called to generate the output file. The
writeXmi subroutine uses the
XmiCasSerializer class provided with the UIMA SDK to
serialize the CAS to the output file (see the example source code for
details).
public void processCas(CAS aCAS) throws ResourceProcessException {
  String modelFileName = null;

  JCas jcas;
  try {
    jcas = aCAS.getJCas();
  } catch (CASException e) {
    throw new ResourceProcessException(e);
  }

    // retreive the filename of the input file from the CAS
  FSIterator it = jcas
            .getAnnotationIndex(SourceDocumentInformation.type)
                  .iterator();
  File outFile = null;
  if (it.hasNext()) {
    SourceDocumentInformation fileLoc =
            (SourceDocumentInformation) it.next();
    File inFile;
    try {
      inFile = new File(new URL(fileLoc.getUri()).getPath());
      String outFileName = inFile.getName();
      if (fileLoc.getOffsetInSource() > 0) {
        outFileName += ("_" + fileLoc.getOffsetInSource());
      }
      outFileName += ".xmi";
      outFile = new File(mOutputDir, outFileName);
      modelFileName = mOutputDir.getAbsolutePath() +
            "/" + inFile.getName() + ".ecore";
    } catch (MalformedURLException e1) {
      // invalid URL, use default processing below
    }
  }
  if (outFile == null) {
    outFile = new File(mOutputDir, "doc" + mDocNum++);
  }
  // serialize XCAS and write to output file
  try {
    writeXmi(jcas.getCas(), outFile, modelFileName);
  } catch (IOException e) {
    throw new ResourceProcessException(e);
  } catch (SAXException e) {
    throw new ResourceProcessException(e);
  }
}The following methods are optional in a CAS Consumer, though they are often used.
The framework calls the batchProcessComplete() method at the end of each batch of CASes. This gives the CAS Consumer or Analysis Engine an opportunity to perform any batch level processing. Our simple XMI Writer CAS Consumer does not perform any batch level processing, so this method is empty. Batch size is set in the Collection Processing Engine descriptor.
The framework calls the collectionProcessComplete() method at the end of the collection (i.e., when all objects in the collection have been processed). At this point in time, no CAS is passed in as a parameter. This gives the CAS Consumer or Analysis Engine an opportunity to perform collection processing over the entire set of objects in the collection. Our simple XMI Writer CAS Consumer does not perform any collection level processing, so this method is empty.
The CPM provides a number of service and deployment options that cover instantiation and execution of CPEs, error recovery, and local and distributed deployment of the CPE components. The behavior of the CPM (and correspondingly, the CPE) is controlled by various options and parameters set in the CPE descriptor. The current version of the CPE Configurator tool, however, supports only default error handling and deployment options. To change these options, you must manually edit the CPE descriptor.
Eventually the CPE Configurator tool will support configuring these options and a detailed tutorial for these settings will be provided. In the meantime, we provide only a high-level, conceptual overview of these advanced features in the rest of this chapter, and refer the advanced user to Chapter 3, Collection Processing Engine Descriptor Reference in UIMA References for details on setting these options in the CPE Descriptor.
Figure 2.2, “CPE Instantiation” shows a logical view of how an application uses the UIMA framework to instantiate a CPE from a CPE descriptor. The CPE descriptor identifies the CPE components (referencing their corresponding descriptors) and specifies the various options for configuring the CPM and deploying the CPE components.
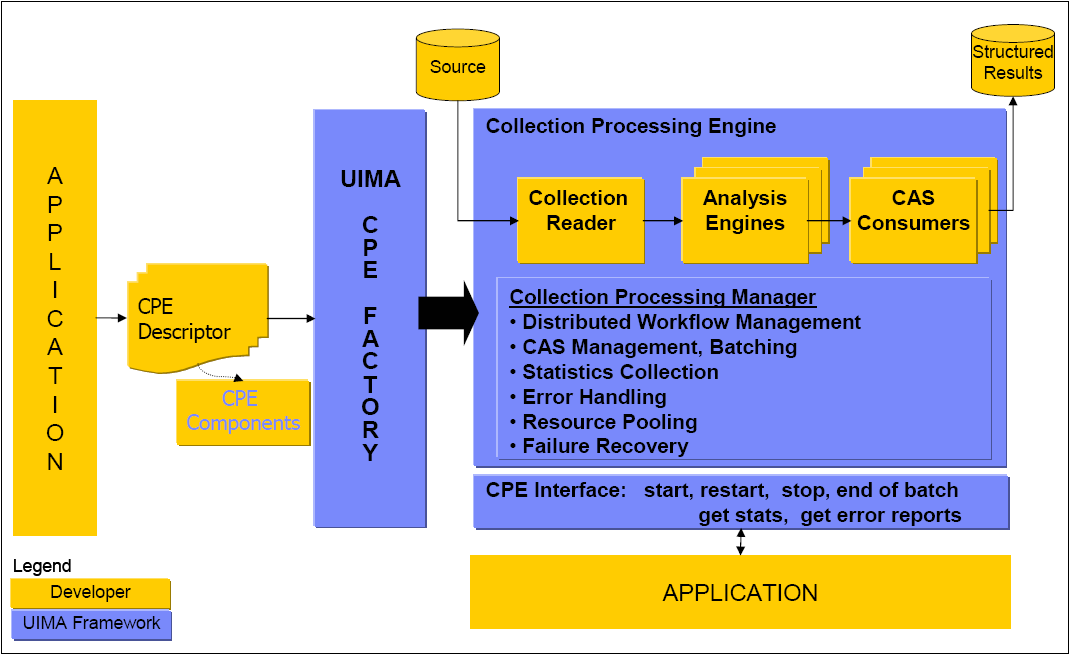
There are three deployment modes for CAS Processors (Analysis Engines and CAS Consumers) in a CPE:
Integrated (runs in the same Java instance as the CPM)
Managed (runs in a separate process on the same machine), and
Non-managed (runs in a separate process, perhaps on a different machine).
An integrated CAS Processor runs in the same JVM as the CPE. A managed CAS Processor runs in a separate process from the CPE, but still on the same computer. The CPE controls startup, shutdown, and recovery of a managed CAS Processor. A non-managed CAS Processor runs as a service and may be on the same computer as the CPE or on a remote computer. A non-managed CAS Processor service is started and managed independently from the CPE.
For both managed and non-managed CAS Processors, the CAS must be transmitted between separate processes and possibly between separate computers. This is accomplished using Vinci, a communication protocol used by the CPM and which is provided as a part of Apache UIMA. Vinci handles service naming and location and data transport (see Section 3.6.2, “Deploying as a Vinci Service” for more information). Service naming and location are provided by a Vinci Naming Service, or VNS. For managed CAS Processors, the CPE uses its own internal VNS. For non-managed CAS Processors, a separate VNS must be running.
Note
The UIMA SDK also supports using unmanaged remote services via the web-standard SOAP communications protocol (see Section 3.6.1, “Deploying as SOAP Service”. This approach is based on a proxy implementation, where the proxy is essentially running in an integrated mode. To use this approach with the CPM, use the Integrated mode, with the component being an Aggregate which, in turn, connects to a remote service.
The CPE Configurator tool currently only supports constructing CPEs that deploy CAS Processors in integrated mode. To deploy CAS Processors in any other mode, the CPE descriptor must be edited by hand (better tooling may be provided later). Details on the CPE descriptor and the required settings for various CAS Processor deployment modes can be found in Chapter 3, Collection Processing Engine Descriptor Reference in UIMA References . In the following sections we merely summarize the various CAS Processor deployment options.
Managed CAS Processor deployment is shown in Figure 2.3, “CPE with Managed CAS Processors”. A managed CAS Processor is deployed by the CPE as a Vinci service. The CPE manages the lifecycle of the CAS Processor including service launch, restart on failures, and service shutdown. A managed CAS Processor runs on the same machine as the CPE, but in a separate process. This provides the necessary fault isolation for the CPE to protect it from non-robust CAS Processors. A fatal failure of a managed CAS Processor does not threaten the stability of the CPE.
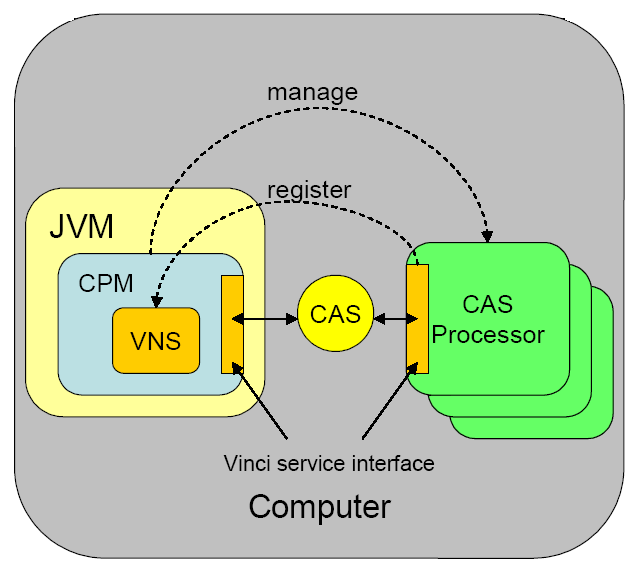
The CPE communicates with managed CAS Processors using the Vinci communication
protocol. A CAS Processor is launched as a Vinci service and its
process() method is invoked remotely via a Vinci command. The
CPE uses its own internal VNS to support managed CAS processors. The VNS, by default,
listens on port 9005. If this port is not available, the VNS will increment its listen
port until it finds one that is available. All managed CAS Processors are internally
configured to “talk” to the CPE managed VNS. This internal VNS is
transparent to the end user launching the CPE.
To deploy a managed CAS Processor, the CPE deployer must change the CPE descriptor. The following is a section from the CPE descriptor that shows an example configuration specifying a managed CAS Processor.
<casProcessor deployment="local" name="Meeting Detector TAE">
  <descriptor>
    <include href="deploy/vinci/Deploy_MeetingDetectorTAE.xml"/>
  </descriptor>
  <runInSeparateProcess>
    <exec dir="." executable="java">
      <env key="CLASSPATH"
         value="src;C:/Program Files/apache/uima/lib/uima-core.jar;
                    C:/Program Files/apache/uima/lib/uima-cpe.jar;
                    C:/Program Files/apache/uima/lib/uima-examples.jar;
                    C:/Program Files/apache/uima/lib/uima-adapter-vinci.jar;
                    C:/Program Files/apache/uima/lib/jVinci.jar"/>
      <arg>-DLOG=C:/Temp/service.log</arg>
      <arg>org.apache.uima.reference_impl.collection.
         service.vinci.VinciAnalysisEnginerService_impl</arg>
      <arg>${descriptor}</arg>
    </exec>
  </runInSeparateProcess>
  <deploymentParameters/>
  <filter/>
  <errorHandling>
    <errorRateThreshold action="terminate" value="1/100"/>
    <maxConsecutiveRestarts action="terminate" value="3"/>
    <timeout max="100000"/>
  </errorHandling>
  <checkpoint batch="10000"/>
</casProcessor>
See Chapter 3, Collection Processing Engine Descriptor Reference in UIMA References for details and required settings.
Non-managed CAS Processor deployment is shown in Figure 2.4, “CPE with non-managed CAS Processors”. In non-managed mode, the CPE supports connectivity to CAS Processors running on local or remote computers using Vinci. Non-managed processors are different from managed processors in two aspects:
Non-managed processors are neither started nor stopped by the CPE.
Non-managed processors use an independent VNS, also neither started nor stopped by the CPE.
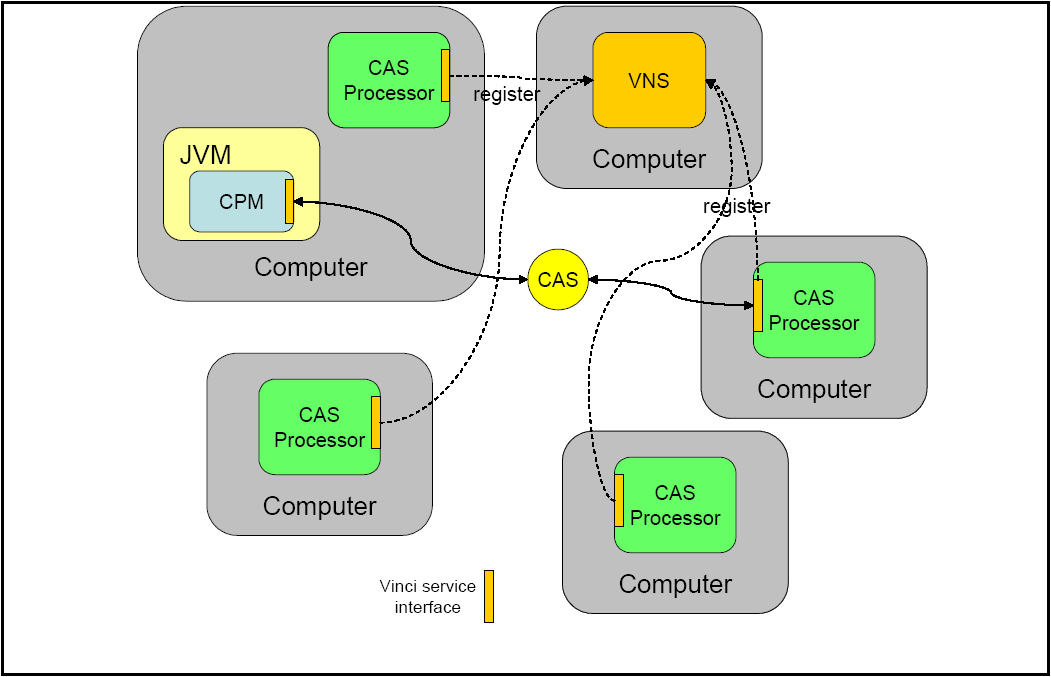
While non-managed CAS Processors provide the same level of fault isolation and robustness as managed CAS Processors, error recovery support for non-managed CAS Processors is much more limited. In particular, the CPE cannot restart a non-managed CAS Processor after an error.
Non-managed CAS Processors also require a separate Vinci Naming Service running on the network. This VNS must be manually started and monitored by the end user or application. Instructions for running a VNS can be found in Section 3.6.5.1, “Starting VNS”.
To deploy a non-managed CAS Processor, the CPE deployer must change the CPE descriptor. The following is a section from the CPE descriptor that shows an example configuration for the non-managed CAS Processor.
<casProcessor deployment="remote" name="Meeting Detector TAE">
  <descriptor>
    <include href=
        "descriptors/vinciService/MeetingDetectorVinciService.xml"/>
  </descriptor>
  <deploymentParameters/>
  <filter/>
  <errorHandling>
    <errorRateThreshold action="terminate" value="1/100"/>
    <maxConsecutiveRestarts action="terminate" value="3"/>
    <timeout max="100000"/>
  </errorHandling>
  <checkpoint batch="10000"/>
</casProcessor>
See Chapter 3, Collection Processing Engine Descriptor Reference in UIMA References for details and required settings.
Integrated CAS Processors are shown in Figure 2.5, “CPE with integrated CAS Processor”. Here the CAS Processors run in the same JVM as the CPE, just like the Collection Reader and CAS Initializer. This deployment method results in minimal CAS communication and transport overhead as the CAS is shared in the same process space of the JVM. However, a CPE running with all integrated CAS Processors is limited in scalability by the capability of the single computer on which the CPE is running. There is also a stability risk associated with integrated processors because a poorly written CAS Processor can cause the JVM, and hence the entire CPE, to abort.
The following is a section from a CPE descriptor that shows an example configuration for the integrated CAS Processor.
<casProcessor deployment=“integrated” name=“Meeting Detector TAE”>
  <descriptor>
    <include href="descriptors/tutorial/ex4/MeetingDetectorTAE.xml"/>
  </descriptor>
  <deploymentParameters/>
  <filter/>
  <errorHandling>
    <errorRateThreshold action="terminate" value="100/1000"/>
    <maxConsecutiveRestarts action="terminate" value="30"/>
    <timeout max="100000"/>
  </errorHandling>
  <checkpoint batch="10000"/>
</casProcessor>
See Chapter 3, Collection Processing Engine Descriptor Reference in UIMA References for details and required settings.
The UIMA SDK includes a set of examples illustrating the three modes of deployment,
integrated, managed, and non-managed. These are in the
/examples/descriptors/collection_processing_engine
directory. There are three CPE descriptors that run an example annotator (the Meeting
Finder) in these modes.
To run either the integrated or managed examples, use the
runCPE script in the /bin directory of the UIMA installation,
passing the appropriate CPE descriptor as an argument, or
if you're using Eclipse and have the uimaj-examples project in your
workspace, you can use the Eclipse Menu → Run → Run... → and then pick the
launch configuration “UIMA Run CPE”.
Note
The runCPE script must
be run from the %UIMA_HOME%\examples directory, because the example
CPE descriptors use relative path names that are resolved relative to this working directory.
For instance,
runCPE
descriptors\collection_processing_engine\MeetingFinderCPE_Integrated.xml
To run the non-managed example, there are some additional steps.
Start a VNS service by running the
startVNSscript in the/bindirectory, or using the Eclipse launcher “UIMA Start Vinci Service”.Deploy the Meeting Detector Analysis Engine as a Vinci service, by running the
startVinciServicescript in the/bindirectory or using the Eclipse launcher for this, and passing it the location of the descriptor to deploy, in this case%UIMA_HOME%/examples/deploy/vinci/Deploy_MeetingDetectorTAE.xml, or if you're using Eclipse and have theuimaj-examplesproject in your workspace, you can use the Eclipse Menu → Run → Run... → and then pick the launch configuration “UIMA Start Vinci Service”.Now, run the runCPE script (or if in Eclipse, run the launch configuration “UIMA Run CPE”), passing it the CPE for the non-managed version
(%UIMA_HOME%/examples/descriptors/collection_processing_engine/
            MeetingFinderCPE_NonManaged.xml
).
This assumes that the Vinci Naming Service, the runCPE application, and the
MeetingDetectorTAE service are all running on the same machine.
Most of the scripts that need information about VNS will look for values to use in
environment variables VNS_HOST and VNS_PORT; these default to
“localhost” and “9000”. You may set these to appropriate
values before running the scripts, as needed; you can also pass the name of the VNS host as
the second argument to the startVinciService script.
Alternatively, you can edit the scripts and/or the XML files to specify
alternatives for the VNS_HOST and VNS_PORT. For instance, if the
runCPE application is running on a different machine from the
Vinci Naming Service, you can edit the
MeetingFinderCPE_NonManaged.xml and change the vnsHost
parameter:
<parameter name="vnsHost" value="localhost" type="string"/>
to specify the VNS host instead of “localhost”.
[4] CAS Initializers are deprecated in favor of a more general mechanism, multiple subjects of analysis.
[5] There is also a fourth pane,
for the CAS Initializer, but it is hidden by default. To enable it click the
View → CAS Initializer Panel menu item.
[6] Replace
%UIMA_HOME% with the path to where you installed UIMA.
This chapter describes how to develop an application using the Unstructured Information Management Architecture (UIMA). The term application describes a program that provides end-user functionality. A UIMA application incorporates one or more UIMA components such as Analysis Engines, Collection Processing Engines, a Search Engine, and/or a Document Store and adds application-specific logic and user interfaces.
An application developer's starting point for accessing UIMA framework functionality is the
org.apache.uima.UIMAFramework class. The following is a short introduction to some
important methods on this class. Several of these methods are used in examples in the rest of this chapter. For
more details, see the JavaDocs (in the docs/api directory of the UIMA SDK).
UIMAFramework.getXMLParser(): Returns an instance of the UIMA XML Parser class, which then can be used to parse the various types of UIMA component descriptors. Examples of this can be found in the remainder of this chapter.
UIMAFramework.produceXXX(ResourceSpecifier): There are various produce methods that are used to create different types of UIMA components from their descriptors. The argument type, ResourceSpecifier, is the base interface that subsumes all types of component descriptors in UIMA. You can get a ResourceSpecifier from the XMLParser. Examples of produce methods are:
produceAnalysisEngine
produceCasConsumer
produceCasInitializer
produceCollectionProcessingEngine
produceCollectionReader
There are other variations of each of these methods that take additional, optional arguments. See the JavaDocs for details.
UIMAFramework.getLogger(<optional-logger-name>): Gets a reference to the UIMA Logger, to which you can write log messages. If no logger name is passed, the name of the returned logger instance is “org.apache.uima”.
UIMAFramework.getVersionString(): Gets the number of the UIMA version you are using.
UIMAFramework.newDefaultResourceManager(): Gets an instance of the UIMA ResourceManager. The key method on ResourceManager is setDataPath, which allows you to specify the location where UIMA components will go to look for their external resource files. Once you've obtained and initialized a ResourceManager, you can pass it to any of the produceXXX methods.
This section describes how to add analysis capability to your application by using Analysis Engines developed using the UIMA SDK. An Analysis Engine (AE) is a component that analyzes artifacts (e.g. documents) and infers information about them.
An Analysis Engine consists of two parts - Java classes (typically packaged as one or more JAR files) and AE descriptors (one or more XML files). You must put the Java classes in your application's class path, but thereafter you will not need to directly interact with them. The UIMA framework insulates you from this by providing a standard AnalysisEngine interfaces.
The term Text Analysis Engine (TAE) is sometimes used to describe an Analysis Engine that analyzes a text document. In the UIMA SDK v1.x, there was a TextAnalysisEngine interface that was commonly used. However, as of the UIMA SDK v2.0, this interface has been deprecated and all applications should switch to using the standard AnalysisEngine interface.
The AE descriptor XML files contain the configuration settings for the Analysis Engine as well as a description of the AE's input and output requirements. You may need to edit these files in order to configure the AE appropriately for your application - the supplier of the AE may have provided documentation (or comments in the XML descriptor itself) about how to do this.
The following code shows how to instantiate an AE from its XML descriptor:
  //get Resource Specifier from XML file
XMLInputSource in = new XMLInputSource("MyDescriptor.xml");
ResourceSpecifier specifier =
    UIMAFramework.getXMLParser().parseResourceSpecifier(in);

  //create AE here
AnalysisEngine ae =
    UIMAFramework.produceAnalysisEngine(specifier);
The first two lines parse the XML descriptor (for AEs with multiple descriptor files, one of them is the
“main” descriptor - the AE documentation should indicate which it is). The result of the parse
is a ResourceSpecifier object. The third line of code invokes a static factory method
UIMAFramework.produceAnalysisEngine, which takes the specifier and instantiates
an AnalysisEngine object.
There is one caveat to using this approach - the Analysis Engine instance that you create will not support multiple threads running through it concurrently. If you need to support this, see Section 3.2.5, “Multi-threaded Applications”.
There are two ways to use the AE interface to analyze documents. You can either use the JCas interface, which is described in detail by Chapter 5, JCas Reference in UIMA References or you can directly use the CAS interface, which is described in detail in Chapter 4, CAS Reference in UIMA References. Besides text documents, other kinds of artifacts can also be analyzed; see Chapter 5, Annotations, Artifacts, and Sofas for more information.
The basic structure of your application will look similar in both cases:
Using the JCas
  //create a JCas, given an Analysis Engine (ae)
JCas jcas = ae.newJCas();

  //analyze a document
jcas.setDocumentText(doc1text);
ae.process(jcas);
doSomethingWithResults(jcas);
jcas.reset();

  //analyze another document
jcas.setDocumentText(doc2text);
ae.process(jcas);
doSomethingWithResults(jcas);
jcas.reset();
...
  //done
ae.destroy();
Using the CAS
//create a CAS
CAS aCasView = ae.newCAS();

//analyze a document
aCasView.setDocumentText(doc1text);
ae.process(aCasView);
doSomethingWithResults(aCasView);
aCasView.reset();

//analyze another document
aCasView.setDocumentText(doc2text);
ae.process(aCasView);
doSomethingWithResults(aCasView);
aCasView.reset();
...
//done
ae.destroy();
First, you create the CAS or JCas that you will use. Then, you repeat the following four steps for each document:
Put the document text into the CAS or JCas.
Call the AE's process method, passing the CAS or JCas as an argument
Do something with the results that the AE has added to the CAS or JCas
Call the CAS's or JCas's reset() method to prepare for another analysis
Analyzing non-text artifacts is similar to analyzing text documents. The main difference is that
instead of using the setDocumentText method, you need to use the Sofa APIs to set the
artifact into the CAS. See Chapter 5, Annotations, Artifacts, and Sofas
for details.
Annotators (and applications) access the results of analysis via the CAS, using the CAS or JCas
interfaces. These results are accessed using the CAS Indexes. There is one built-in index for instances of
the built-in type uima.tcas.Annotation that can be used to retrieve instances of
Annotation or any subtype of Annotation. You can also define additional indexes over
other types.
Indexes provide a method to obtain an iterators over their contents; the iterator returns the matching elements one at time from the CAS.
See:
Chapter 5, JCas Reference in UIMA References
The JavaDocs for
org.apache.uima.jcas.JCas.
See:
Chapter 4, CAS Reference in UIMA References
The source code for
org.apache.uima.examples.PrintAnnotations, which is inexamples\src.The JavaDocs for the
org.apache.uima.casandorg.apache.uima.cas.textpackages.
The simplest way to use an AE in a multi-threaded environment is to use the Java synchronized keyword to ensure that only one thread is using an AE at any given time. For example:
public class MyApplication {
  private AnalysisEngine mAnalysisEngine;
  private CAS mCAS;

  public MyApplication() {
    //get Resource Specifier from XML file
    XMLInputSource in = new XMLInputSource("MyDescriptor.xml");
    ResourceSpecifier specifier =
        UIMAFramework.getXMLParser().parseResourceSpecifier(in);

    //create Analysis Engine here
    mAnalysisEngine = UIMAFramework.produceAnalysisEngine(specifier);
    mCAS = mAnalysisEngine.newCAS();
  }

  // Assume some other part of your multi-threaded application could
  // call “analyzeDocument” on different threads, asynchronusly

  public synchronized void analyzeDocument(String aDoc) {
    //analyze a document
    mCAS.setDocumentText(aDoc);
    mAnalysisEngine.process();
    doSomethingWithResults(mCAS);
    mCAS.reset();
  }
  ...
}
Without the synchronized keyword, this application would not be thread-safe. If multiple threads called the analyzeDocument method simultaneously, they would both use the same CAS and clobber each others' results. The synchronized keyword ensures that no more than one thread is executing this method at any given time. For more information on thread synchronization in Java, see http://java.sun.com/docs/books/tutorial/essential/threads/multithreaded.html .
The synchronized keyword ensures thread-safety, but does not allow you to process more than one document at a time. If you need to process multiple documents simultaneously (for example, to make use of a multiprocessor machine), you'll need to use more than one CAS instance.
Because CAS instances use memory and can take some time to construct, you don't want to create a new CAS
instance for each request. Instead, you should use a feature of the UIMA SDK called the CAS
Pool, implemented by the type CasPool.
A CAS Pool contains some number of CAS instances (you specify how many when you create the pool). When a thread wants to use a CAS, it checks out an instance from the pool. When the thread is done using the CAS, it must release the CAS instance back into the pool. If all instances are checked out, additional threads will block and wait for an instance to become available. Here is some example code:
public class MyApplication {
  private CasPool mCasPool;

  private AnalysisEngine mAnalysisEngine;

  public MyApplication()
  {
    //get Resource Specifier from XML file
    XMLInputSource in = new XMLInputSource("MyDescriptor.xml");
    ResourceSpecifier specifier =
      UIMAFramework.getXMLParser().parseResourceSpecifier(in);

    //create multithreadable AE that will
    //accept 3 simultaneous requests
    mAnalysisEngine = UIMAFramework.produceAnalysisEngine(specifier,3);

    //create CAS pool with 3 CAS instances
    mCasPool = new CasPool(mAnalysisEngine,3);
  }

  public void analyzeDocument(String aDoc) {
    //check out a CAS instance (argument 0 means no timeout)
    CAS cas = mCasPool.getCas(0);
    try {
      //analyze a document
      cas.setDocumentText(aDoc);
      mAnalysisEngine.process(cas);
      doSomethingWithResults(cas);
    } finally {
      //MAKE SURE we release the CAS instance
      mCasPool.releaseCas(cas);
    }
  }
  ...
}
There is not much more code required here than in the previous example. First, there is one additional parameter to the AnalysisEngine producer, specifying the number of annotator instances to create[7]. Then, instead of creating a single CAS in the constructor, we now create a CasPool containing 3 instances. In the analyze method, we check out a CAS, use it, and then release it.
Note
Frequently, the two numbers (number of CASes, and the number of AEs) will be the same. It would not make sense to have the number of CASes less than the number of AEs – the extra AE instances would always block waiting for a CAS from the pool. It could make sense to have additional CASes, though – if you had other multi-threaded processes that were using the CASes, other than the AEs.
The getCAS() method returns a CAS which is not specialized to any particular subject of analysis. To process things other than this, please refer to Chapter 5, Annotations, Artifacts, and Sofas .
Note the use of the try...finally block. This is very important, as it ensures that the CAS we have checked out will be released back into the pool, even if the analysis code throws an exception. You should always use try...finally when using the CAS pool; if you do not, you risk exhausting the pool and causing deadlock.
The parameter 0 passed to the CasPool.getCas() method is a timeout value. If this is set to a positive integer, it is the maximum number of milliseconds that the thread will wait for an instance to become available in the pool. If this time elapses, the getCas method will return null, and the application can do something intelligent, like ask the user to try again later. A value of 0 will cause the thread to wait for an available CAS, potentially forever.
In most cases, the easiest way to use multiple Analysis Engines from within an application is to combine them into an aggregate AE. For instructions, see Section 1.3, “Building Aggregate Analysis Engines”. Be sure that you understand this method before deciding to use the more advanced feature described in this section.
If you decide that your application does need to instantiate multiple AEs and have those AEs share a
single CAS, then you will no longer be able to use the various methods on the
AnalysisEngine class that create CASes (or JCases) to create your CAS. This is because
these methods create a CAS with a data model specific to a single AE and which therefore cannot be shared by
other AEs. Instead, you create a CAS as follows:
Suppose you have two analysis engines, and one CAS Consumer, and you want to create one type system from the merge of all of their type specifications. Then you can do the following:
AnalysisEngineDescription aeDesc1 =
  UIMAFramework.getXMLParser().parseAnalysisEngineDescription(...);

  AnalysisEngineDescription aeDesc2 =
  UIMAFramework.getXMLParser().parseAnalysisEngineDescription(...);

  CasConsumerDescription ccDesc =
  UIMAFramework.getXMLParser().parseCasConsumerDescription(...);

  List list = new ArrayList();

  list.add(aeDesc1);
  list.add(aeDesc2);
  list.add(ccDesc);

  CAS cas = CasCreationUtils.createCas(list);

  // (optional, if using the JCas interface)
  JCas jcas = cas.getJCas();
The CasCreationUtils class takes care of the work of merging the AEs' type systems and producing a CAS for the combined type system. If the type systems are not compatible, an exception will be thrown.
The UIMA framework provides APIs to save and restore the contents of a CAS to streams. The CASes are stored in an XML format. There are two forms of this format. The preferred form is the XMI form (see Section 8.3, “Using XMI CAS Serialization”). An older format is also available, called XCAS.
To save an XMI representation of a CAS, use the serialize method of the class
org.apache.uima.util.XmlCasSerializer. To save an XCAS representation of a CAS,
use the class org.apache.uima.cas.impl.XCASSerializer instead; see the JavaDocs
for details.
Both of these external forms can be read back in, using the deserialize method of
the class org.apache.uima.util.XmlCasDeserializer. This method deserializes
into a pre-existing CAS, which you must create ahead of time, pre-set-up with the proper type system. See the
JavaDocs for details.
A Collection Processing Engine (CPE) processes collections of artifacts (documents) through the combination of the following components: a Collection Reader, an optional CAS Initializer, Analysis Engines, and CAS Consumers. Collection Processing Engines and their components are described in Chapter 2, Collection Processing Engine Developer's Guide .
Like Analysis Engines, CPEs consist of a set of Java classes and a set of descriptors. You need to make sure the Java classes are in your classpath, but otherwise you only deal with descriptors.
Section 2.3, “Running a CPE from Your Own Java Application” describes how to use the APIs to read a CPE descriptor and run it from an application.
For the finest level of control over the CPE descriptor settings, the CPE offers programmatic access to the descriptor via an API. With this API, a developer can create a complete descriptor and then save the result to a file. This also can be used to read in a descriptor (using XMLParser.parseCpeDescription as shown in the previous section), modify it, and write it back out again. The CPE Descriptor API allows a developer to redefine default behavior related to error handling for each component, turn-on check-pointing, change performance characteristics of the CPE, and plug-in a custom timer.
Below is some example code that illustrates how this works. See the JavaDocs for package org.apache.uima.collection.metadata for more details.
//Creates descriptor with default settings
CpeDescription cpe = CpeDescriptorFactory.produceDescriptor();

//Add CollectionReader
cpe.addCollectionReader([descriptor]);

//Add CasInitializer (deprecated)
cpe.addCasInitializer(<cas initializer descriptor>);

// Provide the number of CASes the CPE will use
cpe.setCasPoolSize(2);

//  Define and add Analysis Engine
CpeIntegratedCasProcessor personTitleProcessor =
   CpeDescriptorFactory.produceCasProcessor (“Person”);

// Provide descriptor for the Analysis Engine
personTitleProcessor.setDescriptor([descriptor]);

//Continue, despite errors and skip bad Cas
personTitleProcessor.setActionOnMaxError(“terminate”);

  //Increase amount of time in ms the CPE waits for response
//from this Analysis Engine
personTitleProcessor.setTimeout(100000);

//Add Analysis Engine to the descriptor
cpe.addCasProcessor(personTitleProcessor);

//  Define and add CAS Consumer
CpeIntegratedCasProcessor consumerProcessor =
CpeDescriptorFactory.produceCasProcessor(“Printer”);
consumerProcessor.setDescriptor([descriptor]);

//Define batch size
consumerProcessor.setBatchSize(100);

//Terminate CPE on max errors
personTitleProcessor.setActionOnMaxError(“terminate”);

//Add CAS Consumer to the descriptor
cpe.addCasProcessor(consumerProcessor);

//  Add Checkpoint file and define checkpoint frequency (ms)
cpe.setCheckpoint(“[path]/checkpoint.dat”, 3000);

//  Plug in custom timer class used for timing events
cpe.setTimer(“org.apache.uima.internal.util.JavaTimer”);

//  Define number of documents to process
cpe.setNumToProcess(1000);

//  Dump the descriptor to the System.out
((CpeDescriptionImpl)cpe).toXML(System.out);
The CPE descriptor for the above configuration looks like this:
<?xml version="1.0" encoding="UTF-8"?>
<cpeDescription xmlns="http://uima.apache.org/resourceSpecifier">
  <collectionReader>
    <collectionIterator>
      <descriptor>
        <include href="[descriptor]"/>
      </descriptor>
      <configurationParameterSettings>...
      </configurationParameterSettings>
    </collectionIterator>

    <casInitializer>
      <descriptor>
        <include href="[descriptor]"/>
      </descriptor>
      <configurationParameterSettings>...
      </configurationParameterSettings>
    </casInitializer>
  </collectionReader>

  <casProcessors casPoolSize="2" processingUnitThreadCount="1">
    <casProcessor deployment="integrated" name="Person">
      <descriptor>
        <include href="[descriptor]"/>
      </descriptor>
      <deploymentParameters/>
      <errorHandling>
        <errorRateThreshold action="terminate" value="100/1000"/>
        <maxConsecutiveRestarts action="terminate" value="30"/>
        <timeout max="100000"/>
      </errorHandling>
      <checkpoint batch="100" time="1000ms"/>
    </casProcessor>

    <casProcessor deployment="integrated" name="Printer">
      <descriptor>
        <include href="[descriptor]"/>
      </descriptor>
      <deploymentParameters/>
      <errorHandling>
        <errorRateThreshold action="terminate"
          value="100/1000"/>
        <maxConsecutiveRestarts action="terminate"
          value="30"/>
        <timeout max="100000" default="-1"/>
      </errorHandling>
      <checkpoint batch="100" time="1000ms"/>
    </casProcessor>
  </casProcessors>

  <cpeConfig>
    <numToProcess>1000</numToProcess>
    <deployAs>immediate</deployAs>
    <checkpoint file="[path]/checkpoint.dat" time="3000ms"/>
    <timerImpl>
      org.apache.uima.reference_impl.util.JavaTimer
    </timerImpl>
  </cpeConfig>
</cpeDescription>Configuration parameters can be set using APIs as well as configured using the XML descriptor metadata specification (see Section 1.2.1, “Configuration Parameters”.
There are two different places you can set the parameters via the APIs.
After reading the XML descriptor for a component, but before you produce the component itself, and
After the component has been produced.
Setting the parameters before you produce the component is done using the
ConfigurationParameterSettings object. You get an instance of this for a particular component by accessing
that component description's metadata. For instance, if you produced a component description by using
UIMAFramework.getXMLParser().parse... method, you can use that component
description's getMetaData() method to get the metadata, and then the metadata's
getConfigurationParameterSettings method to get the ConfigurationParameterSettings object. Using that
object, you can set individual parameters using the setParameterValue method. Here's an example, for a
CAS Consumer component:
// Create a description object by reading the XML for the descriptor

CasConsumerDescription casConsumerDesc =
   UIMAFramework.getXMLParser().parseCasConsumerDescription(new
     XMLInputSource("descriptors/cas_consumer/InlineXmlCasConsumer.xml"));

// get the settings from the metadata
ConfigurationParameterSettings consumerParamSettings =
    casConsumerDesc.getMetaData().getConfigurationParameterSettings();

// Set a parameter value
consumerParamSettings.setParameterValue(
  InlineXmlCasConsumer.PARAM_OUTPUTDIR,
  outputDir.getAbsolutePath());
Then you might produce this component using:
CasConsumer component =
  UIMAFramework.produceCasConsumer(casConsumerDesc);
A side effect of producing a component is calling the component's “initialize” method, allowing it to read its configuration parameters. If you want to change parameters after this, use
component.setConfigParameterValue(
    “<parameter-name>”,
    “<parameter-value>”);
and then signal the component to re-read its configuration by calling the component's reconfigure method:
component.reconfigure();
Although these examples are for a CAS Consumer component, the parameter APIs also work for other kinds of components.
The UIMA SDK on IBM's alphaWorks http://www.alphaworks.ibm.com/tech/uima includes a semantic search engine that you can use to build a search index that includes the results of the analysis done by your AE. This combination of AEs with a search engine capable of indexing both words and annotations over spans of text enables what UIMA refers to as semantic search. Over time we expect to provide additional information on integrating other open source search engines.
Semantic search is a search where the semantic intent of the query is specified using one or more entity or relation specifiers. For example, one could specify that they are looking for a person (named) “Bush.” Such a query would then not return results about the kind of bushes that grow in your garden.
To build a semantic search index using the UIMA SDK, you run a Collection Processing Engine that includes
your AE along with a CAS Consumer which takes the tokens and annotatitions, together with sentence
boundaries, and feeds them to a semantic searcher's index term input. The alphaWorks semantic search
component includes a CAS Consumer called the Semantic Search CAS Indexer that does
this; this component is available from the alphaWorks site. Your AE must include an annotator that produces
Tokens and Sentence annotations, along with any “semantic” annotations, because the
Indexer requires this. The Semantic Search CAS Indexer's descriptor is located here:
examples/descriptors/cas_consumer/SemanticSearchCasIndexer.xml .
Since there are several ways you might want to build a search index from the information in the CAS
produced by your AE, you need to supply the Semantic Search CAS Consumer – Indexer with
configuration information in the form of an Index Build Specification file.
Apache UIMA includes code for parsing Index Build Specification files (see the Javadocs for details). An
example of an Indexing specification tailored to the AE from the tutorial in the Chapter 1, Annotator and Analysis Engine Developer's Guide
is located in
examples/descriptors/tutorial/search/MeetingIndexBuildSpec.xml . It looks
like this:
<indexBuildSpecification>
  <indexBuildItem>
    <name>org.apache.uima.examples.tokenizer.Token</name>
    <indexRule>
      <style name="Term"/>
    </indexRule>
  </indexBuildItem>
  <indexBuildItem>
    <name>org.apache.uima.examples.tokenizer.Sentence</name>
    <indexRule>
      <style name="Breaking"/>
    </indexRule>
  </indexBuildItem>
  <indexBuildItem>
    <name>org.apache.uima.tutorial.Meeting</name>
    <indexRule>
      <style name="Annotation"/>
    </indexRule>
  </indexBuildItem>
  <indexBuildItem>
    <name>org.apache.uima.tutorial.RoomNumber</name>
    <indexRule>
      <style name="Annotation">
        <attributeMappings>
          <mapping>
            <feature>building</feature>
            <indexName>building</indexName>
          </mapping>
        </attributeMappings>
      </style>
    </indexRule>
  </indexBuildItem>
  <indexBuildItem>
    <name>org.apache.uima.tutorial.DateAnnot</name>
    <indexRule>
      <style name="Annotation"/>
    </indexRule>
  </indexBuildItem>
  <indexBuildItem>
    <name>org.apache.uima.tutorial.TimeAnnot</name>
    <indexRule>
      <style name="Annotation"/>
    </indexRule>
  </indexBuildItem>
</indexBuildSpecification>
The index build specification is a series of index build items, each of which identifies a CAS
annotation type (a subtype of uima.tcas.Annotation – see Chapter 4, CAS Reference
in UIMA References) and a style.
The first item in this example specifies that the annotation type
org.apache.uima.examples.tokenizer.Token should be indexed with the
“Term” style. This means that each span of text annotated by a Token will be considered a
single token for standard text search purposes.
The second item in this example specifies that the annotation type
org.apache.uima.examples.tokenizer.Sentence should be indexed with the
“Breaking” style. This means that each span of text annotated by a Sentence will be
considered a single sentence, which can affect that search engine's algorithm for matching queries. The
semantic search engine available from alphaWorks always requires tokens and sentences in order to index a
document.
Note
Requirements for Term and Breaking rules: The Semantic Search indexer from alphaWorks requires that the items to be indexed as words be designated using the Term rule.
The remaining items all use the “Annotation” style. This indicates that each annotation of the specified types will be stored in the index as a searchable span, with a name equal to the annotation name (without the namespace).
Also, features of annotations can be indexed using the
<attributeMappings> subelement. In the example index build
specification, we declare that the building feature of the type
org.apache.uima.tutorial.RoomNumber should be indexed. The
<indexName> element can be used to map the feature name to a different name in
the index, but in this example we have opted to use the same name, building.
At the end of the batch or collection, the Semantic Search CAS Indexer builds the index. This index can be queried with simple tokens or with XML tags.
Examples:
A query on the word “UIMA” will retrieve all documents that have the occurrence of the word. But a query of the type
<Meeting>UIMA</Meeting>will retrieve only those documents that contain a Meeting annotation (produced by our MeetingDetector TAE, for example), where that Meeting annotation contains the word “UIMA”.A query for
<RoomNumber building="Yorktown"/>will return documents that have a RoomNumber annotation whosebuildingfeature contains the term “Yorktown”.
More information on the syntax of these kinds of queries, called XML Fragments, can be found in
documentation for the semantic search engine component on http://www.alphaworks.ibm.com/tech/uima. For more information on the Index Build
Specification format, see the UIMA JavaDocs for class
org.apache.uima.search.IndexBuildSpecification. Accessing the JavaDocs is
described Chapter 1, Javadocs
in UIMA References.
The following steps illustrate how to build and run a CPE that uses the UIMA Meeting Detector TAE and the Simple Token and Sentence Annotator, discussed in the Chapter 1, Annotator and Analysis Engine Developer's Guide along with a CAS Consumer called the Semantic Search CAS Indexer, to build an index that allows you to query for documents based not only on textual content but also on whether they contain mentions of Meetings detected by the TAE.
Run the CPE Configurator tool by executing the cpeGui shell script in the
bin directory of the UIMA SDK. (For instructions on using this tool, see the Chapter 2, Collection Processing Engine Configurator User's Guide
in UIMA Tools Guide and Reference.)
In the CPE Configurator tool, select the following components by browsing to their descriptors:
Collection Reader:
%UIMA_HOME%/examples/descriptors/collectionReader/
              FileSystemCollectionReader.xml
Analysis Engine: include both of these; one produces tokens/sentences, required by the indexer in all cases and the other produces the meeting annotations of interest.
%UIMA_HOME%/examples/descriptors/analysis_engine/
SimpleTokenAndSentenceAnnotator.xmland %UIMA_HOME%/examples/descriptors/tutorial/ex6/ UIMAMeetingDetectorTAE.xmlTwo CAS Consumers:
%UIMA_HOME%/examples/descriptors/cas_consumer/
SemanticSearchCasIndexer.xml
%UIMA_HOME%/examples/descriptors/cas_consumer/
XmiWriterCasConsumer.xml
Set up parameters:
Set the File System Collection Reader's “Input Directory” parameter to point to the
%UIMA_HOME%/examples/datadirectory.Set the Semantic Search CAS Indexer's “Indexing Specification Descriptor” parameter to point to
%UIMA_HOME%/examples/descriptors/tutorial/search/
              MeetingIndexBuildSpec.xml
Set the Semantic Search CAS Indexer's “Index Dir” parameter to whatever directory into which you want the indexer to write its index files.
Warning
The Indexer erases old versions of the files it creates in this directory.
Set the XMI Writer CAS Consumer's “Output Directory” parameter to whatever directory into which you want to store the XMI files containing the results of your analysis for each document.
Click on the Run Button. Once the run completes, a statistics dialog should appear, in which you can see how much time was spent in each of the components involved in the run.
The Semantic Search component from UIMA on alphaWorks contains a simple tool for running queries
against a semantic search index. After building an index as described in the previous section, you can launch
this tool by running the shell script: semanticSearch, found in the /bin subdirectory
of the Semantic Search UIMA install, at the command prompt. If you are using Eclipse, and have installed the
UIMA examples, there will be a Run configuration you can use to conveniently launch this, called
UIMA Semantic Search. This will display the following screen:
 |
Configure the fields on this screen as follows:
Set the “Index Directory” to the directory where you built your index. This is the same value that you supplied for the “Index Dir” parameter of the Semantic Search CAS Indexer in the CPE Configurator.
Set the “XMI/XCAS Directory” to the directory where you stored the results of your analysis. This is the same value that you supplied for the “Output Directory” parameter of XMI Writer CAS Consumer in the CPE Configurator.
Optionally, set the “Original Documents Directory” to the directory containing the original plain text documents that were analyzed and indexed. This is only needed for the "View Original Document" button.
Set the “Type System Descriptor” to the location of the descriptor that describes your type system. For this example, this will be
%UIMA_HOME%/examples/
              descriptors/tutorial/ex4/TutorialTypeSystem.xml
Now, in the “XML Fragments” field, you can type in single words or XML queries where the XML
tags correspond to the labels in the index build specification file (e.g.
<Meeting>UIMA</Meeting>). XML Fragments are described in the
documentation for the semantic search engine component on http://www.alphaworks.ibm.com/tech/uima.
After you enter a query and click the “Search” button, a list of hits will appear. Select one of the documents and click “View Analysis” to view the document in the UIMA Annotation Viewer.
The source code for the Semantic Search query program is in
examples/src/com/ibm/uima/examples/search/SemanticSearchGUI.java . A simple
command-line query program is also provided in
examples/src/com/ibm/uima/examples/search/SemanticSearch.java . Using these
as a model, you can build a query interface from your own application. For details on the Semantic Search
Engine query language and interface, see the documentation for the semantic search engine component on
http://www.alphaworks.ibm.com/tech/uima.
The UIMA SDK allows you to easily take any Analysis Engine or CAS Consumer and deploy it as a service. That Analysis Engine or CAS Consumer can then be called from a remote machine using various network protocols.
The UIMA SDK provides support for two communications protocols:
SOAP, the standard Web Services protocol
Vinci, a lightweight version of SOAP, included as a part of Apache UIMA.
The UIMA framework can make use of these services in two different ways:
An Analysis Engine can create a proxy to a remote service; this proxy acts like a local component, but connects to the remote. The proxy has limited error handling and retry capabilities. Both Vinci and SOAP are supported.
A Collection Processing Engine can specify non-Integrated mode (see Section 2.5, “Deploying a CPE”. The CPE provides more extensive error recovery capabilities. This mode only supports the Vinci communications protocol.
To deploy a UIMA component as a SOAP Web Service, you need to first install the following software components:
Apache Tomcat 5.0 or 5.5 ( http://jakarta.apache.org/tomcat/)
Apache Axis 1.1 or 1.3 (http://ws.apache.org/axis/)
Later versions of these components will likely also work, but have not been tested.
Next, you need to do the following setup steps:
Set the CATALINA_HOME environment variable to the location where Tomcat is installed.
Copy all of the JAR files from
%UIMA_HOME%/libto the%CATALINA_HOME%/webapps/axis/WEB-INF/libin your installation.Copy your JAR files for the UIMA components that you wish to
%CATALINA_HOME%/webapps/axis/WEB-INF/libin your installation.IMPORTANT: any time you add JAR files to Tomcat (for instance, in the above 2 steps), you must shutdown and restart Tomcat before it “notices” this. So now, please shutdown and restart Tomcat.
All the Java classes for the UIMA Examples are packaged in the
uimaj-examples.jarfile which is included in the%UIMA_HOME%/libfolder.In addition, if an annotator needs to locate resource files in the classpath, those resources must be available in the Axis classpath, so copy these also to
%CATALINA_HOME%/webapps/axis/WEB-INF/classes.As an example, if you are deploying the GovernmentTitleRecognizer (found in
examples/descriptors/analysis_engine/
              GovernmentOfficialRecognizer_RegEx_TAE
) as a SOAP service, you need to copy the fileexamples/resources/GovernmentTitlePatterns.datinto.../WEB-INF/classes.
Test your installation of Tomcat and Axis by starting Tomcat and going to
http://localhost:8080/axis/happyaxis.jsp in your browser. Check to be sure that
this reports that all of the required Axis libraries are present. One common missing file may be
activation.jar, which you can get from java.sun.com.
After completing these setup instructions, you can deploy Analysis Engines or CAS Consumers as SOAP web
services by using the deploytool utility, with is located in the
/bin directory of the UIMA SDK. deploytool is a command line
program utility that takes as an argument a web services deployment descriptors (WSDD file); example WSDD
files are provided in the examples/deploy/soap directory of the UIMA SDK. Deployment
Descriptors have been provided for deploying and undeploying some of the example Analysis Engines that come
with the SDK.
As an example, the WSDD file for deploying the example Person Title annotator looks like this (important parts are in bold italics):
<deployment name="PersonTitleAnnotator"
            xmlns="http://xml.apache.org/axis/wsdd/"
            xmlns:java="http://xml.apache.org/axis/wsdd/providers/java">

  <service name="urn:PersonTitleAnnotator" provider="java:RPC">

    <parameter name="scope" value="Request"/>

    <parameter name="className"
      value="org.apache.uima.reference_impl.analysis_engine
                .service.soap.AxisAnalysisEngineService_impl"/>

    <parameter name="allowedMethods" value="getMetaData process"/>
    <parameter name="allowedRoles" value="*"/>
    <parameter name="resourceSpecifierPath"
      value="C:/Program Files/apache/uima/examples/
           descriptors/analysis_engine/PersonTitleAnnotator.xml"/>

    <parameter name="numInstances" value="3"/>

    <!-- Type Mappings omitted from this document;
          you will not need to edit them. -->

    <typeMapping .../>
    <typeMapping .../>
    <typeMapping .../>

  </service>

</deployment>
To modify this WSDD file to deploy your own Analysis Engine or CAS Consumer, just replace the areas indicated in bold italics (deployment name, service name, and resource specifier path) with values appropriate for your component.
The numInstances parameter specifies how many instances of your Analysis Engine
or CAS Consumer will be created. This allows your service to support multiple clients concurrently. When a
new request comes in, if all of the instances are busy, the new request will wait until an instance becomes
available.
To deploy the Person Title annotator service, issue the following command:
C:/Program Files/apache/uima/bin>deploytool
../examples/deploy/soap/Deploy_PersonTitleAnnotator.wsdd
Test if the deployment was successful by starting up a browser, pointing it to your Tomcat
installation's “axis” webpage (e.g., http://localhost:8080/axis)
and clicking on the List link. This should bring up a page which shows the deployed services, where you should
see the service you just deployed.
The other components can be deployed by replacing
Deploy_PersonTitleAnnotator.wsdd with one of the other Deploy descriptors in the
deploy directory. The deploytool utility can also undeploy services when passed one of the Undeploy
descriptors.
Note
The deploytool shell script assumes that the web services are to be installed at
http://localhost:8080/axis. If this is not the case, you will need to update the shell
script appropriately.
Once you have deployed your component as a web service, you may call it from a remote machine. See Section 3.6.3, “Calling a UIMA Service” for instructions.
There are no software prerequisites for deploying a Vinci service. The necessary libraries are part of the UIMA SDK. However, before you can use Vinci services you need to deploy the Vinci Naming Service (VNS), as described in section Section 3.6.5, “The Vinci Naming Services (VNS)”.
To deploy a service, you have to insure any components you want to include can be found on the class path.
One way to do this is to set the environment variable UIMA_CLASSPATH to the set of class paths you need for any
included components. Then run the startVinciService shell script, which is located
in the bin directory, and pass it the path to a Vinci deployment descriptor, for
example: C:UIMA>bin/startVinciService
../examples/deploy/vinci/Deploy_PersonTitleAnnotator.xml.
If you are running Eclipse, and have the uimaj-examples project
in your workspace, you can use the Eclipse Menu → Run → Run... and then
pick “UIMA Start Vinci Service”.
This example deployment descriptor looks like:
<deployment name="Vinci Person Title Annotator Service">

  <service name="uima.annotator.PersonTitleAnnotator" provider="vinci">

    <parameter name="resourceSpecifierPath"
      value="C:/Program Files/apache/uima/examples/descriptors/
          analysis_engine/PersonTitleAnnotator.xml"/>

    <parameter name="numInstances" value="1"/>

    <parameter name="serverSocketTimeout" value="120000"/>

  </service>

</deployment>
To modify this deployment descriptor to deploy your own Analysis Engine or CAS Consumer, just replace the areas indicated in bold italics (deployment name, service name, and resource specifier path) with values appropriate for your component.
The numInstances parameter specifies how many instances of your Analysis Engine
or CAS Consumer will be created. This allows your service to support multiple clients concurrently. When a
new request comes in, if all of the instances are busy, the new request will wait until an instance becomes
available.
The serverSocketTimeout parameter specifies the number of milliseconds
(default = 5 minutes) that the service will wait between requests to process something. After this amount of
time, the server will presume the client may have gone away - and it “cleans up”, releasing any
resources it is holding. The next call to process on the service will result in a cycle which will cause the
client to re-establish its connection with the service (some additional overhead).
The startVinciService script takes two additional optional parameters. The
first one overrides the value of the VNS_HOST environment variable, allowing you to specify the name server
to use. The second parameter if specified needs to be a unique (on this server) non-negative number,
specifying the instance of this service. When used, this number allows multiple instances of the same named
service to be started on one server; they will all register with the Vinci name service and be made available to
client requests.
Once you have deployed your component as a web service, you may call it from a remote machine. See Section 3.6.3, “Calling a UIMA Service” for instructions.
Once an Analysis Engine or CAS Consumer has been deployed as a service, it can be used from any UIMA application, in the exact same way that a local Analysis Engine or CAS Consumer is used. For example, you can call an Analysis Engine service from the Document Analyzer or use the CPE Configurator to build a CPE that includes Analysis Engine and CAS Consumer services.
To do this, you use a service client descriptor in place of the usual Analysis
Engine or CAS Consumer Descriptor. A service client descriptor is a simple XML file that indicates the
location of the remote service and a few parameters. Example service client descriptors are provided in the
UIMA SDK under the directories examples/descriptors/soapService and
examples/descriptors/vinciService. The contents of these descriptors are
explained below.
Also, before you can call a SOAP service, you need to have the necessary Axis JAR files in your classpath.
If you use any of the scripts in the bin directory of the UIMA installation to launch your
application, such as documentAnalyzer, these JARs are added to the classpath, automatically, using the
CATALINA_HOME environment variable. The required files are the following (all part
of the Apache Axis download)
activation.jar
axis.jar
commons-discovery.jar
commons-logging.jar
jaxrpc.jar
saaj.jar
The descriptor used to call the PersonTitleAnnotator SOAP service from the example above is:
<uriSpecifier xmlns="http://uima.apache.org/resourceSpecifier">
   <resourceType>AnalysisEngine</resourceType>
   <uri>http://localhost:8080/axis/services/urn:PersonTitleAnnotator</uri>
    <protocol>SOAP</protocol>
    <timeout>60000</timeout>
</uriSpecifier>
The <resourceType> element must contain either AnalysisEngine or CasConsumer. This specifies what type of component you expect to be at the specified service address.
The <uri> element describes which service to call. It specifies the host (localhost, in this example) and the service name (urn:PersonTitleAnnotator), which must match the name specified in the deployment descriptor used to deploy the service.
To call a Vinci service, a similar descriptor is used:
<uriSpecifier xmlns="http://uima.apache.org/resourceSpecifier">
   <resourceType>AnalysisEngine</resourceType>
   <uri>uima.annot.PersonTitleAnnotator</uri>
   <protocol>Vinci</protocol>
   <timeout>60000</timeout>
   <parameters>
     <parameter name="VNS_HOST" value="some.internet.ip.name-or-address"/>
     <parameter name="VNS_PORT" value="9000"/>
   </parameters>
</uriSpecifier>
Note that Vinci uses a centralized naming server, so the host where the service is deployed does not
need to be specified. Only a name (uima.annot.PersonTitleAnnotator) is given,
which must match the name specified in the deployment descriptor used to deploy the service.
The host and/or port where your Vinci Naming Service (VNS) server is running can be specified by the
optional <parameter> elements. If not specified, the value is taken from the specification given
your Java command line (if present) using -DVNS_HOST=<host> and
-DVNS_PORT=<port> system arguments. If not specified on the Java command
line, defaults are used: localhost for the VNS_HOST, and 9000
for the VNS_PORT. See the next section for details on setting up a VNS server.
Remotely deployed services are started on remote machines, using UIMA component descriptors on those remote machines. These descriptors supply any configuration and resource parameters for the service (configuration parameters are not transmitted from the calling instance to the remote one). Likewise, the remote descriptors supply the type system specification for the remote annotators that will be run (the type system of the calling instance is not transmitted to the remote one).
The remote service wrapper, when it receives a CAS from the caller, instantiates it for the remote service, making instances of all types which the remote service specifies. Other instances in the incoming CAS for types which the remote service has no type specification for are kept aside, and when the remote service returns the CAS back to the caller, these type instances are re-merged back into the CAS being transmitted back to the caller. Because of this design, a remote service which doesn't declare a type system won't receive any type instances.
Note
This behavior may change in future releases, to one where configuration parameters and / or type systems are transmitted to remote services.
Vinci consists of components for building network-accessible services, clients for accessing those services, and an infrastructure for locating and managing services. The primary infrastructure component is the Vinci directory, known as VNS (for Vinci Naming Service).
On startup, Vinci services locate the VNS and provide it with information that is used by VNS during service discovery. Vinci service provides the name of the host machine on which it runs, and the name of the service. The VNS internally creates a binding for the service name and returns the port number on which the Vinci service will wait for client requests. This VNS stores its bindings in a filesystem in a file called vns.services.
In Vinci, services are identified by their service name. If there is more than one physical service with the same service name, then Vinci assumes they are equivalent and will route queries to them randomly, provided that they are all running on different hosts. You should therefore use a unique service name if you don't want to conflict with other services listed in whatever VNS you have configured jVinci to use.
To run the VNS use the startVNS script found in the
bin directory of the UIMA installation,
or launch it from Eclipse. If you've installed the uimaj-examples project,
it will supply a pre-configured launch script you can access in Eclipse by selecting
Menu → Run → Run... and picking “UIMA Start Vinci Service”.
Note
VNS runs on port 9000 by default so please make sure this port is available. If you see the following exception:
java.net.BindException: Address already in use:

JVM_Bind
it indicates that another process is running on port 9000. In this case, add the parameter -p
<port> to the startVNS command, using
<port> to specify an alternative port to use.
When started, the VNS produces output similar to the following:
[10/6/04 3:44 PM | main] WARNING: Config file doesn't exist,
            creating a new empty config file!
[10/6/04 3:44 PM | main] Loading config file : .vns.services
[10/6/04 3:44 PM | main] Loading workspaces file : .vns.workspaces
[10/6/04 3:44 PM | main] ====================================
(WARNING) Unexpected exception:
java.io.FileNotFoundException: .vns.workspaces (The system cannot find
the file specified)
  at java.io.FileInputStream.open(Native Method)
  at java.io.FileInputStream.<init>(Unknown Source)
  at java.io.FileInputStream.<init>(Unknown Source)
  at java.io.FileReader.<init>(Unknown Source)
  at org.apache.vinci.transport.vns.service.VNS.loadWorkspaces(VNS.java:339)
  at org.apache.vinci.transport.vns.service.VNS.startServing(VNS.java:237)
  at org.apache.vinci.transport.vns.service.VNS.main(VNS.java:179)
[10/6/04 3:44 PM | main] WARNING: failed to load workspace.
[10/6/04 3:44 PM | main] VNS Workspace : null
[10/6/04 3:44 PM | main] Loading counter file : .vns.counter
[10/6/04 3:44 PM | main] Could not load the counter file : .vns.counter
[10/6/04 3:44 PM | main] Starting backup thread,
            using files .vns.services.bak
and .vns.services
[10/6/04 3:44 PM | main] Serving on port : 9000
[10/6/04 3:44 PM | Thread-0] Backup thread started
[10/6/04 3:44 PM | Thread-0] Saving to config file : .vns.services.bak
>>>>>>>>>>>>> VNS is up and running! <<<<<<<<<<<<<<<<<
>>>>>>>>>>>>> Type 'quit' and hit ENTER to terminate VNS <<<<<<<<<<<<<
[10/6/04 3:44 PM | Thread-0] Config save required 10 millis.
[10/6/04 3:44 PM | Thread-0] Saving to config file : .vns.services
[10/6/04 3:44 PM | Thread-0] Config save required 10 millis.
[10/6/04 3:44 PM | Thread-0] Saving counter file : .vns.counter
Note
Disregard the java.io.FileNotFoundException: .\vns.workspaces (The system cannot
find the file specified). It is just a complaint. not a serious problem. VNS Workspace is a
feature of the VNS that is not critical. The important information to note is [10/6/04 3:44 PM |
main] Serving on port : 9000 which states the actual port where VNS will listen for incoming
requests. All Vinci services and all clients connecting to services must provide the VNS port on the
command line IF the port is not a default. Again the default port is 9000. Please see Section 3.6.5.3, “Launching Vinci Services” below for details about the command
line and parameters.
The VNS maintains two external files:
vns.servicesvns.counter
These files are generated by the VNS in the same directory where the VNS is launched from. Since these files may contain old information it is best to remove them before starting the VNS. This step ensures that the VNS has always the newest information and will not attempt to connect to a service that has been shutdown.
When launching Vinci service, you must indicate which VNS the service will
connect to. A Vinci service is typically started using the script
startVinciService, found in the bin
directory of the UIMA installation. (If you're using Eclipse and have the
uimaj-examples project in the workspace, you will also find
an Eclipse launcher named “UIMA Start Vinci Service” you can use.)
For the script, the environmental variable VNS_HOST should
be set to the name or IP address of the machine hosting the Vinci Naming Service. The
default is localhost, the machine the service is deployed on. This name can also be
passed as the second argument to the startVinciService script. The default port
for VNS is 9000 but can be overriden with the VNS_PORT environmental
variable.
If you write your own startup script, to define Vinci's default VNS you must provide the following JVM parameters:
java -DVNS_HOST=localhost -DVNS_PORT=9000 ...
The above setting is for the VNS running on the same machine as the service. Of course one can deploy the VNS on a different machine and the JVM parameter will need to be changed to this:
java -DVNS_HOST=<host> -DVNS_PORT=9000 ...
where “<host>” is a machine name or its IP where the VNS is running.
Note
VNS runs on port 9000 by default. If you see the following exception:
(WARNING) Unexpected exception:
org.apache.vinci.transport.ServiceDownException:
VNS inaccessible: java.net.Connect
Exception: Connection refused: connectthen, perhaps the VNS is not running OR the VNS is running but it is using a different port. To correct the latter, set the environmental variable VNS_PORT to the correct port before starting the service.
To get the right port check the VNS output for something similar to the following:
[10/6/04 3:44 PM |
          main] Serving on port : 9000
It is printed by the VNS on startup.
UIMA has several timeout specifications, summarized here. The timeouts associated with remote services are discussed below. In addition there are timeouts that can be specified for:
Acquiring an empty CAS from a CAS Pool: See Section 3.2.5, “Multi-threaded Applications”.
Reassembling chunks of a large document See Section 3.7, “CPE Operational Parameters” in UIMA References
If your application uses remote UIMA services it is important to consider how to set the timeout values appropriately. This is particularly important if your service can take a long time to process each request.
There are two types of timeout settings in UIMA, the client timeout and the server socket timeout. The client timeout is usually the most important, it specifies how long that client is willing to wait for the service to process each CAS. The client timeout can be specified for both Vinci and SOAP. The server socket timeout (Vinci only) specifies how long the service holds the connection open between calls from the client. After this amount of time, the server will presume the client may have gone away - and it “cleans up”, releasing any resources it is holding. The next call to process on the service will cause the client to re-establish its connection with the service (some additional overhead).
The way to set the client timeout is different depending on what deployment mode you use in your CPE (if any).
If you are using the default “integrated” deployment mode in your CPE, or if you are not using a CPE at all, then the client timeout is specified in your Service Client Descriptor (see Section 3.6.3, “Calling a UIMA Service”). For example:
<uriSpecifier xmlns="http://uima.apache.org/resourceSpecifier">
   <resourceType>AnalysisEngine</resourceType>
   <uri>uima.annot.PersonTitleAnnotator</uri>
   <protocol>Vinci</protocol>
   <timeout>60000</timeout>
   <parameters>
     <parameter name="VNS_HOST" value="some.internet.ip.name-or-address"/>
     <parameter name="VNS_PORT" value="9000"/>
   </parameters>
</uriSpecifier>
The client timeout in this example is 60000. This value specifies the number of
milliseconds that the client will wait for the service to respond to each request. In this example, the
client will wait for one minute.
If the service does not respond within this amount of time, processing of the current CAS will abort. If
you called the AnalysisEngine.process method directly from your application, an
Exception will be thrown. If you are running a CPE, what happens next is dependent on the error handling
settings in your CPE descriptor (see Section 3.6.1.7, “<errorHandling> Element” in UIMA References
). The default action is for the CPE to terminate, but you can override this.
If you are using the “managed” or “non-managed” deployment mode in your
CPE, then the client timeout is specified in your CPE desciptor's errorHandling
element. For example:
<errorHandling>
  <maxConsecutiveRestarts .../>
  <errorRateThreshold .../>
  <timeout max="60000"/>
</errorHandling>
As in the previous example, the client timeout is set to 60000, and this
specifies the number of milliseconds that the client will wait for the service to respond to each
request.
If the service does not respond within the specified amount of time, the action is determined by the
settings for maxConsecutiveRestarts and
errorRateThreshold. These settings support such things as restarting the process
(for “managed” deployment mode), dropping and reestablishing the connection (for
“non-managed” deployment mode), and removing the offending service from the pipeline. See
Section 3.6.1.7, “<errorHandling> Element” in UIMA References
) for details.
The Server Socket Timeout applies only to Vinci services, and is specified in the Vinci deployment descriptor as discussed in section Section 3.6.2, “Deploying as a Vinci Service”. For example:
<deployment name="Vinci Person Title Annotator Service">

  <service name="uima.annotator.PersonTitleAnnotator" provider="vinci">

    <parameter name="resourceSpecifierPath"
      value="C:/Program Files/apache/uima/examples/descriptors/
          analysis_engine/PersonTitleAnnotator.xml"/>

    <parameter name="numInstances" value="1"/>

    <parameter name="serverSocketTimeout" value="120000"/>

  </service>

</deployment>
The server socket timeout here is set to 120000 milliseconds, or two minutes.
This parameter specifies how long the service will wait between requests to process something. After this
amount of time, the server will presume the client may have gone away - and it “cleans up”,
releasing any resources it is holding. The next call to process on the service will cause the client to
re-establish its connection with the service (some additional overhead). The service may print a
“Read Timed Out” message to the console when the server socket timeout elapses.
In most cases, it is not a problem if the server socket timeout elapses. The client will simply reconnect. However, if you notice “Read Timed Out” messages on your server console, followed by other connection problems, it is possible that the client is having trouble reconnecting for some reason. In this situation it may help increase the stability of your application if you increase the server socket timeout so that it does not elapse during actual processing.
There are several ways to exploit parallelism to increase performance in the UIMA Framework. These range from running with additional threads within one Java virtual machine on one host (which might be a multi-processor or hyper-threaded host) to deploying analysis engines on a set of remote machines.
The Collection Processing facility in UIMA provides the ability to scale the pipe-line of analysis
engines. This scale-out runs multiple threads within the Java virtual machine running the CPM, one for each
pipe in the pipe-line. To activate it, in the <casProcessors> descriptor
element, set the attribute processingUnitThreadCount, which specifies the number of
replicated processing pipelines, to a value greater than 1, and insure that the size of the CAS pool is equal to or
greater than this number (the attribute of <casProcessors> to set is
casPoolSize). For more details on these settings, see Section 3.6, “CAS Processors” in UIMA References .
For deployments that incorporate remote analysis engines in the Collection Manager pipe-line, running on multiple remote hosts, scale-out is supported which uses the Vinci naming service. If multiple instances of a service with the same name, but running on different hosts, are registered with the Vinci Name Server, it will assign these instances to incoming requests.
There are two modes supported: a “random” assignment, and a “exclusive” one. The “random” mode distributes load using an algorithm that selects a service instance at random. The UIMA framework supports this only for the case where all of the instances are running on unique hosts; the framework does not support starting 2 or more instances on the same host.
The exclusive mode dedicates a particular remote instance to each Collection Manager pip-line instance. This mode is enabled by adding a configuration parameter in the <casProcessor> section of the CPE descriptor:
<deploymentParameters>
<parameter name="service-access" value="exclusive" />
</deploymentParameters>
If this is not specified, the “random” mode is used.
In addition, remote UIMA engine services can be started with a parameter that specifies the number of
instances the service should support (see the <parameter name="numInstances">
XML element in remote deployment descriptor Section 3.6, “Working with Remote Services”
Specifying more than one causes the service wrapper for the analysis engine to use multi-threading (within the
single Java Virtual Machine – which can take advantage of multi-processor and hyper-threaded
architectures).
Note
When using Vinci in “exclusive” mode (see service access under Section 3.6.1.5, “<deploymentParameters> Element” in UIMA References ), only one thread is used. To achieve multi-processing on a server in this case, use multiple instances of the service, instead of multiple threads (see Section 3.6.2, “Deploying as a Vinci Service”.
As of version 2, UIMA supports remote monitoring of Analysis Engine performance via the Java Management Extensions (JMX) API. JMX is a standard part of the Java Runtime Environment v5.0; there is also a reference implementation available from Sun for Java 1.4. An introduction to JMX is available from Sun here: http://java.sun.com/developer/technicalArticles/J2SE/jmx.html. When you run a UIMA with a JVM that supports JMX, the UIMA framework will automatically detect the presence of JMX and will register MBeans that provide access to the performance statistics.
To enable remote monitoring of these performance statistics, when you start your UIMA application
specify the following JVM parameter: -Dcom.sun.management.jmxremote
Now, you can use any JMX client to view the statistics. JDK 5.0 provides a standard client that you can use.
Simply open a command prompt, make sure the JDK 5.0 bin directory is in your path, and
execute the jconsole command. This should bring up the following window:
 |
Here you can choose from among your JMX-enabled applications that are currently running. Select a UIMA application from the list and click “Connect”. The next screen will show a summary of information about the Java process that you connected to. Click on the “MBeans” tab, then expand “org.apache.uima” in the tree at the left. You should see a view like this:
 |
Each of the nodes under “org.apache.uima” in the tree represents one
of the UIMA Analysis Engines in the application that you connected to. You can select one of the analysis engines
to view its performance statistics in the view at the right.
Probably the most useful statistic is “CASes Per Second”, which is the number of CASes that this AE has processed divided by the amount of time spent in the AE's process method, in seconds. Note that this is the total elapsed time, not CPU time. Even so, it can be useful to compare the “CASes Per Second” numbers of all of your Analysis Engines to discover where the bottlenecks occur in your application.
The AnalysisTime, BatchProcessCompleteTime, and
CollectionProcessCompleteTime properties show the total elapsed time, in
milliseconds, that has been spent in the AnalysisEngine's process(), batchProcessComplete(),
and collectionProcessComplete() methods, respectively. (Note that for
CAS Multipliers, time spent in the hasNext() and next() methods is
also counted towards the AnalysisTime.)
Note that once your UIMA application terminates, you can no longer view the statistics through the JMX console. If you want to use JMX to view processes that have completed, you will need to write your application so that the JVM remains running after processing completes, waiting for some user signal before terminating.
For information on JMX can be found in the Java 5 documentation.
[7] Both the UIMA Collection Processing Manager framework and the remote deployment services framework have implementations which use CAS pools in this manner, and thereby relieve the annotator developer of the necessity to make their annotators thread-safe.
A Flow Controller is a component that plugs into an Aggregate Analysis Engine. When a CAS is input to the Aggregate, the Flow Controller determines the order in which the components of that aggregate are invoked on that CAS. The ability to provide your own Flow Controller implementation is new as of release 2.0 of UIMA.
Flow Controllers may decide the flow dynamically, based on the contents of the CAS. So, as just one example, you could develop a Flow Controller that first sends each CAS to a Language Identification Annotator and then, based on the output of the Language Identification Annotator, routes that CAS to an Annotator that is specialized for that particular language.
Flow Controller implementations should extend from the
JCasFlowController_ImplBase or
CasFlowController_ImplBase classes, depending on which CAS interface they prefer
to use. As with other types of components, the Flow Controller ImplBase classes define optional
initialize, destroy, and reconfigure
methods. They also define the required method computeFlow.
The computeFlow method is called by the framework whenever a new CAS enters the
Aggregate Analysis Engine. It is given the CAS as an argument and must return an object which implements the
Flow interface (the Flow object). The Flow Controller developer must define this
object. It is the object that is responsible for routing this particular CAS through the components of the
Aggregate Analysis Engine. For convenience, the framework provides basic implementation of flow objects
in the classes CasFlow_ImplBase and JCasFlow_ImplBase; use the JCas one if you are using the JCas interface
to the CAS.
The framework then uses the Flow object and calls its next() method, which returns
a Step object (implemented by the UIMA Framework) that indicates what to do next with
this CAS next. There are two common types of steps:
SimpleStep, which specifies a single Analysis Engine that should receive the CAS next.FinalStep, which indicates that the flow is completed.
There may be additional types of steps added in future versions; for example to invoke multiple Analysis Engines in parallel on the same CAS.
After executing the step, the framework will call the Flow object's next()
method again to determine the next destination, and this will be repeated until the Flow Object indicates
that processing is complete by returning a FinalStep.
The Flow Controller has access to a FlowControllerContext, which is a subtype of
UimaContext. In addition to the configuration parameter and resource access
provided by a UimaContext, the FlowControllerContext also
gives access to the metadata for all of the Analysis Engines that the Flow Controller can route CASes to. Most
Flow Controllers will need to use this information to make routing decisions. You can get a handle to the
FlowControllerContext by calling the getContext() method
defined in JCasFlowController_ImplBase and
CasFlowController_ImplBase. Then, the
FlowControllerContext.getAnalysisEngineMetaDataMapmethod can be called to get a map
containing an entry for each of the Analysis Engines in the Aggregate. The keys in this map are the same as the
delegate analysis engine keys specified in the aggregate descriptor, and the values are the corresponding
AnalysisEngineMetaData objects.
This section walks through the source code of an example Flow Controller that simluates a simple version of the “Whiteboard” flow model. At each step of the flow, the Flow Controller looks it all of the available Analysis Engines that have not yet run on this CAS, and picks one whose input requirements are satisfied.
The Java class for the example is
org.apache.uima.examples.flow.WhiteboardFlowController
and the source code is included in the UIMA SDK under the
examples/src directory.
public class WhiteboardFlowController extends CasFlowController_ImplBase {
  public Flow computeFlow(CAS aCAS) throws AnalysisEngineProcessException {
    WhiteboardFlow flow = new WhiteboardFlow();
    flow.setCas(aCAS);
    return flow;
  }

  class WhiteboardFlow extends CasFlow_ImplBase {
     // Discussed Later
  }
}
The WhiteboardFlowController extends from
CasFlowController_ImplBase and implements the
computeFlow method. The implementation of the
computeFlow method is very simple; it just constructs a new
WhiteboardFlow object that will be responsible for routing
this CAS, and calls the WhiteboardFlow.setCas method to
give it a handle to that CAS, which it will later use to make its routing decisions.
The setCas method is a method provided by the
..._ImplBase classes for Flows.
Note that we will have one instance of WhiteboardFlow
per CAS, so if there are multiple CASes being simultaneously processed there will
not be any confusion.
class WhiteboardFlow extends CasFlow_ImplBase {
  private Set mAlreadyCalled = new HashSet();

  public Step next() throws AnalysisEngineProcessException {
    // Get the CAS that this Flow object is responsible for routing.
    // Each Flow instance is responsible for a single CAS.
    CAS cas = getCas();

    // iterate over available AEs
    Iterator aeIter = getContext().getAnalysisEngineMetaDataMap().
        entrySet().iterator();
    while (aeIter.hasNext()) {
      Map.Entry entry = (Map.Entry) aeIter.next();
      // skip AEs that were already called on this CAS
      String aeKey = (String) entry.getKey();
      if (!mAlreadyCalled.contains(aeKey)) {
        // check for satisfied input capabilities
        //(i.e. the CAS contains at least one instance
        // of each required input
        AnalysisEngineMetaData md =
            (AnalysisEngineMetaData) entry.getValue();
        Capability[] caps = md.getCapabilities();
        boolean satisfied = true;
        for (int i = 0; i < caps.length; i++) {
          satisfied = inputsSatisfied(caps[i].getInputs(), cas);
          if (satisfied)
            break;
        }
        if (satisfied) {
          mAlreadyCalled.add(aeKey);
          if (mLogger.isLoggable(Level.FINEST)) {
            getContext().getLogger().log(Level.FINEST,
                "Next AE is: " + aeKey);
          }
          return new SimpleStep(aeKey);
        }
      }
    }
    // no appropriate AEs to call - end of flow
    getContext().getLogger().log(Level.FINEST, "Flow Complete.");
    return new FinalStep();
  }

  private boolean inputsSatisfied(TypeOrFeature[] aInputs, CAS aCAS) {
      //implementation detail; see the actual source code
  }
}
Each instance of the WhiteboardFlowController is
responsible for routing a single CAS. A handle to the CAS instance is available by
calling the getCas() method, which is a standard method
defined on the CasFlow_ImplBase superclass.
Each time the next method is called, the Flow object
iterates over the metadata of all of the available Analysis Engines (obtained via
the call to getContext(). getAnalysisEngineMetaDataMap)
and sees if the input types declared in an AnalysisEngineMetaData object are
satisfied by the CAS (that is, the CAS contains at least one instance of each
declared input type). The exact details of checking for instances of types in the
CAS are not discussed here – see the WhiteboardFlowController.java file
for the complete source.
When the Flow object decides which AnalysisEngine should be called next, it indicates this by creating a SimpleStep object with the key for that AnalysisEngine and returning it:
return new SimpleStep(aeKey);
The Flow object keeps a list of which Analysis Engines it has invoked in the
mAlreadyCalled field, and never invokes the same Analysis
Engine twice. Note this is not a hard requirement. It is acceptable to design a
FlowController that invokes the same Analysis Engine more than once. However, if
you do this you must make sure that the flow will eventually terminate.
If there are no Analysis Engines left whose input requirements are satisfied, the Flow object signals the end of the flow by returning a FinalStep object:
return new FinalStep();
Also, note the use of the logger to write tracing messages indicating the decisions made by the Flow Controller. This is a good practice that helps with debugging if the Flow Controller is behaving in an unexpected way.
To create a Flow Controller Descriptor in the CDE, use File → New → Other → UIMA → Flow Controller Descriptor File:
 |
This will bring up the Overview page for the Flow Controller Descriptor:
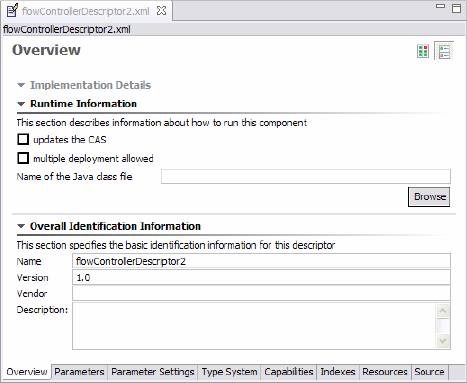 |
Type in the Java class name that implements the Flow Controller, or use the
“Browse” button to select it. You must select a Java class that
implements the FlowController interface.
Flow Controller Descriptors are very similar to Primitive Analysis Engine Descriptors – for example you can specify configuration parameters and external resources if you wish.
If you wish to edit a Flow Controller Descriptor by hand, see section Section 2.5, “Flow Controller Descriptors” in UIMA References for the syntax.
To use a Flow Controller you must add it to an Aggregate Analysis Engine. You can only have one Flow Controller per Aggregate Analysis Engine. In the Component Descriptor Editor, the Flow Controller is specified on the Aggregate page, as a choice in the flow control kind - pick “User-defined Flow”. When you do, the Browse and Search buttons underneath become active, and allow you to specify an existing Flow Controller Descriptor, which when you select it, will be imported into the aggregate descriptor.
 |
The key name is created automatically from the name element in the Flow Controller Descriptor being imported. If you need to change this name, you can do so by switching to the “Source” view using the bottom tabs, and editing the name in the XML source.
If you edit your Aggregate Analysis Engine Descriptor by hand, the syntax for adding a Flow Controller is:
  <delegateAnalysisEngineSpecifiers>
    ...
  </delegateAnalysisEngineSpecifiers>
  <flowController key=“[String]”>
    <import .../>
  </flowController>
As usual, you can use either in import by location or import by name – see Section 2.2, “Imports” in UIMA References.
The key that you assign to the FlowController can be used elsewhere in the Aggregate Analysis Engine Descriptor – in parameter overrides, resource bindings, and Sofa mappings.
Flow Controllers cannot be added directly to Collection Processing Engines. To use a Flow Controller in a CPE you first need to wrap the part of your CPE that requires complex flow control into an Aggregate Analysis Engine, and then add the Aggregate Analysis Engine to your CPE. The CPE's deployment and error handling options can then only be configured for the entire Aggregate Analysis Engine as a unit.
If you want your Flow Controller to work inside an Aggregate Analysis Engine that contains a CAS Multiplier (see Chapter 7, CAS Multiplier Developer's Guide ), there are additional things you must consider.
When your Flow Controller routes a CAS to a CAS Multiplier, the CAS Multiplier may produce new CASes that then will also need to be routed by the Flow Controller. When a new output CAS is produced, the framework will call the method:
protected Flow newCasProduced(AbstractCas newOutputCas, String producedBy)
on the Flow object that was managing the flow of the parent CAS (the one that was input to
the CAS Multiplier). The newCasProduced method must create a new
Flow object that will be responsible for routing the new output CAS.
In the CasFlow_ImplBase and
JCasFlow_ImplBase classes, the
newCasProduced method is defined to throw an exception
indicating that the Flow Controller does not handle CAS Multipliers. If you want your
Flow Controller to properly deal with CAS Multipliers you must override this
method.
Also, there is a variant of FinalStep which can only be
specified for output CASes produced by CAS Multipliers within the Aggregate Analysis
Engine containing the Flow Controller. This version of
FinalStep is produced by the calling the constructor with a
true argument, and it causes the CAS to be immediately released
back to the pool. No further processing will be done on it and it will not be output from the
aggregate. This is the way that you can build an Aggregate Analysis Engine that outputs
some new CASes but not others. Note that if you never want any new CASes to be output from
the Aggregate Analysis Engine, you don't need to use this; instead just declare
<outputsNewCASes>false</outputsNewCASes> in
your Aggregate Analysis Engine Descriptor as described in Section 7.3.3, “Aggregate CAS Multipliers”.
Up to this point, the documentation has focused on analyzing strings of Unicode text, producing subtypes of Annotations which reference offsets in those strings. This chapter generalizes this concept and shows how other kinds of artifacts can be handled, including non-text things like audio and images, and how you can define your own kinds of “annotations” for these.
The Artifact is the unstructured thing being analyzed by an annotator. It could be an HTML web page, an image, a video stream, a recorded audio conversation, an MPEG-4 stream, etc. Artifacts are often restructured in the course of processing to facilitate particular kinds of analysis. For instance, an HTML page may be converted into a “de-tagged” version. Annotators at different places in the pipeline may be analyzing different versions of the artifact.
Each representation of an Artifact is called a Subject of Analysis, abbreviated using the acronym “Sofa” which stands for Subject OF Analysis. Annotation metadata, which have explicit designations of sub-regions of the artifact to which they apply, are always associated with a particular Sofa. For instance, an annotation over text specifies two features, the begin and end, which represent the character offsets into the text string Sofa being analyzed.
Other examples of representations of Artifacts, which could be Sofas include: An HTML web page, a detagged web page, the translated text of that document, an audio or video stream, closed-caption text from a video stream, etc.
Often, there is one Sofa being analyzed in a CAS. The next chapter will show how UIMA facilitates working with multiple representations of an artifact at the same time, in the same CAS.
Sofa data can be Java Unicode Strings, Feature Structure arrays of primitive types, or a URI which references remote data available via a network connection.
The arrays of primitive types can be things like byte arrays or float arrays, and are intended to be used for artifacts like audio data, image data, etc.
The URI form holds a URI specification String.
When a CAS is created, you can set its Sofa Data, just one time; this property insures that metadata describing regions of the Sofa remain valid. As a consequence, the following methods that set data for a given Sofa can only be called once for a given Sofa.
The following methods on the CAS set the Sofa Data to one of the 3 formats. Assume that the variable “aCas” holds a reference to a CAS:
aCas.setSofaDataString(document_text_string, mime_type_string);
aCas.setSofaDataArray(feature_structure_primitive_array, mime_type_string);
aCas.setSofaDataURI(uri_string, mime_type_string);
In addition, the method
aCas.setDocumentText(document_text_string) may still be
used, and is equivalent to setSofaDataString(string,
"text"). The mime type is currently not used by the UIMA framework, but may
be set and retrieved by user code.
Feature Structure primitive arrays are all the UIMA Array types except arrays of Feature Structures, Strings, and Booleans. Typically, these are arrays of bytes, but can be other types, such as floats, longs, etc.
The URI string should conform to the standard URI format.
The analysis algorithms typically work with the Sofa data. The following methods on the CAS access the Sofa Data:
String           aCas.getDocumentText();
String           aCas.getSofaDataString();
FeatureStructure aCas.getSofaDataArray();
String           aCas.getSofaDataURI();
String           aCas.getSofaMimeType();
The getDocumentText and
getSofaDataString return the same text string. The
getSofaDataURI returns the URI itself, not the data the URI is
pointing to. You can use standard Java I/O capabilities to get the data associated
with the URI, or use the UIMA Framework Streaming method described next.
The framework provides a consistent method for accessing the Sofa data, independent of it being stored locally, or accessed remotely using the URI. Get a Java InputStream instance from the Sofa data using:
InputStream inputStream = aCas.getSofaDataStream();
If the data is local, this method returns a ByteArrayInputStream. This stream provides bytes.
If the Sofa data was set using setDocumentText or setSofaDataString, the String is converted to bytes by using the UTF-8 encoding.
If the Sofa data was set as a DataArray, the bytes in the data array are serialized, high-byte first.
If the Sofa data was specified as a URI, this method returns the handle from url.openStream(). Java offers built-in support for several URI schemes including “FILE:”, “HTTP:”, “FTP:” and has an extensible mechanism,
URLStreamHandlerFactory, for customizing access to an arbitrary URI. See more details at http://java.sun.com/j2se/1.4.2/docs/api/java/net/URLStreamHandlerFactory.html .
Information about a Sofa is contained in a special built-in Feature Structure of
type uima.cas.Sofa. This feature structure is created and
managed by the UIMA Framework; users must not create it directly. Although these Sofa
type instances are implemented as standard feature structures, generic
CAS APIs can not be used to create Sofas or set their features. Instead,
Sofas are created implicitly by the creation of new CAS views. Similarly, Sofa features
are set by CAS methods such as cas.setDocumentText().
Features of the Sofa type include
SofaID: Every Sofa in a CAS has a unique SofaID. SofaIDs are the primary handle for access. This ID is often the same as the name string given to the Sofa by the developer, but it can be mapped to a different name (see Section 6.4, “Sofa Name Mapping”.
Mime type: This string feature can be used to describe the type of the data represented by a Sofa. It is not used by the framework; the framework provides APIs to set and get its value.
Sofa Data: The Sofa data itself. This data can be resident in the CAS or it can be a reference to data outside the CAS.
Annotators add meta data about a Sofa to the CAS. It is often useful to have this metadata denote a region of the Sofa to which it applies. For instance, assuming the Sofa is a String, the metadata might describe a particular substring as the name of a person. The built-in UIMA type, uima.tcas.Annotation, has two extra features that enable this - the begin and end features - which denote a character position offset into the text string being analyzed.
The concept of “annotations” can be generalized for non-string kinds of Sofas. For instance, an audio stream might have an audio annotation which describes sounds regions in terms of floating point time offsets in the Sofa. An image annotation might use two pairs of x,y coordinates to define the region the annotation applies to.
The built-in CAS type, uima.tcas.Annotation, is just one
kind of definition of an Annotation. It was designed for annotating text strings, and
has begin and end features which describe which substring of the Sofa being
annotated.
For applications which have other kinds of Sofas, the UIMA developer will design
their own kinds of Annotation types, as needed to describe an annotation, by
declaring new types which are subtypes of
uima.cas.AnnotationBase. For instance, for images, you
might have the concept of a rectangular region to which the annotation applies. In
this case, you might describe the region with 2 pairs of x, y coordinates.
Annotations are always associated with a particular Sofa. In subsequent chapters, you will learn how there can be multiple Sofas associated with an artifact; which Sofa an annotation refers to is described by the Annotation feature structure itself.
All annotation types extend from the built-in type uima.cas.AnnotationBase. This type has one feature, a reference to the Sofa associated with the annotation. This value is currently used by the Framework to support the getCoveredText() method on the annotation instance - this returns the portion of a text Sofa that the annotation spans. It also is used to insure that the Annotation is indexed only in the CAS View associated with this Sofa.
A built-in type, uima.cas.AnnotationBase, is provided by
UIMA to allow users to extend the Annotation capabilities to different kinds of
Annotations. The AnnotationBase type has one feature, named
sofa, which holds a reference to the
Sofa feature structure with which this annotation is associated.
The sofa feature is automatically set when creating an annotation
(meaning — any type derived from the built-in
uima.cas.AnnotationBase type); it should not be set by the user.
There is one method, getView(), provided by
AnnotationBase that returns the CAS View for the Sofa the
annotation is pointing at. Note that this method always returns a CAS, even when applied
to JCas annotation instances.
The built-in type uima.tcas.Annotation extends
uima.cas.AnnotationBase and adds two features, a begin and an
end feature, which are suitable for identifying a span in a text string that the
annotation applies to. Users may define other extensions to
AnnotationBase with alternative specifications that can
denote a particular region within the subject of analysis, as appropriate to their
application.
UIMA provides an extension to the basic model of the CAS which supports analysis of multiple views of the same artifact, all contained with the CAS. This chapter describes the concepts, terminology, and the API and XML extensions that enable this.
Multiple CAS Views can simplify things when different versions of the artifact are needed at different stages of the analysis. They are also key to enabling multimodal analysis where the initial artifact is transformed from one modality to another, or where the artifact itself is multimodal, such as the audio, video and closed-captioned text associated with an MPEG object. Each representation of the artifact can be analyzed independently with the standard UIMA programming model; in addition, multi-view components and applications can be constructed.
UIMA supports this by augmenting the CAS with additional light-weight CAS objects, one for each view, where these objects share most of the same underlying CAS, except for two things: each view has its own set of indexed Feature Structures, and each view has its own subject of analysis (Sofa) - its own version of the artifact being analyzed. The Feature Structure instances themselves are in the shared part of the CAS; only the entries in the indexes are unique for each CAS view.
All of these CAS view objects are kept together with the CAS, and passed as a unit between components in a UIMA application. APIs exist which allow components and applications to switch among the various view objects, as needed.
Feature Structures may be indexed in multiple views, if necessary. New methods on CAS Views facilitate adding or removing Feature Structures to or from their index repositories:
aView.addFsToIndexes(aFeatureStructure)
aView.removeFsFromIndexes(aFeatureStructure)
specify the view in which this Feature Structure should be added to or removed from the indexes.
Sofas (see Section 5.1.2, “Subject of Analysis — Sofa”) and CAS Views are linked. In this implementation, every CAS view has one associated Sofa, and every Sofa has one associated CAS View.
The developer assigns a name to the View / Sofa, which is a simple string (following the rules for Java identifiers, usually without periods, but see special exception below). These names are declared in the component XML metadata, and are used during assembly and by the runtime to enable switching among multiple Views of the CAS at the same time.
Note
The name is called the Sofa name, for historical reasons, but it applies equally to the View. In the rest of this chapter, we'll refer to it as the Sofa name.
Some applications contain components that expect a variable number of Sofas as input or output. An example of a component that takes a variable number of input Sofas could be one that takes several translations of a document and merges them, where each translation was in a separate Sofa.
You can specify a variable number of input or output sofa names, where each name
has the same base part, by writing the base part of the name (with no periods), followed
by a period character and an asterisk character (.*). These denote sofas that have
names matching the base part up to the period; for example, names such as
base_name_part.TTX_3d would match a specification of
base_name_part.*.
Components and applications can be written to be Multi-View or Single-View. Most components used as primitive building blocks are expected to be Single-View. UIMA provides capabilities to combine these kinds of components with Multi-View components when assembling analysis aggregates or applications.
Single-View components and applications use only one subject of analysis, and one CAS View. The code and descriptors for these components do not use the facilities described in this chapter.
Conversely, Multi-View components and applications are aware of the possibility of multiple Views and Sofas, and have code and XML descriptors that create and manipulate them.
Every UIMA component has an associated XML Component Descriptor. Multi-View components are identified simply as those whose descriptors declare one or more Sofa names in their Capability sections, as inputs or outputs. If a Component Descriptor does not mention any input or output Sofa names, the framework treats that component as a Single-View component.
A Multi-View component is passed a special kind of a CAS object, called a base CAS, which it must use to switch to the particular view it wishes to process. The base CAS object itself has no Sofa and no ability to use Indexes; only the views have that capability.
Additional capabilities provided for components and applications aware of the possibilities of multiple Views and Sofas include:
Creating new Views, and for each, setting up the associated Sofa data
Getting a reference to an existing View and its associated Sofa, by name
Specifying a view in which to index a particular Feature Structure instance
Each Multi-View component that creates a Sofa or wants to switch to a specific previously created Sofa must declare the name for the Sofa in the capabilities section. For example, a component expecting as input a web document in html format and creating a plain text document for further processing might declare:
<capabilities>
  <capability>
    <inputs/>
    <outputs/>
    <inputSofas>
      <sofaName>rawContent</sofaName>
    </inputSofas>
    <outputSofas>
      <sofaName>detagContent</sofaName>
    </outputSofas>
  </capability>
</capabilities>
Details on this specification are found in Chapter 2, Component Descriptor Reference in UIMA References. The Component Descriptor Editor supports Sofa declarations on the Section 1.9, “Capabilities Page” in UIMA Tools Guide and Reference.
In addition to components, applications can make use of these capabilities. When an application creates a new CAS, it also creates the initial view of that CAS - and this view is the object that is returned from the create call. Additional views beyond this first one can be dynamically created at any time. The application can use the Sofa APIs described in Chapter 5, Annotations, Artifacts, and Sofas to specify the data to be analyzed.
If an Application creates a new CAS, the initial CAS that is created will be a view named “_InitialView”. This name can be used in the application and in Sofa Mapping (see the next section) to refer to this otherwise unnamed view.
Sofa Name mapping is the mechanism which enables UIMA component developers to choose locally meaningful Sofa names in their source code and let aggregate, collection processing engine developers, and application developers connect output Sofas created in one component to input Sofas required in another.
At a given aggregation level, the assembler or application developer defines names for all the Sofas, and then specifies how these names map to the contained components, using the Sofa Map.
Consider annotator code to create a new CAS view:
CAS viewX = cas.createView("X");Or code to get an existing CAS view:
CAS viewX = cas.getView("X");Without Sofa name mapping the SofaID for the new Sofa will be “X”. However, if a name mapping for “X” has been specified by the aggregate or CPE calling this annotator, the actual SofaID in the CAS can be different.
All Sofas in a CAS must have unique names. This is accomplished by mapping all declared Sofas as described in the following sections. An attempt to create a Sofa with a SofaID already in use will throw an exception.
Sofa name mapping must not use the “.” (period) character. Runtime Sofa mapping maps names up to the “.” and appends the period and the following characters to the mapped name.
Sofa name mappings are not currently supported for remote Analysis Engines. See Section 6.4.5, “Name Mapping for Remote Services”.
For each component of an Aggregate, name mapping specifies the conversion between component Sofa names and names at the aggregate level.
Here's an example. Consider two Multi-View annotators to be assembled into an aggregate which takes an audio segment consisting of spoken English and produces a German text translation.
The first annotator takes an audio segment as input Sofa and produces a text transcript as output Sofa. The annotator designer might choose these Sofa names to be “AudioInput” and “TranscribedText”.
The second annotator is designed to translate text from English to German. This developer might choose the input and output Sofa names to be “EnglishDocument” and “GermanDocument”, respectively.
In order to hook these two annotators together, the following section would be added to the top level of the aggregate descriptor:
<sofaMappings>
  <sofaMapping>
    <componentKey>SpeechToText</componentKey>
    <componentSofaName>AudioInput</componentSofaName>
    <aggregateSofaName>SegementedAudio</aggregateSofaName>
  </sofaMapping>
  <sofaMapping>
    <componentKey>SpeechToText</componentKey>
    <componentSofaName>TranscribedText</componentSofaName>
    <aggregateSofaName>EnglishTranscript</aggregateSofaName>
  </sofaMapping>
  <sofaMapping>
    <componentKey>EnglishToGermanTranslator</componentKey>
    <componentSofaName>EnglishDocument</componentSofaName>
    <aggregateSofaName>EnglishTranscript</aggregateSofaName>
  </sofaMapping>
  <sofaMapping>
    <componentKey>EnglishToGermanTranslator</componentKey>
    <componentSofaName>GermanDocument</componentSofaName>
    <aggregateSofaName>GermanTranslation</aggregateSofaName>
  </sofaMapping>
</sofaMappings>
The Component Descriptor Editor supports Sofa name mapping in aggregates and simplifies the task. See Section 1.9.1, “Sofa (and view) name mappings” in UIMA Tools Guide and Reference for details.
The CPE descriptor aggregates together a Collection Reader and CAS Processors
(Annotators and CAS Consumers). Sofa mappings can be added to the following elements
of CPE descriptors: <collectionIterator>,
<casInitializer> and the
<casProcessor>. To be consistent with the
organization of CPE descriptors, the maps for the CPE descriptor are distributed
among the XML markup for each of the parts (collectionIterator, casInitializer,
casProcessor). Because of this the
<componentKey> element is not needed. Finally, rather than
sub-elements for the parts, the XML markup for these uses attributes. See Section 3.6.1.3, “<sofaNameMappings> Element” in UIMA References.
Here's an example. Let's use the aggregate from the previous section in a collection processing engine. Here we will add a Collection Reader that outputs audio segments in an output Sofa named “nextSegment”. Remember to declare an output Sofa nextSegment in the collection reader description. We'll add a CAS Consumer in the next section.
<collectionReader>
  <collectionIterator>
    <descriptor>
    . . .
    </descriptor>
    <configurationParameterSettings>...</configurationParameterSettings>
    <sofaNameMappings>
      <sofaNameMapping componentSofaName="nextSegment"
                       cpeSofaName="SegementedAudio"/>
      </sofaNameMappings>
  </collectionIterator>
  <casInitializer/>
<collectionReader>
At this point the CAS Processor section for the aggregate does not need any Sofa mapping because the aggregate input Sofa has the same name, “SegementedAudio”, as is being produced by the Collection Reader.
Single-View components receive a Sofa named “_InitialView”, or a Sofa that is mapped to this name.
For example, assume that the CAS Consumer to be used in our CPE is a Single-View component that expects the analysis results associated with the input CAS, and that we want it to use the results from the translated German text Sofa. The following mapping added to the CAS Processor section for the CPE will instruct the CPE to get the CAS view for the German text Sofa and pass it to the CAS Consumer:
<casProcessor>
  . . .
  <sofaNameMappings>
    <sofaNameMapping componentSofaName="_InitialView"
                           cpeSofaName="GermanTranslation"/>
  <sofaNameMappings>
</casProcessor>
An alternative syntax for this kind of mapping is to simply leave out the component sofa name in this case.
Applications which instantiate UIMA components directly using the UIMAFramework methods can also create a top level Sofa mapping using the “additional parameters” capability.
//create a "root" UIMA context for your whole application

UimaContextAdmin rootContext =
   UIMAFramework.newUimaContext(UIMAFramework.getLogger(),
      UIMAFramework.newDefaultResourceManager(),
      UIMAFramework.newConfigurationManager());

input = new XMLInputSource("test.xml");
desc = UIMAFramework.getXMLParser().parseAnalysisEngineDescription(input);

//setup sofa name mappings using the api

HashMap sofamappings = new HashMap();
sofamappings.put("localName1", "globalName1");
sofamappings.put("localName2", "globalName2");

//create a UIMA Context for the new AE we are about to create

//first argument is unique key among all AEs used in the application
UimaContextAdmin childContext = rootContext.createChild("myAE", sofamap);

//instantiate AE, passing the UIMA Context through the additional
//parameters map

Map additionalParams = new HashMap();
additionalParams.put(Resource.PARAM_UIMA_CONTEXT, childContext);

AnalysisEngine ae = UIMAFramework.produceAnalysisEngine(desc,additionalParams);
Sofa mappings are applied from the inside out, i.e., local to global. First, any aggregate mappings are applied, then any CPE mappings, and finally, any specified using this “additional parameters” capability.
Currently, no client-side Sofa mapping information is passed from a UIMA client to a remote service. This can cause complications for UIMA services in a Multi-View application.
Remote Multi-View services will work only if the service is Single-View, or if the Sofa names expected by the service exactly match the Sofa names produced by the client.
If your application requires Sofa mappings for a remote Analysis Engine, you can wrap your remotely deployed AE in an aggregate (on the remote side), and specify the necessary Sofa mappings in the descriptor for that aggregate.
The JCas interface to the CAS can be used with any / all views, as well as the base CAS sent to Multi-View components. You can always get a JCas object from an existing CAS object by using the method getJCas(); this call will create the JCas if it doesn't already exist. If it does exist, it just returns the existing JCas that corresponds to the CAS.
JCas implements the getView(...) method, enabling switching to other named views, just like the corresponding method on the CAS. The JCas version, however, returns JCas objects, instead of CAS objects, corresponding to the view.
The UIMA SDK contains a simple Sofa example application which demonstrates many
Sofa specific concepts and methods. The source code for the application driver is in
examples/src/org/apache/uima/examples/SofaExampleApplication.java
and the Multi-View annotator is given in
SofaExampleAnnotator.java in the same directory.
This sample application demonstrates a language translator annotator which expects an input text Sofa with an English document and creates an output text Sofa containing a German translation. Some of the key Sofa concepts illustrated here include:
Sofa creation.
Access of multiple CAS views.
Unique feature structure index space for each view.
Feature structures containing cross references between annotations in different CAS views.
The strong affinity of annotations with a specific Sofa.
The annotator descriptor in
examples/descriptors/analysis_engine/SofaExampleAnnotator.xml
declares an input Sofa named “EnglishDocument” and an output Sofa
named “GermanDocument”. A custom type
“CrossAnnotation” is also defined:
<typeDescription>
  <name>sofa.test.CrossAnnotation</name>
  <description/>
  <supertypeName>uima.tcas.Annotation</supertypeName>
  <features>
    <featureDescription>
      <name>otherAnnotation</name>
      <description/>
      <rangeTypeName>uima.tcas.Annotation</rangeTypeName>
    </featureDescription>
  </features>
</typeDescription>
The CrossAnnotation type is derived from
uima.tcas.Annotation and includes one new feature: a
reference to another annotation.
The application driver instantiates an analysis engine,
seAnnotator, from the annotator descriptor, obtains a new
base CAS using that engine's CAS definition, and creates the expected input
Sofa using:
CAS cas = seAnnotator.newCAS();
CAS aView = cas.createView("EnglishDocument");
Since seAnnotator is a primitive component, and no Sofa
mapping has been defined, the SofaID will be “EnglishDocument”.
Local Sofa data is set using:
aView.setDocumentText("this beer is good");At this point the CAS contains all necessary inputs for the translation annotator and its process method is called.
Annotator processing consists of parsing the English document into individual
words, doing word-by-word translation and concatenating the translations into a
German translation. Analysis metadata on the English Sofa will be an annotation for
each English word. Analysis metadata on the German Sofa will be a
CrossAnnotation for each German word, where the
otherAnnotation feature will be a reference to the associated
English annotation.
Code of interest includes two CAS views:
// get View of the English text Sofa
englishView = aCas.getView("EnglishDocument");

// Create the output German text Sofa
germanView = aCas.createView("GermanDocument");
the indexing of annotations with the appropriate view:
englishView.addFsToIndexes(engAnnot);
. . .
germanView.addFsToIndexes(germAnnot);
and the combining of metadata belonging to different Sofas in the same feature structure:
// add link to English text
germAnnot.setFeatureValue(other, engAnnot);
The application needs to get the results of analysis, which may be in different views. Analysis results for each Sofa are dumped independently by iterating over all annotations for each associated CAS view. For the English Sofa:
//get annotation iterator for this CAS
FSIndex anIndex = aView.getAnnotationIndex();
FSIterator anIter = anIndex.iterator();
while (anIter.isValid()) {
  AnnotationFS annot = (AnnotationFS) anIter.get();
  System.out.println(" " + annot.getType().getName()
                         + ": " + annot.getCoveredText());
  anIter.moveToNext();
}
Iterating over all German annotations looks the same, except for the following:
if (annot.getType() == cross) {
  AnnotationFS crossAnnot =
          (AnnotationFS) annot.getFeatureValue(other);
  System.out.println("   other annotation feature: "
          + crossAnnot.getCoveredText());
}
Of particular interest here is the built-in Annotation type method
getCoveredText(). This method uses the
“begin” and “end” features of the annotation to create
a substring from the CAS document. The SofaRef feature of the annotation is used to
identify the correct Sofa's data from which to create the substring.
The example program output is:
---Printing all annotations for English Sofa---
uima.tcas.DocumentAnnotation: this beer is good
uima.tcas.Annotation: this
uima.tcas.Annotation: beer
uima.tcas.Annotation: is
uima.tcas.Annotation: good

---Printing all annotations for German Sofa---
uima.tcas.DocumentAnnotation: das bier ist gut
sofa.test.CrossAnnotation: das
 other annotation feature: this
sofa.test.CrossAnnotation: bier
 other annotation feature: beer
sofa.test.CrossAnnotation: ist
 other annotation feature: is
sofa.test.CrossAnnotation: gut
other annotation feature: goodThe recommended way to deliver a particular CAS view to a Single-View component is to use by Sofa-mapping in the CPE and/or aggregate descriptors.
For Multi-View components or applications, the following methods are used to create or get a reference to a CAS view for a particular Sofa:
Creating a new View:
JCas newView = aJCas.createView(String localNameOfTheViewBeforeMapping);
CAS  newView = aCAS .createView(String localNameOfTheViewBeforeMapping);
Getting a View from a CAS or JCas:
JCas myView = aJCas.getView(String localNameOfTheViewBeforeMapping);
CAS  myView = aCAS .getView(String localNameOfTheViewBeforeMapping);
The following methods are useful for all annotators and applications:
Setting Sofa data for a CAS or JCas:
aCasOrJCas.setDocumentText(String docText);
aCasOrJCas.setSofaDataString(String docText, String mimeType);
aCasOrJCas.setSofaDataArray(FeatureStructure array, String mimeType);
aCasOrJCas.setSofaDataURI(String uri, String mimeType);
Getting Sofa data for a particular CAS or JCas:
String doc = aCasOrJCas.getDocumentText();
String doc = aCasOrJCas.getSofaDataString();
FeatureStructure array = aCasOrJCas.getSofaDataArray();
String uri = aCasOrJCas.getSofaDataURI();
InputStream is = aCasOrJCas.getSofaDataStream();
A major change in version 2 is related to the support of Single-View components
and applications. Given an analysis engine, ae, the API
CAS cas = ae.newCas();
used to return the base CAS. Now it returns a view of the Sofa named “_InitialView”. This Sofa will actually only be created if any Sofa data is set for this view. The initial view is used for Single-View applications and Multi-View annotators with no Sofa mapping.
The process method of Multi-View annotators receive the base CAS, however the base CAS no longer has an index repository to hold “global” data. Global data needs to be put in a specific named CAS view of your choice.
Because of these changes, the following scenarios will break with v2.0 clients:
Any version 1.x services (you must migrate the services to version 2).
Applications or components explicitly referencing “_DefaultTextSofaName” in code or descriptors.
Multi-View applications using the Base CAS index repository.
The UIMA analysis components (Annotators and CAS Consumers) described previously in this manual all take a single CAS as input, optionally make modifications to it, and output that same CAS. This chapter describes an advanced feature that became available in the UIMA SDK v2.0: a new type of analysis component called a CAS Multiplier, which can create new CASes during processing.
CAS Multipliers are often used to split a large artifact into manageable pieces. This is a common requirement of audio and video analysis applications, but can also occur in text analysis on very large documents. A CAS Multiplier would take as input a single CAS representing the large artifact (perhaps by a remote reference to the actual data — see Section 5.2, “Formats of Sofa Data”) and produce as output a series of new CASes each of which contains only a small portion of the original artifact.
CAS Multipliers are not limited to dividing an artifact into smaller pieces, however. A CAS Multiplier can also be used to combine smaller segments together to form larger segments. In general, a CAS Multiplier is used to change the segmentation of a series of CASes; that is, to change how a stream of data is divided among discrete CAS objects.
CAS Multiplier implementations should extend from the
JCasMultiplier_ImplBase or CasMultiplier_ImplBase
classes, depending on which CAS interface they prefer to use. As with other types of analysis components, the
CAS Multiplier ImplBase classes define optional initialize,
destroy, and reconfigure methods. There are then three
required methods: process, hasNext, and
next. The framework interacts with these methods as follows:
The framework calls the CAS Multiplier's
processmethod, passing it an input CAS. The process method returns, but may hold on to a reference to the input CAS.The framework then calls the CAS Multiplier's
hasNextmethod. The CAS Multiplier should returntruefrom this method if it intends to output one or more new CASes (for instance, segments of this CAS), andfalseif not.If
hasNextreturned true, the framework will call the CAS Multiplier'snextmethod. The CAS Multiplier creates a new CAS (we will see how in a moment), populates it, and returns it from thehasNextmethod.Steps 2 and 3 continue until
hasNextreturns false.
From the time when process is called until the hasNext
method returns false, the CAS Multiplier “owns” the CAS that was passed to its
process method. The CAS Multiplier can store a reference to this CAS in a local field and
can read from it or write to it during this time. Once hasNext returns false, the CAS
Multiplier gives up ownership of the input CAS and should no longer retain a reference to it.
The CAS Multiplier's next method must return a CAS instance that represents
a new representation of the input artifact. Since CAS instances are managed by the framework, the CAS
Multiplier cannot actually create a new CAS; instead it should request an empty CAS by calling the method:
CAS getEmptyCAS()

or

JCas getEmptyJCas()
which are
defined on the CasMultiplier_ImplBase and
JCasMultiplier_ImplBase classes, respectively.
Note that if it is more convenient you can request an empty CAS during the process or
hasNext methods, not just during the next method.
By default, a CAS Multiplier is only allowed to hold one output CAS instance at a time. You must return the
CAS from the next method before you can request a second CAS. If you try to call
getEmptyCAS a second time you will get an Exception. You can change this default behavior by overriding the
method getCasInstancesRequired to return the number of CAS instances that you need.
Be aware that CAS instances consume a significant amount of memory, so setting this to a large value will cause
your application to use a lot of RAM. So, for example, it is not a good practice to attempt to generate a large
number of new CASes in the CAS Multiplier's process method. Instead, you should
spread your processing out across the calls to the hasNext or
next methods.
Note
You can only call getEmptyCAS() or getEmptyJCas()
from your CAS Multiplier's process, hasNext, or
next methods. You cannot call it from other methods such as
initialize. This is because the Aggregate AE's Type System is not available
until all of the components of the aggregate have finished their initialization.
The Type System of the empty CAS will contain all of the type definitions for all components of the outermost Aggregate Analysis Engine or Collection Processing Engine that contains your CAS Multiplier. Therefore downstream components that receive these CASes can add new instances of any type that they define.
Warning
Be careful to keep the Feature Structures that belong to each CAS separate. You cannot create references from a Feature Structure in one CAS to a Feature Structure in another CAS. You also cannot add a Feature Structure created in one CAS to the indexes of a different CAS. If you attempt to do this, the results are undefined.
This section walks through the source code of an example CAS Multiplier that breaks text documents into
smaller pieces. The Java class for the example is
org.apache.uima.examples.casMultiplier.SimpleTextSegmenter and the source
code is included in the UIMA SDK under the examples/src directory.
public class SimpleTextSegmenter extends JCasMultiplier_ImplBase {
  private String mDoc;
  private int mPos;
  private int mSegmentSize;
  private String mDocUri;

  public void initialize(UimaContext aContext)
          throws ResourceInitializationException
  { ... }

  public void process(JCas aJCas) throws AnalysisEngineProcessException
  { ... }

  public boolean hasNext() throws AnalysisEngineProcessException
  { ... }

  public AbstractCas next() throws AnalysisEngineProcessException
  { ... }
}
The SimpleTextSegmenter class extends
JCasMultiplier_ImplBase and implements the optional
initialize method as well as the required process,
hasNext, and next methods. Each method is described
below.
public void initialize(UimaContext aContext) throws
                    ResourceInitializationException {
  super.initialize(aContext);
  mSegmentSize = ((Integer)aContext.getConfigParameterValue(
                            "segmentSize")).intValue();
}
Like an Annotator, a CAS Multiplier can override the initialize method and read configuration parameter values from the UimaContext. The SimpleTextSegmenter defines one parameter, “Segment Size”, which determines the approximate size (in characters) of each segment that it will produce.
public void process(JCas aJCas)
       throws AnalysisEngineProcessException {
  mDoc = aJCas.getDocumentText();
  mPos = 0;
  // retreive the filename of the input file from the CAS so that it can
  // be added to each segment
  FSIterator it = aJCas.
          getAnnotationIndex(SourceDocumentInformation.type).iterator();
  if (it.hasNext()) {
    SourceDocumentInformation fileLoc =
          (SourceDocumentInformation)it.next();
    mDocUri = fileLoc.getUri();
  }
  else {
    mDocUri = null;
  }
 }
The process method receives a new JCas to be processed(segmented) by this CAS Multiplier. The SimpleTextSegmenter extracts some information from this JCas and stores it in fields (the document text is stored in the field mDoc and the source URI in the field mDocURI). Recall that the CAS Multiplier is considered to “own” the JCas from the time when process is called until the time when hasNext returns false. Therefore it is acceptable to retain references to objects from the JCas in a CAS Multiplier, whereas this should never be done in an Annotator. The CAS Multiplier could have chosen to store a reference to the JCas itself, but that was not necessary for this example.
The CAS Multiplier also initializes the mPos variable to 0. This variable is a position into the document text and will be incremented as each new segment is produced.
public boolean hasNext() throws AnalysisEngineProcessException {
  return mPos < mDoc.length();
}
The job of the hasNext method is to report whether there are any additional output CASes to produce. For this example, the CAS Multiplier will break the entire input document into segments, so we know there will always be a next segment until the very end of the document has been reached.
public AbstractCas next() throws AnalysisEngineProcessException {
  int breakAt = mPos + mSegmentSize;
  if (breakAt > mDoc.length())
    breakAt = mDoc.length();

  // search for the next newline character.
  // Note: this example segmenter implementation
  // assumes that the document contains many newlines.
  // In the worst case, if this segmenter
  // is run on a document with no newlines,
  // it will produce only one segment containing the
  // entire document text.
  // A better implementation might specify a maximum segment size as
  // well as a minimum.

  while (breakAt < mDoc.length() &&
         mDoc.charAt(breakAt - 1) != '\n')
    breakAt++;

  JCas jcas = getEmptyJCas();
  try {
    jcas.setDocumentText(mDoc.substring(mPos, breakAt));
    // if original CAS had SourceDocumentInformation,
          also add SourceDocumentInformatio
    // to each segment
    if (mDocUri != null) {
      SourceDocumentInformation sdi =
          new SourceDocumentInformation(jcas);
      sdi.setUri(mDocUri);
      sdi.setOffsetInSource(mPos);
      sdi.setDocumentSize(breakAt - mPos);
      sdi.addToIndexes();

      if (breakAt == mDoc.length()) {
        sdi.setLastSegment(true);
      }
    }

    mPos = breakAt;
    return jcas;
  } catch (Exception e) {
    jcas.release();
    throw new AnalysisEngineProcessException(e);
  }
}
The next method actually produces the next segment and returns it. The
framework guarantees that it will not call next unless
hasNext has returned true since the last call to process or
next .
Note that in order to produce a segment, the CAS Multiplier must get an empty JCas to populate. This is done by the line:
JCas jcas = getEmptyJCas();
This requests an empty JCas from the framework, which maintains a pool of JCas instances to draw from.
Also, note the use of the try...catch block to ensure that a JCas is released back
to the pool if an exception occurs. This is very important to allow a CAS Multiplier to recover from
errors.
There is not a separate type of descriptor for a CAS Multiplier. CAS Multiplier are considered a type of Analysis Engine, and so their descriptors use the same syntax as any other Analysis Engine Descriptor.
The descriptor for the SimpleTextSegmenter is located in the
examples/descriptors/cas_multiplier/SimpleTextSegmenter.xml directory of the
UIMA SDK.
The Analysis Engine Description, in its “Operational Properties” section, now contains a new “outputsNewCASes” property which takes a Boolean value. If the Analysis Engine is a CAS Multiplier, this property should be set to true.
If you use the CDE, be sure to check the “Outputs new CASes” box in the Runtime Information section on the Overview page, as shown here:
 |
If you edit the Analysis Engine Descriptor by hand, you need to add a
<outputsNewCASes> element to your descriptor as shown here:
<operationalProperties>
    <modifiesCas>false</modifiesCas>
    <multipleDeploymentAllowed>true</multipleDeploymentAllowed>
    <outputsNewCASes>true</outputsNewCASes>
  </operationalProperties>
Note
The “modifiedCas” operational property refers to the input CAS, not the new output CASes produced. So our example SimpleTextSegmenter has modifiesCas set to false since it doesn't modify the input CAS.
You can include a CAS Multiplier as a component in an Aggregate Analysis Engine. For example, this allows you to construct an Aggregate Analysis Engine that takes each input CAS, breaks it up into segments, and runs a series of Annotators on each segment.
Since CAS Multiplier are considered a type of Analysis Engine, adding them to an aggregate works the same
way as for other Analysis Engines. Using the CDE, you just click the “Add...” button in the
Component Engines view and browse to the Analysis Engine Descriptor of your CAS Multiplier. If editing the
aggregate descriptor directly, just import the Analysis Engine Descriptor of your
CAS Multiplier as usual.
An example descriptor for an Aggregate Analysis Engine containing a CAS Multiplier is provided in
examples/descriptors/cas_multiplier/SegmenterAndTokenizerAE.xml. This
Aggregate runs the SimpleTextSegmenter example to break a large document into
segments, and then runs each segment through the SimpleTokenAndSentenceAnnotator.
Try running it in the Document Analyzer tool with a large text file as input, to see that it outputs multiple
output CASes, one for each segment produced by the SimpleTextSegmenter.
CAS Multipliers are only supported in the context of Fixed Flow or custom Flow Control. If you use the built-in “Fixed Flow” for your Aggregate Analysis Engine, you can position the CAS Multiplier anywhere in that flow. Processing then works as follows: When a CAS is input to the Aggregate AE, that CAS is routed to the components in the order specified by the Fixed Flow, until that CAS reaches a CAS Multiplier.
Upon reaching a CAS Multiplier, if that CAS Multiplier produces new output CASes, then each output CAS from that CAS Multiplier will continue through the flow, starting at the node immediately after the CAS Multiplier in the Fixed Flow. No further processing will be done on the original input CAS after it has reached a CAS Multiplier – it will not continue in the flow.
If the CAS Multiplier does not produce any output CASes for a given input CAS, then that input CAS will continue in the flow. This behavior is appropriate, for example, for a CAS Multiplier that may segment an input CAS into pieces but only does so if the input CAS is larger than a certain size.
It is possible to put more than one CAS Multiplier in your flow. In this case, when a new CAS output from the first CAS Multiplier reaches the second CAS Multiplier and if the second CAS Multiplier produces output CASes, then no further processing will occur on the input CAS, and any new output CASes produced by the second CAS Multiplier will continue the flow starting at the node after the second CAS Multiplier.
This default behavior can be customized. The FixedFlowController component
that implement's UIMA's default flow defines a configuration parameter
ActionAfterCasMultiplier that can take the following values:
continue– the CAS continues on to the next element in the flowstop– the CAS will no longer continue in the flow, and will be returned from the aggregate if possible.drop– the CAS will no longer continue in the flow, and will be dropped (not returned from the aggregate) if possible.dropIfNewCasProduced(the default) – if the CAS multiplier produced a new CAS as a result of processing this CAS, then this CAS will be dropped. If not, then this CAS will continue.
You can override this parameter in your Aggregate Analysis Engine the same way you would override a
parameter in a delegate Analysis Engine. But to do so you must first explicitly identify that you are using the
FixedFlowController implementation by importing its descriptor into your
aggregate as follows:
<flowController key="FixedFlowController">
          <import name="org.apache.uima.flow.FixedFlowController"/>
        </flowController>
The parameter could then be overriden as, for example:
<configurationParameters>
          <configurationParameter>
            <name>ActionForIntermediateSegments</name>
            <type>String</type>
            <multiValued>false</multiValued>
            <mandatory>false</mandatory>
            <overrides>
              <parameter>
                FixedFlowController/ActionAfterCasMultiplier
              </parameter>
            </overrides>
          </configurationParameter>
        </configurationParameters>

       <configurationParameterSettings>
         <nameValuePair>
           <name>ActionForIntermediateSegments</name>
           <value>
             <string>drop</string>
           </value>
         </nameValuePair>
       </configurationParameterSettings>
This overriding can also be done using the Component Descriptor Editor tool. An example of an Analysis
Engine that overrides this parameter can be found in
examples/descriptors/cas_multiplier/Segment_Annotate_Merge_AE.xml. For more
information about how to specify a flow controller as part of your Aggregate Analysis Engine descriptor, see
Section 4.3, “Adding Flow Controller to an Aggregate”.
If you would like to further customize the flow, you will need to implement a custom FlowController as described in Chapter 4, Flow Controller Developer's Guide . For example, you could implement a flow where a CAS that is input to a CAS Multiplier will be processed further by some downstream components, but not others.
An important consideration when you put a CAS Multiplier inside an Aggregate Analysis Engine is whether
you want the Aggregate to also function as a CAS Multiplier
– that is, whether you want the new output CASes produced within the Aggregate to be output from the
Aggregate. This is controlled by the <outputsNewCASes> element in the
Operational Properties of your Aggregate Analysis Engine descriptor. The syntax is the same as what was
described in Section 7.2, “CAS Multiplier Descriptor” .
If you set this property to true, then any new output CASes produced by a CAS
Multiplier inside this Aggregate will be output from the Aggregate. Thus the Aggregate will function as a CAS
Multiplier and can be used in any of the ways in which a primitive CAS Multiplier can be used.
If you set the <outputsNewCASes> property to false , then any new output
CASes produced by a CAS Multiplier inside the Aggregate will be dropped (i.e. the CASes will be released back
to the pool) once they have finished being processed. Such an Aggregate Analysis Engine functions just like a
“normal” non-CAS-Multiplier Analysis Engine; the fact that CAS Multiplication is
occurring inside it is hidden from users of that Analysis Engine.
Note
If you want to output some new Output CASes and not others, you need to implement a custom Flow Controller that makes this decision — see Section 4.5, “Using Flow Controllers with CAS Multipliers”.
It is currently a limitation that CAS Multiplier cannot be deployed directly in a Collection Processing
Engine. The only way that you can use a CAS Multiplier in a CPE is to first wrap it in an Aggregate Analysis Engine
whose outputsNewCASes property is set to false, which in effect
hides the existence of the CAS Multiplier from the CPE.
Note that you can build an Aggregate Analysis Engine that consists of CAS Multipliers and Annotators, followed by CAS Consumers. This can simulate what a CPE would do, but without the deployment and error handling options that the CPE provides.
The AnalysisEngine interface has the following methods that allow you to
interact with CAS Multiplier:
CasIterator processAndOutputNewCASes(CAS)JCasIterator processAndOutputNewCASes(JCas)
From your application, you call processAndOutputNewCASes and pass it the input
CAS. An iterator is returned that allows you to step through each of the new output CASes that are produced by
the Analysis Engine.
It is very important to realize that CASes are pooled objects and so your application must release each
CAS (by calling the CAS.release() method) that it obtains from the CasIterator
before it calls the CasIterator.next method again.
Otherwise, the CAS pool will be exhausted and a deadlock will occur.
The example code in the class org.apache.uima.examples.casMultiplier.
CasMultiplierExampleApplication illusrates this. Here is the main processing loop:
CasIterator casIterator = ae.processAndOutputNewCASes(initialCas);
while (casIterator.hasNext()) {
  CAS outCas = casIterator.next();

  //dump the document text and annotations for this segment
  System.out.println("********* NEW SEGMENT *********");
  System.out.println(outCas.getDocumentText());
  PrintAnnotations.printAnnotations(outCas, System.out);

  //release the CAS (important)
  outCas.release();
Note that as defined by the CAS Multiplier contract in Section 7.1.1, “CAS Multiplier Interface Overview”, the CAS Multiplier owns the input CAS
(initialCas in the example) until the last new output CAS has been produced. This means
that the application should not try to make changes to initialCas until after the
CasIterator.hasNext method has returned false, indicating that the segmenter has
finished.
Note that the processing time of the Analysis Engine is spread out over the calls to the
CasIterator's hasNext and next methods. That is, the next
output CAS may not actually be produced and annotated until the application asks for it. So the application
should not expect calls to the CasIterator to necessarily complete quickly.
Also, calls to the CasIterator may throw Exceptions indicating an error has
occurred during processing. If an Exception is thrown, all processing of the input CAS will stop, and no more
output CASes will be produced. There is currently no error recovery mechanism that will allow processing to
continue after an exception.
In your application you can take the output CASes from a CAS Multiplier and pass them to
the process method of other Analysis Engines. However there are some
special considerations regarding the Type System of these CASes.
By default, the output CASes of a CAS Multiplier will have a Type System that contains all of the types and features declared by any component in the outermost Aggregate Analysis Engine or Collection Processing Engine that contains the CAS Multiplier. If in your application you create a CAS Multiplier and another Analysis Engine, where these are not enclosed in an aggregate, then the output CASes from the CAS Multiplier will not support any types or features that are declared in the latter Analysis Engine but not in the CAS Multiplier.
This can be remedied by forcing the CAS Multiplier and Analysis Engine to share a single
UimaContext when they are created, as follows:
//create a "root" UIMA context for your whole application

UimaContextAdmin rootContext =
   UIMAFramework.newUimaContext(UIMAFramework.getLogger(),
      UIMAFramework.newDefaultResourceManager(),
      UIMAFramework.newConfigurationManager());

XMLInputSource input = new XMLInputSource("MyCasMultiplier.xml");
AnalysisEngineDescription desc = UIMAFramework.getXMLParser().
        parseAnalysisEngineDescription(input);

//create a UIMA Context for the new AE we are about to create

//first argument is unique key among all AEs used in the application
UimaContextAdmin childContext = rootContext.createChild(
        "myCasMultiplier", Collections.EMPTY_MAP);

//instantiate CAS Multiplier AE, passing the UIMA Context through the
//additional parameters map

Map additionalParams = new HashMap();
additionalParams.put(Resource.PARAM_UIMA_CONTEXT, childContext);

AnalysisEngine casMultiplierAE = UIMAFramework.produceAnalysisEngine(
        desc,additionalParams);

//repeat for another AE
XMLInputSource input2 = new XMLInputSource("MyAE.xml");
AnalysisEngineDescription desc2 = UIMAFramework.getXMLParser().
        parseAnalysisEngineDescription(input2);

UimaContextAdmin childContext2 = rootContext.createChild(
        "myAE", Collections.EMPTY_MAP);

Map additionalParams2 = new HashMap();
additionalParams2.put(Resource.PARAM_UIMA_CONTEXT, childContext2);

AnalysisEngine myAE = UIMAFramework.produceAnalysisEngine(
        desc2, additionalParams2);
A CAS Multiplier can also be used to combine smaller CASes together to form larger CASes. In this section we describe how this works and walk through an example.
When the framework first calls the CAS Multiplier's
processmethod, the CAS Multiplier requests an empty CAS (which we'll call the "merged CAS") and copies relevant data from the input CAS into the merged CAS. The classorg.apache.uima.util.CasCopierprovides utilities for copying Feature Structures between CASes.When the framework then calls the CAS Multiplier's
hasNextmethod, the CAS Multiplier returnsfalseto indicate that it has no output at this time.When the framework calls
processagain with a new input CAS, the CAS Multiplier copies data from that input CAS into the merged CAS, combining it with the data that was previously copied.Eventually, when the CAS Multiplier decides that it wants to output the merged CAS, it returns
truefrom thehasNextmethod, and then when the framework subsequently calls thenextmethod, the CAS Multiplier returns the merged CAS.
Note
There is no explicit call to flush out any pending CASes from a CAS Multiplier when collection processing completes. It is up to the application to provide some mechanism to let a CAS Multiplier recognize the last CAS in a collection so that it can ensure that its final output CASes are complete.
An example CAS Multiplier that merges CASes can be found is provided in the UIMA SDK. The Java class for
this example is org.apache.uima.examples.casMultiplier.SimpleTextMerger and
the source code is located under the examples/src directory.
Almost all of the code for this example is in the process method. The first part of
the process method shows how to copy Feature Structures from the input CAS to the
"merged CAS":
public void process(JCas aJCas) throws AnalysisEngineProcessException {
    // procure a new CAS if we don't have one already
    if (mMergedCas == null) {
      mMergedCas = getEmptyJCas();
    }

    // append document text
    String docText = aJCas.getDocumentText();
    int prevDocLen = mDocBuf.length();
    mDocBuf.append(docText);

    // copy specified annotation types
    CasCopier copier = new CasCopier(mMergedCas.getCas());

    // needed in case one annotation is in two indexes (could
    // happen if specified annotation types overlap)
    Set copiedIndexedFs = new HashSet();
    for (int i = 0; i < mAnnotationTypesToCopy.length; i++) {
      Type type = mMergedCas.getTypeSystem()
          .getType(mAnnotationTypesToCopy[i]);
      FSIndex index = aJCas.getCas().getAnnotationIndex(type);
      Iterator iter = index.iterator();
      while (iter.hasNext()) {
        FeatureStructure fs = (FeatureStructure) iter.next();
        if (!copiedIndexedFs.contains(fs)) {
          Annotation copyOfFs = (Annotation) copier.copyFs(fs);
          // update begin and end
          copyOfFs.setBegin(copyOfFs.getBegin() + prevDocLen);
          copyOfFs.setEnd(copyOfFs.getEnd() + prevDocLen);
          mMergedCas.addFsToIndexes(copyOfFs);
          copiedIndexedFs.add(fs);
        }
      }
    }
The CasCopier class is used to copy Feature Structures of certain types
(specified by a configuration parameter) to the merged CAS. The CasCopier does deep
copies, meaning that if the copied FeatureStructure references another FeatureStructure, the
referenced FeatureStructure will also be copied.
This example also merges the document text using a separate StringBuffer. Note
that we cannot append document text to the Sofa data of the merged CAS because Sofa data cannot be modified
once it is set.
The remainder of the process method determines whether it is time to output a new
CAS. For this example, we are attempting to merge all CASes that are segments of one original artifact. This
is done by checking the
SourceDocumentInformation Feature Structure in the CAS to see if its
lastSegment feature is set to true. That feature (which is set by the
example
SimpleTextSegmenter discussed previously) marks the CAS as being the last segment of an
artifact, so when the CAS Multiplier sees this segment it knows it is time to produce an output CAS.
// get the SourceDocumentInformation FS,
// which indicates the sourceURI of the document
// and whether the incoming CAS is the last segment
FSIterator it = aJCas
        .getAnnotationIndex(SourceDocumentInformation.type).iterator();
if (!it.hasNext()) {
  throw new RuntimeException("Missing SourceDocumentInformation");
}
SourceDocumentInformation sourceDocInfo =
      (SourceDocumentInformation) it.next();
if (sourceDocInfo.getLastSegment()) {
  // time to produce an output CAS
  // set the document text
  mMergedCas.setDocumentText(mDocBuf.toString());

  // add source document info to destination CAS
  SourceDocumentInformation destSDI =
      new SourceDocumentInformation(mMergedCas);
  destSDI.setUri(sourceDocInfo.getUri());
  destSDI.setOffsetInSource(0);
  destSDI.setLastSegment(true);
  destSDI.addToIndexes();

  mDocBuf = new StringBuffer();
  mReadyToOutput = true;
}
When it is time to produce an output CAS, the CAS Multiplier makes final updates to the merged CAS
(setting the document text and adding a SourceDocumentInformation
FeatureStructure), and then sets the mReadyToOutput field to true. This field is
then used in the hasNext and next methods.
These methods are relatively simple:
public boolean hasNext() throws AnalysisEngineProcessException {
    return mReadyToOutput;
  }

  public AbstractCas next() throws AnalysisEngineProcessException {
    if (!mReadyToOutput) {
      throw new RuntimeException("No next CAS");
    }
    JCas casToReturn = mMergedCas;
    mMergedCas = null;
    mReadyToOutput = false;
    return casToReturn;
  }
When the merged CAS is ready to be output, hasNext will return true, and
next will return the merged CAS, taking care to set the
mMergedCas field to
null so that the next call to
process will start with a fresh CAS.
An example descriptor for an Aggregate Analysis Engine that uses the
SimpleTextMerger is provided in
examples/descriptors/cas_multiplier/Segment_Annotate_Merge_AE.xml. This
Aggregate first runs the SimpleTextSegmenter example to break a large document into
segments. It then runs each segment through the example tokenizer and name recognizer annotators. Finally
it runs the SimpleTextMerger to reassemble the segments back into one CAS. The
Name annotations are copied to the final merged CAS but the Token
annotations are not.
This example illustrates how you can break large artifacts into pieces for more efficient processing and then reassemble a single output CAS containing only the results most useful to the application. Intermediate results such as tokens, which may consume a lot of space, need not be retained over the entire input artifact.
The intermediate segments are dropped and are never output from the Aggregate Analysis Engine. This is done by configuring the Fixed Flow Controller as described in Section 7.3.2, “CAS Multipliers and Flow Control”, above.
Try running this Analysis Engine in the Document Analyzer tool with a large text file as input, to see that
it outputs just one CAS per input file, and that the final CAS contains only the Name annotations.
In traditional object-oriented terms, a UIMA Type System is a class model and a UIMA CAS is an object graph. There are established standards in this area – specifically, UML® is an OMG™ standard for class models and XMI (XML Metadata Interchange) is an OMG standard for the XML representation of object graphs.
Furthermore, the Eclipse Modeling Framework (EMF) is an open-source framework for model-based application development, and it is based on UML and XMI. In EMF, you define class models using a metamodel called Ecore, which is similar to UML. EMF provides tools for converting a UML model to Ecore. EMF can then generate Java classes from your model, and supports persistence of those classes in the XMI format.
The UIMA SDK provides tools for interoperability with XMI and EMF. These tools allow conversions of UIMA Type Systems to and from Ecore models, as well as conversions of UIMA CASes to and from XMI format. This provides a number of advantages, including:
You can define a model using a UML Editor, such as Rational Rose or EclipseUML, and then automatically convert it to a UIMA Type System.
You can take an existing UIMA application, convert its type system to Ecore, and save the CASes it produces to XMI. This data is now in a form where it can easily be ingested by an EMF-based application.
More generally, we are adopting the well-documented, open standard XMI as the standard way to represent UIMA-compliant analysis results (replacing the UIMA-specific XCAS format). This use of an open standard enables other applications to more easily produce or consume these UIMA analysis results.
For more information on XMI, see Grose et al. Mastering XMI. Java Programming with XMI, XML, and UML. John Wiley & Sons, Inc. 2002.
For more information on EMF, see Budinsky et al. Eclipse Modeling Framework 2.0. Addison-Wesley. 2006.
For details of how the UIMA CAS is represented in XMI format, see Chapter 7, XMI CAS Serialization Reference in UIMA References .
The UIMA SDK provides the following two classes:
Ecore2UimaTypeSystem:
converts from an .ecore model developed using EMF to a UIMA-compliant
TypeSystem descriptor. This is a Java class that can be run as a standalone program or
invoked from another Java application. To run as a standalone program,
execute:
java org.apache.uima.ecore.Ecore2UimaTypeSystem <ecore file> <output file>
The input .ecore file will be converted to a UIMA TypeSystem descriptor and written to the specified output file. You can then use the resulting TypeSystem descriptor in your UIMA application.
UimaTypeSystem2Ecore:
converts from a UIMA TypeSystem descriptor to an .ecore model. This is a
Java class that can be run as a standalone program or invoked from another Java
application. To run as a standalone program, execute:
java org.apache.uima.ecore.UimaTypeSystem2Ecore <TypeSystem descriptor> <output file>
The input UIMA TypeSystem descriptor will be converted to an Ecore model file and
written to the specified output file. You can then use the resulting Ecore model in EMF
applications. The converted type system will include any
<import...>ed TypeSystems; the fact that they were
imported is currently not preserved.
To run either of these converters, your classpath will need to include the UIMA jar files as well as the following jar files from the EMF distribution: common.jar, ecore.jar, and ecore.xmi.jar.
Also, note that the uima-core.jar file contains the Ecore model file uima.ecore, which defines the built-in UIMA types. You may need to use this file from your EMF applications.
The UIMA SDK provides XMI support through the following two classes:
XmiCasSerializer:
can be run from within a UIMA application to write out a CAS to the standard XMI format. The
XMI that is generated will be compliant with the Ecore model generated by
UimaTypeSystem2Ecore. An EMF application could use this Ecore
model to ingest and process the XMI produced by the XmiCasSerializer.
XmiCasDeserializer:
can be run from within a UIMA application to read in an XMI document and populate a CAS. The
XMI must conform to the Ecore model generated by
UimaTypeSystem2Ecore.
Also, the uimaj-examples Eclipse project contains some example code that shows how to use the serializer and deserializer:
org.apache.uima.examples.xmi.XmiWriterCasConsumer:This is a CAS Consumer that writes each CAS to an output file in XMI format. It is analogous to the XCasWriter CAS Consumer that has existed in prior UIMA versions, except that it uses the XMI serialization format.
org.apache.uima.examples.xmi.XmiCollectionReader:This is a Collection Reader that reads a directory of XMI files and deserializes each of them into a CAS. For example, this would allow you to build a Collection Processing Engine that reads XMI files, which could contain some previous analysis results, and then do further analysis.
Finally, in under the folder uimaj-examples/ecore_src is
the class
org.apache.uima.examples.xmi.XmiEcoreCasConsumer, which
writes each CAS to XMI format and also saves the Type System as an Ecore file. Since this
uses the UimaTypeSystem2Ecore converter, to compile it you must
add to your classpath the EMF jars common.jar, ecore.jar, and ecore.xmi.jar –
see ecore_src/readme.txt for instructions.